Import services from a CSV in ITSI
By bulk importing services from a CSV file rather than manually defining each service in IT Service Intelligence (ITSI), you can perform the following tasks within the same workflow:
- Create multiple services
- Add service dependencies
- Link services to service templates
- Associate entities to services
Don't import more than 1,000 services with links to service templates. If you need to import more than 1,000 services and link them to service templates, do the imports in smaller batches. Only import 200-300 services with links to service templates at a time.
ITSI uses the itsiimportobjects command to import services from a Splunk search or CSV file. All events that Splunk indexes from a service import are stored in the itsi_import_objects index. Each event has the itsi_import_objects:csv sourcetype.
You can't set up a recurring service import from a CSV file directly within ITSI. To configure recurring service imports from data that's stored in a CSV file, you have to configure a universal forwarder to monitor the CSV file and send data to your Splunk platform deployment, run a service import from a Splunk search, and configure a recurring import from the Splunk search. For more information, see Set up a recurring import from a CSV file.
Prerequisites
The rows and columns in your CSV file depend on your specific use case. Perform the following prerequisite steps depending on your use case:
Importing new services
Perform the following high-level steps before importing:
- Create a CSV file that contains the services to import.
- In the first row of a CSV, specify the column names.
- In each subsequent row, specify one service, and, optionally, a service description and one or more service dependencies.
Note that the services created through this method are not populated with KPIs or entities.
Importing new services and linking them to service templates
When you link a service to a service template, the service receives the KPIs and entity rules from the template. If a service already exists, ITSI replaces any entity rules in the service with the entity rules in the service template. For more information about service templates, see Overview of service templates in ITSI.
- Review the entity rules for the service templates and determine which entity rules have configurable values. You must provide those values for each service in the CSV file. For information about entity rules, see Define entity rules for a service in ITSI.
- Create a CSV file that contains the services to import and the corresponding template to link them to.
- In the first row of a CSV, specify column names. In each subsequent row, specify one service, and, optionally, a service description, one or more service dependencies, and the name of the service template to link the service to.
- Include one or more columns that provide values for the configurable entity rules in the service templates.
Importing services with associated entities
Before importing, create a CSV file that contains the services and entities to import. ITSI creates an entity rule for the service with Entity Title matches <value from Entity Title column> for each entity.
Importing services, linking them to service templates, and importing entities
In the CSV file, include columns to use as values for any configurable entity rules in the templates. To import entities, use either a separate column or the same column used for configurable entity rules. In the latter case, entities are created for the column you import as Entity Title. However, instead of adding entity rules in the format Entity Title matches <value from Entity Title column> to the service, ITSI adds the entity rules from the linked template to the service. Any configurable entity rules use the columns you specify as the value for the configurable entity rules.
Steps
The following example shows how to import services and link them to service templates.
You can import a maximum of one service and one entity per row. There is no limit on the number of dependent services, entity aliases, entity information fields, or entity rule values per row. Import from CSV supports five different separators: comma (,), semicolon (;), pipe (|), tab (\t), and caret (^). If a service has multiple dependent services, separate them with commas.
Steps
Follow these steps to perform a one-time bulk import of services from a CSV file.
- Create a CSV file that contains your services.
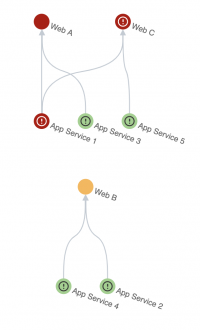
In this example, we want to create eight services with various dependencies and link them to two different service templates. Three columns (applicationname,app_title, andhost) provide entity rule values for the services:

The following image shows what the final service dependency tree will look like:
- After you create your CSV file, click Configuration > Services from the ITSI top menu bar.
- Click Create Service > Import from CSV.
- Click browse... and select your CSV file, or drop it into the UI. ITSI uploads the CSV file and displays a file preview.
- Click Next to see a table populated by the content of your CSV file.
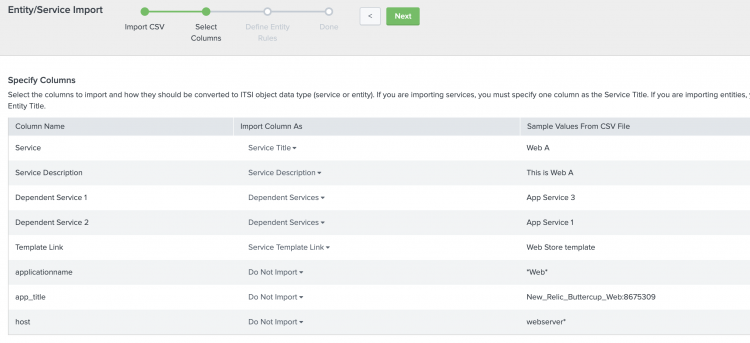
- In the Import Column As column, choose how to categorize each column in your file.
Column type Description Service Title Makes the column entry the name of the service. Service Description Makes the column entry a description of the service. Dependent Services Makes the column entry a dependent service. Service Template Link Makes the column entry the service template to link the service to. The value must be the name of an existing service template in ITSI. Do Not Import Removes the column entry from the imported data. Use this setting for columns containing entity rule values if you are linking services to service templates. You will specify the column to use for entity rules later in the import process. In this example, we are importing the columns in the CSV file as follows. Note that we are not importing the
applicationname,app_title, andhostcolumns. These columns contain entity rule values that are different for each service. You will use them later in the import process.
- In the Settings section, configure the following fields:
Field Description Service Team The team that the service belongs to. Import Services As Whether services are enabled or disabled upon import. KPI searches do not run if the service is disabled. Enable 7 days of backfill for all service KPIs This setting appears if you have selected to import columns as Service TitleandService Template Link. Enabling this setting backfills the KPIs in imported services that are linked to service templates. Enable this setting if you do not have at least seven days of data in the ITSI summary index and you want to use anomaly detection or adaptive thresholding for any of the KPIs in the service template. - See the Preview section to confirm that your service import configuration is correct.
- Click Next.
- Perform one of the following tasks:
- If you selected to import a column as a Service Template Link, go to the Define Entity Rules step (Step 11).
- If you are not linking services to service templates, skip to the Import step (Step 14).
- If you selected to import a column as a Service Template Link, go to the Define Entity Rules step (Step 11).
- In the Define Entity Rules step, select a service template to complete the template entity rules. Note that for the templates that have configurable entity rules, the Entity Rules Complete column displays
Incomplete.
In this example, the Web Store template has four entity rules. One of them has a value defined in the template:itsi_rolematchesoperating_system_host. Every service linked to this template receives this field/value pair. The other three entity rules have values in the service template ofmatches a value to be defined in the service. Therefore, you must provide the value for each service in this step using a column from the CSV file.If the services being imported already exist on the environment, the entity rules that you set are merged with existing entity rules.
- Click Select a column to provide the entity rule value for each configurable entity rule in the template as shown in the following example:
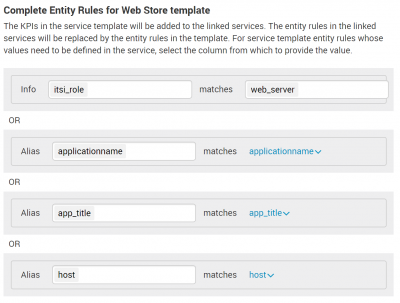
In this example, the Web A service receives*Web*for theapplicationnamevalue,New_Relic_Buttercup_Web:8675309for the app_title value andwebserver*for the host value. - Preview the entities for each service linked to the template. Note that ITSI can only match existing entities. Any entities being imported do not appear in the preview.
- Click Import. A message confirms that the import is complete.
- Click View All Services to confirm that your imported services appear on the Service page. If you linked services to templates, the Service Template column indicates that it's synced with the service template. The template populates the KPIs and entity rules for the services. Any configurable entity rules that came from the template contain the value from the column you specified during the import process.


Set up a recurring service import from a CSV file
Follow these steps to create a recurring service import from data you store in a CSV file. You have to set up a universal forwarder on the system you store the CSV file to monitor the file and send data to your Splunk platform deployment, run an import from a Splunk search, and finally set up a recurring import from the Splunk search.
For more information about monitoring files, see Monitor files and directories in the Splunk Enterprise Getting Data In manual.
You can't set up a recurring import directly from a CSV file in Splunk Web. Instead, follow these steps:
Prerequisites
- You must be assigned the
itoa_adminrole or have thewrite_itsi_servicecapability to bulk import services. - If you plan to link services to service templates, create the service templates first. You cannot create service templates through the bulk import process. For more information, see Create a service template in ITSI.
Steps
- Download and install a universal forwarder on the system that stores the CSV file. For information about setting up a universal forwarder, see Install the universal forwarder software in the Splunk Universal Forwarder Forwarder Manual.
- If your Splunk platform deployment wasn't configured for receiving yet, configure receiving now. For more information, see Enable a receiver in the Splunk Enterprise Forwarding Data manual.
- Configure forwarding on the universal forwarder. For more information, see Configure forwarding with outputs.conf in the Splunk Universal Forwarder Forwarder Manual.
- Configure the universal forwarder to monitor the CSV file that contains data you want to import to ITSI as services. Use
monitorstanzas ininputs.confon the universal forwarder to monitor the CSV file and send data to your Splunk platform deployment. An examplemonitorstanza looks like this:If the file ends with[monitor:///path/to/my/file.csv] disabled = 0 sourcetype = csv
.csv, you don't have to specify the source type. For more information about configuring a universal forwarder to monitor the CSV file, see Monitor files and directories with inputs.conf in the Splunk Enterprise Getting Data In manual. - Restart the universal forwarder:
$SPLUNK_HOME/bin/splunk restart
- Once data from the CSV file is indexed in your Splunk platform deployment that runs ITSI, manually import services from a Splunk search. For more information about manually importing services from a Splunk search, see Import services from a search in ITSI.
- Set up a recurring service import from the import with a Splunk search.
Set up a recurring service import from a Splunk search
Follow these steps to create a recurring service import from a Splunk search.
The recurring import search executes as splunk-system-user, which returns entities from datasets that exist in indexes that the user creating the import might not have access to.
To set up a recurring import, you must have already set up a service import from a Splunk search. For more information, see Import services from a search in ITSI.
- After the import from the search process is complete, click Set up Recurring Import.
- Provide a name for the recurring import.
- Set the scheduled time and frequency to run the import.
- Click Submit. ITSI creates a new saved search in the savedsearches.conf file. The name of the saved search is
ITSI Import Objects - <importName>, whereimportNameis the name of the import you specified when setting up the recurring import. The saved search triggers an alert action which runs a search command to add entities to ITSI.
Note: Configure the scheduled time based on the Splunk server's timezone.
| Create a single service in ITSI | Import services from a search in ITSI |
This documentation applies to the following versions of Splunk® IT Service Intelligence: 4.11.0, 4.11.1, 4.11.2, 4.11.3, 4.11.4, 4.11.5, 4.11.6, 4.12.0 Cloud only, 4.12.1 Cloud only, 4.12.2 Cloud only, 4.13.0, 4.13.1, 4.13.2, 4.13.3, 4.14.0 Cloud only, 4.14.1 Cloud only, 4.14.2 Cloud only, 4.15.0, 4.15.1, 4.15.2, 4.15.3, 4.16.0 Cloud only, 4.17.0, 4.17.1, 4.18.0, 4.18.1
Feedback submitted, thanks!