Install and configure the Content Pack for ITE Work Alert Routing
Follow these high-level steps to install and configure the Content Pack for ITE Work Alert Routing:
- Install and configure any supporting apps or add-ons
- Install the content pack
- Configure the search macro
- Configure alert routing rules on an entity
- Enable alert searches
- Configure the default alert routing settings
Install and configure any supporting apps or add-ons
Some of the supported actions in this content pack depend on the installation and configuration of specific apps available on Splunkbase. Install the prerequisite apps for the actions you want to take before configuring this content pack.
Refer to the following guidelines regarding supporting apps and add-ons for the content pack:
- Send an email: No additional app or add-on needed.
- Create an incident in Splunk On-Call: Install the Splunk On-Call (VictorOps) app.
- Create an incident in ServiceNow: Install the Splunk Add-on for ServiceNow.
- Execute a custom script or action: No additional app or add-on needed.
Install the content pack
To install the Content Pack for ITE Work Alert Routing, you have to install the Splunk App for Content Packs. To install the Splunk App for Content Packs in your environment, see the Splunk App for Content Pack installation instructions.
After you install the Splunk App for Content Packs, follow these steps to configure the Content Pack for ITE Work Alert Routing:
- From the ITSI or ITE Work main navigation bar, click Configuration > Data Integrations.
- Select Content Library.
- Select the ITE Work Alert Routing content pack.
- Click Proceed.
- Configure the content pack settings.
Setting Description Modify status of saved searches This configuration step will be displayed only if the content pack contains saved searches. Within this configuration, you have the flexibility to perform the following operations: - Activate all saved searches - By selecting this option, you can activate all the saved searches associated with the content pack.
- Deactivate all saved searches - By selecting this option, you can deactivate all the saved searches associated with the content pack.
- Retain current status of saved searches - This option allows you to preserve the existing status of the saved searches within the content pack.
- Click Activate/Deactivate all saved searches to modify status of saved searches of the Content Pack for ITE Work Alert Routing.
- Click Install to confirm the installation. Once done, you can view the status of the saved searches, because the tile shows the current status of all the saved searches of the content pack.
Configure the search macro
The itew_get_splunk_base_uri search macro allows for quick navigation from an alert to the Entity Health page in IT Essentials Work.
You must update this macro with the correct base URI for the Splunk search head that runs IT Essentials Work.
Perform the following steps to configure the search macro:
- In Splunk Enterprise go to Settings > Advanced Search.
- From the Advanced Search page select Search macros.
- In the App dropdown select IT Essentials Work Alerting Content (DA-ITSI-CP-itew-alerting-content).
- Select the row for the
itew_get_splunk_base_urisearch macro. - In the Definition field enter the base URI for the Splunk search head that runs IT Essentials Work. The URI must be surrounded by double quotes as shown in the following example.
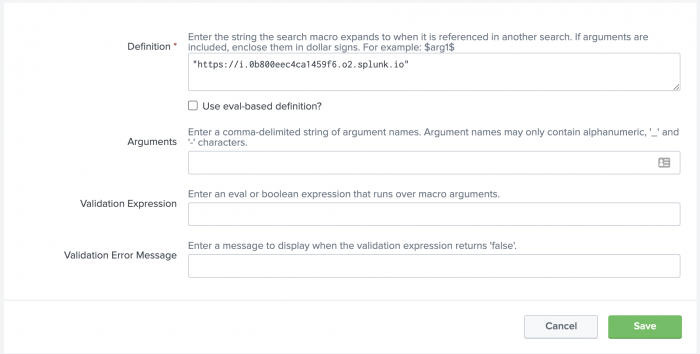
- Click the Save button to save any changes.

Configure alert routing rules on an entity
The content pack determines the external alert actions based on any new information fields you define for each entity. To begin configuring external alert actions, perform the following steps:
You must have admin permissions to configure external alert actions.
- Log into Splunk Enterprise.
- In the IT Essentials Work app, go to Configuration > Entities.
- Select the entity you want to configure and click Edit selected.
- You can add information fields to multiple entities by using the button for Bulk Action and then Edit selected.
- If no entities are found, use the Create Entity button on the far right of the page.
- Add Info Fields values to configure the alert routing. The following Info Field values are valid entries:
Info Field value Supported inputs Required alert_routing Email, On-Call, ServiceNow, Custom Yes alert_email Valid email address Yes, when email is set for alert routing alert_oncall_routing_key Valid Splunk On-Call routing key Yes, when On-Call is set for alert_routing alert_snow_assignment_group Valid ServiceNow assignment group Yes, when ServiceNow is set for alert_routing alert_custom_params Any valid value supported by your custom action No - Save your changes.
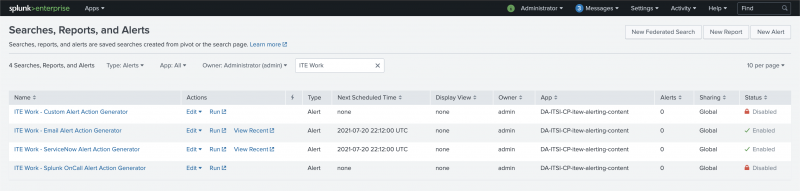
Enable alert searches
You can enable one or more IT Essentials Work Alert Action Generator searches. Perform the following steps to enable these searches:
- In Splunk Enterprise go to Settings > Searches, reports, and alerts.
- From the drop-down menus at the top of the page, select the Type as Alerts and the App as All.
- In the filter field enter "IT Essentials Work".
- Select Edit > Enable for each alert action search you want to enable. You only need to enable the searches that correspond to the alert_routing actions you configured on the entities.
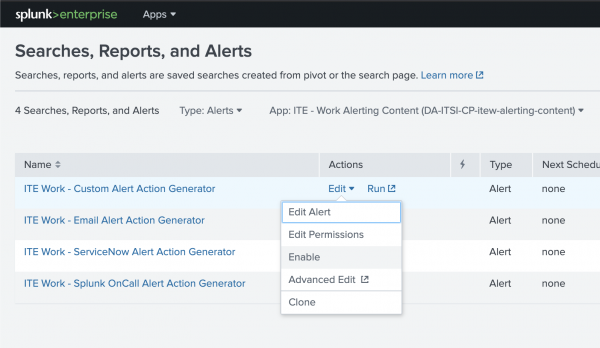
- Click Enable on the resulting modal window to save your changes.

If you enable the ITE Work - ServiceNow Alert Action Generator search and intend to send incidents to ServiceNow, you must edit the alert action within that search to provide your ServiceNow Account information.
If you enable the ITE Work - Splunk OnCall Alert Action Generator search and intend to send alerts to Splunk On-Call, you must edit the alert action within that search and provide the appropriate Splunk On-Call API key.
Configure the default alert routing settings
You can configure the default settings for alert routing as well as the settings for other alert action parameters.
Configure alert routing for a specific vital metric alert
By default, the alert routing configured on the entity is used when an alert is triggered for that entity. You can configure an alternate alert route for a specific vital metric. For example, you can route all alerts for a disk-space vital metric to the storage team regardless of the entity that triggered the alert.
To configure alternate alert routing for a specific vital metric, follow these steps from the IT Essentials Work menu:
- Go to Configuration > Entities.
- Select the Entity types tab and optionally use the filter field to narrow the list of entity types.
- On the row of the entity type you want to modify, click Edit in the Actions column.
- On the resulting modal window, open the Vital metrics (optional) section.
- Select and expand the vital metric you want to modify.
- At the end of the vital metric search, use Splunk
evalcommands to set a value and any additional routing configuration fields. - Click Save to save your changes.
Example
The following example SPL includes the addition of the eval command to the alert routing vital metric:
| eval alert_routing="Email",alert_email="storage-team@buttercup.com
Configure alert routing based on other conditions
By default, the alert routing configured on the entity is used when an alert is triggered for that entity. You can configure alternate alert routes based on more complex conditions. For example, you can alert using email if the incident severity is at a warning level, and alert using both email and the creation of a ServiceNow ticket if the incident severity is critical.
To configure alternate alert routing based on other conditions, you must modify or enhance the SPL of the alert search in the content pack.
To modify the search macro, follow these steps:
- In Splunk Enterprise go to Settings > Advanced Search
- From the Advanced search page choose Search macros.
- In the App drop-down select "IT Essentials Work Alerting Content (DA-ITSI-CP-itew-alerting-content)".
- Select the row for the
lookup_entity_contact_detailssearch macro. - On the resulting page, in the Definition field, add the
evalcommand to the end of the existing SPL to set the alert_routing configurations. - Click Save to save your changes.
Example
In the following example, the alert_routing is changed to be email only when the alert severity is not critical:
| eval alert_routing=if(severity<6, "Email", alert_routing)
The following image shows the lookup_entity_contact_details page. The eval command has been added to the Defintion field:

Configure alert action parameters
The content pack includes a variety of default parameters including scheduling frequency, throttling behavior, and external action text. You can modify the alert action configuration to suit the needs of your organization.
Any changes you make to the default parameters are stored in the local folder. Any subsequent content pack upgrades will not overwrite local changes.
To alter the default alert action configurations and parameters, follow these steps:
- In Splunk Enterprise go to Settings > Searches, reports, and alerts.
- Select the Type of Alert and from the App menu choose All.
- Input "IT Essentials Work" in the filter field.
- Find the alert action you want to change and edit it accordingly.
- Click Save to save your changes.

|
PREVIOUS Release Notes for the Content Pack for ITE Work Alert Routing |
NEXT Troubleshoot the Content Pack for ITE Work Alert Routing |
This documentation applies to the following versions of Content Pack for ITE Work Alert Routing: 1.0.2
Feedback submitted, thanks!