Enter or change configuration information
The Splunk Open Database Connectivity (ODBC) Driver encrypts your Splunk platform password using Windows data protection APIs. You cannot turn off this encryption.
To enter or change configuration information, perform the following steps:
In your Microsoft Windows environment, navigate to the Start screen (or on the Start menu), type odbc.
- Click whichever of the following items that appears. If more than one appears, click the one that corresponds to the ODBC Driver architecture you installed:
- Data sources (ODBC)
- ODBC Data Sources (32bit)
- ODBC Data Sources (64bit)
In the ODBC Data Source Administrator window, click the System DSN tab.
Click Splunk ODBC in the list of system data sources.
Click Configure. The Splunk ODBC Connection Options window appears.
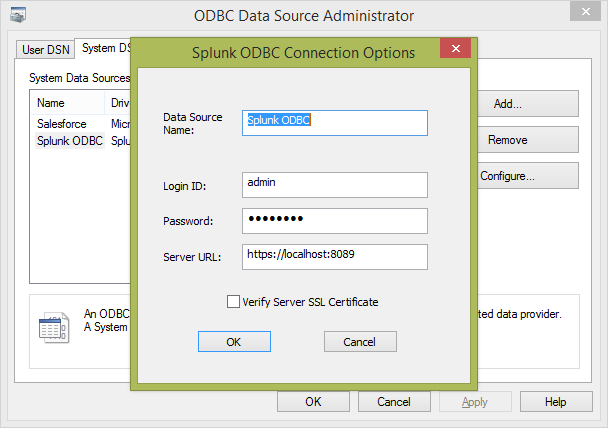
- In this window, you can change any of the options described in the Install the Splunk ODBC Driver topic in this manual, plus the following additional option:
- Verify Server SSL Certificate: This checkbox instructs the Splunk ODBC Driver to ensure the integrity of the Splunk platform server's SSL certificate. Select this checkbox if your server is across a firewall from the computer on which you're running the Splunk ODBC Driver. Follow the instructions in configure the TLS certificate topic in this manual.

Adjust logging levels
- Navigate to
\Library\ODBC\and open the driver configuration file (odbc.ini) in a text editor.sudo vi \Library\ODBC\odbc.ini
- Change the setting for
LogLevel. For example,LogLevel=6. See the following table for information on all of the Log Levels. The best practice is6.Log Level Description 0Disables all logging. 1Logs very severe error events that might lead the driver to abort. 2Logs error events that might still allow the driver to continue running. 3Logs potentially harmful situations. 4Logs general information that describes the progress of the driver. 5Logs detailed information that is useful for debugging the driver. 6(TRACE) Logs more detailed information than log level 5. - Set the
LogPathattribute to the full path to the folder where you want to save log files. This directory must exist already, and be writable, including being writable by other users if the application using the driver runs as a specific user. For example,LogPath=\tmp.if specific path does not exist, or is not writable, then log files will be created in the same folder as your application binary.
- Save the driver configuration file.
- Restart the application you are using the driver with. Configuration changes will not be picked up by the application until it reloads the driver.
The following log file will be created:
splunk_driver.log
Configure number of scanned rows in the Splunk ODBC driver
Configure number of scanned rows in the Splunk ODBC driver on a Microsoft Windows operating system.
- Navigate to the
HKEY_LOCAL_MACHINE\SOFTWARE\ODBC\ODBC.INI\Splunk ODBC\NumberOfRowsForMetadataExtractionregistry key in your system, and open it with a text editor. - Navigate to the
REG_SZtext string, and adjust the numerical value. The default and recommended value is100. The best practice is to adjust only after troubleshooting other options.1000is the maximum value. - Save your changes.
|
PREVIOUS Verify installation |
NEXT Configure the proxy server |
This documentation applies to the following versions of Splunk® ODBC Driver: 3.1.0, 3.1.1
Feedback submitted, thanks!