Modify event processing
You can change the event processing settings and save the improved settings as a new source type.
- View the event data, as described in the "Set Sourcetype" page.
- Modify the event processing settings.
- Review the effect of your changes and iterate until you are satisfied.
- Save the modified settings as a new source type.
- Apply the new source type to any of your inputs.
Modify the event processing settings
To create the new source type, use the event-breaking and timestamp parameters, then save the source type.

On the left side of the "Set Sourcetypes" page, there are collapsible tabs and links for the three types of adjustments that you can perform:
- Event Breaks. Adjust the way that breaks the data into events.
- Timestamps. Adjust the way determines event timestamps.
- Advanced mode. If you have Splunk Enterprise, edit
props.conf.
Event breaks

To modify event break parameters, click Event Breaks. The bar opens to display the following buttons:
- Auto. Break events based on the location of timestamps in the data.
- Every line. Consider every line a single event.
- Regex... Use specified regular expression to break data into events.
For information on line breaking, See Configure event linebreaking. For a primer on regular expression syntax and usage, see Regular-Expressions.info. You can test your regular expression by using it in a search with the rex search command. The Splunk software also maintains a list of useful third-party tools for writing and testing regular expressions.
Timestamps

To modify timestamp recognition parameters click the Timestamps tab to expand it. The tab opens to reveal these options:
For Extraction, you can choose one of these options:
- Auto. Locate the timestamp automatically.
- Current Time. Uses the current system time.
- Advanced. Specify additional advanced parameters to adjust the timestamp.
The "Advanced" parameters are:
- Timezone. The time zone that you want to use for the events.
- Timestamp format. A string that represents the timestamp format for to use when searching for timestamps in the data.
- Timestamp prefix. A regular expression that represents the characters that appear before a timestamp.
- Lookahead. The number of characters that should look into the event (or, for the regular expression that you specified in "Timestamp prefix") for the timestamp.
Note: If you specify a timestamp format in the "Timestamp format" field and the timestamp is not located at the very start of each event, you must also specify a prefix in the Timestamp prefix field. Otherwise, cannot process the formatting instructions, and every event will contain a warning about the inability to use strptime. (It's possible that you still end up with a valid timestamp, based on how attempts to recover from the problem.)
For information on configuring timestamps, see "Configure timestamps".
Advanced
To modify advanced parameters, click the Advanced tab. The tab shows options that let you specify source type properties by editing the underlying props.conf file.
You can add or change source type properties by specifying attribute/value pairs. See props.conf for details on how to set these properties.
The "Advanced" box shows the current, complete set of properties for the selected source type:
- Settings generated by changes made in the Event Breaks or Timestamps tabs (after you click Apply).
- Pre-existing settings for a source type that was either auto-detected or manually selected when you first previewed the file.
- Settings you apply from the Additional settings text box (after you click Apply settings).

For information on how to set source type properties, see "props.conf" in the Configuration file reference. See also "How timestamp assignment works" and "event linebreaking."
How combines settings
The settings changes you make in Advanced mode take precedence. For example, if you alter a timestamp setting using the Timestamps tab and also make a conflicting timestamp change in Advanced mode, the Advanced mode change takes precedence over the modification that you made in the "Timestamps" tab.
Starting with highest precedence, here is how combines any adjustments with the underlying default settings:
- Advanced mode changes
- Event Breaks/Timestamps changes
- Settings for the underlying source type, if any
- Default system settings for all source types
Also, if you return to the Event Breaks or Timestamps tabs after making changes in Advanced mode, the changes will not be visible from those tabs.
Review your changes
When you are ready to view the effect of your changes, select Apply settings. Splunk Web refreshes the screen, so you can review the effect of your changes on the data.
To make further changes using any of the three adjustment methods available again, select Apply changes to view the effect of the changes on your data.
Save modifications as a new source type
- Click "Save As" next to the "Sourcetype" button. Splunk Web displays a dialog box where you can name your new source type, choose the category in which it should be shown in the "Sourcetype" button dialog, and the application context it should use.
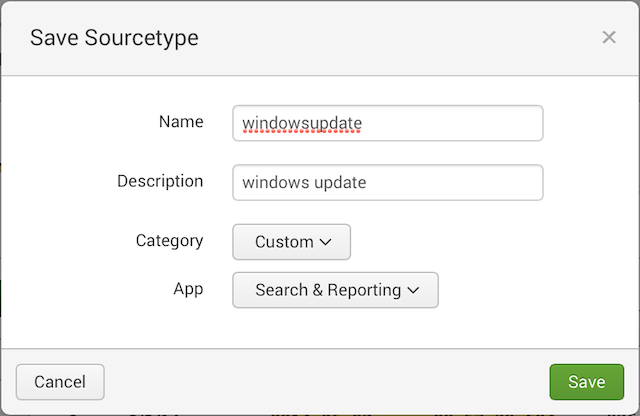
- Enter the Name of the new source type.
- Enter the Description of the source type.
- Select the Category in which the source type should appear when you click "Sourcetype".
- Select the App for which the new source type should be used.
- Click Save to save the source type and return to the Set Sourcetypes page.

Next steps
You have several options after you save the source type:
- (Optional) Click Next to apply the source type to your data and proceed to the Input settings page.
- (Optional) Click "<" to go back and choose a new file to upload or monitor.
- (Optional) Click Add data to return to the beginning of the Add Data wizard.
|
PREVIOUS Prepare your data for preview |
NEXT Modify input settings |
This documentation applies to the following versions of Splunk® Enterprise: 7.0.0, 7.0.1, 7.0.2, 7.0.3, 7.0.4, 7.0.5, 7.0.6, 7.0.7, 7.0.8, 7.0.9, 7.0.10, 7.0.11, 7.0.13
Feedback submitted, thanks!