 Download topic as PDF
Use Streams Config UI
The Streams Config UI lets you configure event capture for many commonly used network data protocols. You can select and filter data capture with a high degree of specificity to collect only the event data that you require for analysis, thus minimizing the quantity of data that Splunk indexes.
The Streams Config UI lets you:
- Enable capture of network data streams.
- Select the specific data protocols you want to capture.
- Add filters with pre-defined conditions that allow capture of specific events.
- Create custom (cloned) streams.
- Aggregate event data over user-defined intervals.
- View ephemeral stream configuration defined in the Splunk Enterprise Security App.
For details on how the Streams Config UI communicates with Splunk_TA_stream, see How streamfwd communicates with splunk_app_stream.
Enable Streams
To enable or disable streams:
1. In the Splunk App for Stream menu, click Streams.
The Streams Config page opens.
2. Click on the name of the Stream you want to enable/disable.
The configuration page opens for that specific stream.
3. Select the Enabled or Disabled button at the top right of the page.
The stream is enabled/disabled for event capture.
Note: By default, the Config Streams page enables all available streams for you.
Select Fields
You can choose the specific fields that you want to capture as part of your stream event.
- Select the Enable checkbox to add that field to the stream.
Add Filters
You can add filters to a Stream based on conditions that compare a Term with a specific value. For example, for the term "http_method," you could add a condition that http_method must "contain" the value GET. If all (or any) http_method matches this condition, the stream event data passes through.
1. Click the Add button next to the term for which you want to create the filter condition.
2. Select a Comparison type from the drop-down menu.
3. Enter the Value that defines the condition of the comparison.
4. Click Save Changes
Your new filter is added to the Stream configuration file and appears in the list of filters for that Stream.
Note: Filter comparison values can be strings or numeric values.
Create custom streams
You can create custom streams that provide additional granularity for network data capture. You can also add additional filters to custom streams and aggregate custom stream data over specific time intervals.
Clone streams
To create a custom stream, you must clone an existing stream. When you clone a stream, the app produces an exact duplicate of the original stream, including all enabled fields and existing filters.
1. In the main menu, click Streams.
This opens the main Streams Config page.
2. Click the Clone Stream button (upper right).
The Clone Stream dialog appears.
3. Enter a Name and Description for your stream. Then select the existing stream you want to clone from the Stream list. Click OK.
A new configuration page opens for the cloned stream.
4. Click Save (upper right) to save the clone as a new stream.
Your new custom stream now appears in the list of streams on the main Streams Config page.
Aggregate events
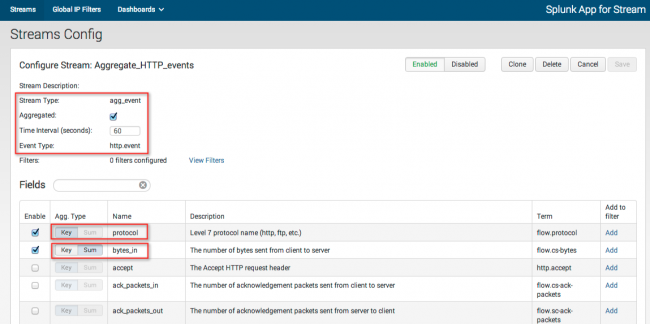
Splunk App for Stream lets you aggregate events for custom streams over specific time-intervals. The app groups events into aggregation buckets, with one bucket allocated for each unique collection of "Key" fields. At the end of the time-interval, the app emits an object that represents each bucket.
For example, if you choose to aggregate bytes_in over an interval of 60 seconds, the app aggregates the total number of bytes_in over a 60 second interval in a unique bucket.
Aggregate Types
Key: Fields that have aggregate type Key are used for grouping and are included in the stream objects.
Sum: The values of fields that have aggregate type Sum are added together for all events over the time-interval.
To aggregate events:
1. On the Streams Config page, click on the name of your custom stream.
The configuration page for that custom stream opens.
2. Select the Aggregated checkbox.
This changes the Stream Type to "agg_events" and disables all fields.
3. Enter the Time Interval (in seconds) for aggregated events.
4. Select the Enable checkbox for each field you want to aggregate.
5. Select Key to define the aggregate bucket. This gives you a separate bucket for each value of the term. For example, if you select Key for the field "protocol" the app creates a separate bucket for each Level 7 protocol name (http, ftp, etc.).
6. Select Sum to aggregate numeric values for a field.
If your aggregate event includes multiple Key fields, Splunk App for Stream looks for unique combinations of Key event values and creates a unique bucket for each combination.
For example, if you assign Key to the field "protocol" and you assign Sum to the field "bytes_in," the app creates a unique bucket for each protocol value (http, ftp, etc.), and sums the number of bytes_in over the defined interval for each bucket. If you also assign Key to the "src_ip" and "dest_ip" fields, the app creates a unique bucket for each permutation of protocol, source, and destination IP address.
|
PREVIOUS Add SSL keys to use for decryption |
NEXT Global IP Filters |
This documentation applies to the following versions of Splunk Stream™: 6.0, 6.0.1, 6.0.2

Feedback submitted, thanks!