On August 31, 2022, the Splunk App for VMware will reach its end of life. After this date, Splunk will no longer maintain or develop this product. The functionality in this app is migrating to a content pack in Data Integrations. Learn about the Content Pack for VMware Dashboards and Reports.
This documentation does not apply to the most recent version of Splunk® App for VMware (Legacy).
For documentation on the most recent version, go to the latest release.
 Download topic as PDF
Install the FA VM
You will deploy the Splunk Forwarder Appliance for VMware into vSphere using the vSphere client.
Deploy the the FA VM into your vSphere environment:
- On your Windows machine, open the vSphere client and log into vCenter Server
- Invoke the OVA template wizard. Click File > Deploy OVF Template.
- In the Deploy OVF Template wizard click Deploy from a file or URL, then click Browse…
- Browse to the location of your FA ova file,
splunk_for_vmware_forwarder_appliance_<version>-<build_number>.ova, then click Next.- Note: You can not download the file directly from the URL as, before doing so, Splunkbase requires you to be authenticated via a supported web browser.
- Review the OVF template details, then click Next
- In the Name and Location screen provide a new name for the FA VM, though you can use the default FA VM name.
- Select a datacenter or folder as the deployment destination for the FA VM, then click Next.
- On the Host / Cluster screen, select the specific host or cluster where you would like to run the FA VM, then click Next.
- In the Datastore screen, choose the datastore where you want the VM and its filesystem to reside. The datastore must be at least 20 GB. Click “Next”.
- On the Disk Format screen, select either Thin or Thick Provisioning, then click “Next”. We recommend thick provisioning.
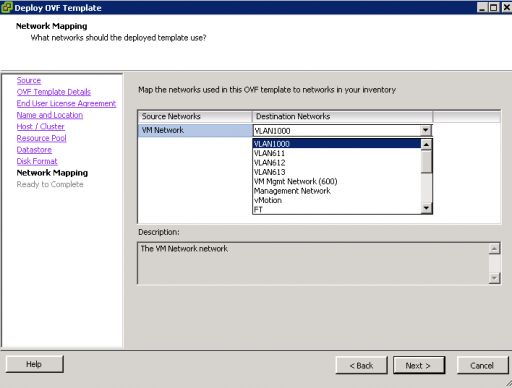
- On the Network Mapping screen, to specify the networks that you want the deployed template to use. Use the Destination Networks drop-down menu to map your FA .ova template to one of the networks in your inventory.
- Validate your selections in the Ready to Complete dialog, then select Next to begin deployment.
- Once deployed, click Close to complete the installation and exit the wizard.
- Locate the FA VM in the vSphere Client tree view.
- Right-click on the FA VM and choose Power > Power On from the menu to start the FA VM. When you power on the FA, Splunk starts automatically even though the VMware data collection mechanism is not configured. By default, the FA VM boots and gets its network settings via DHCP. You can keep this default setting or you can set a static IP address. If you use DHCP, check the Summary tab in the vSphere client to get the IP address of the FA VM.
- Configure the FA VM to get data from your VMware environment and then forward the data to the port on which the Splunk indexer(s) is configured to receive data. For more information, see "engine.conf file structure" in this manual.
Last modified on 18 February, 2014
|
PREVIOUS About the FA VM |
NEXT Configure default properties for the FA VM |
This documentation applies to the following versions of Splunk® App for VMware (Legacy): 2.0

Feedback submitted, thanks!