Define a CSV lookup in Splunk Web
CSV lookups are file-based lookups that match field values from your events to field values in the static table represented by a CSV file. They output corresponding field values from the table to your events. They are also referred to as static lookups.
CSV lookups are best for small sets of data. The general workflow for creating a CSV lookup in Splunk Web is to upload a file, share the lookup table file, and then create the lookup definition from the lookup table file. CSV inline lookup table files, and inline lookup definitions that use CSV files, are both dataset types. See Dataset types and usage.
Your role must have the upload_lookup_files capability. Without it you cannot create or edit CSV lookups in Splunk Web.
See Define roles with capabilities in Securing Splunk Enterprise.
About the CSV files
There are some restrictions to the files that can be used for CSV lookups.
- The table in the CSV file should have at least two columns. One column represents a field with a set of values that includes values belonging to a field in your events. The column does not have to have the same name as the event field. Any column can have multiple instances of the same value, which is a multivalued field.
- The characters in the CSV file must be plain ASCII text and valid UTF-8 characters. Non-UTF-8 characters are not supported.
- CSV files cannot have "\r" line endings (OSX 9 or earlier)
- CSV files cannot have header rows that exceed 4096 characters.
Upload the lookup table file
To use a lookup table file, you must upload the file to your Splunk platform.
Prerequisites
- See lookup for an example of how to define a CSV lookup.
- An available .csv or .gz table file.
- Your role must have the upload_lookup_files capability. Without it you cannot upload lookup table files in Splunk Web. See Define roles with capabilities in Securing Splunk Enterprise.
Steps
- Select Settings > Lookups to go to the Lookups manager page.
- Click Add new next to Lookup table files.
- Select a Destination app from the drop-down list.
- Click Choose File to look for the CSV file to upload.
- Enter the destination filename. This is the name the lookup table file will have on the Splunk server. If you are uploading a gzipped CSV file, enter a filename ending in ".gz". If you are uploading a plaintext CSV file, use a filename ending in ".csv".
- Click Save.
By default, the Splunk software saves your CSV file in your user directory for the Destination app: $SPLUNK_HOME/etc/users/<username>/<app_name>/lookups/.
After you upload the lookup file, tell the Splunk software which applications can use this file. The default app is Launcher.
- Select Settings > Lookups.
- From the Lookup manager, click Lookup table files.
- Click Permissions in the Sharing column of the lookup you want to share.
- In the Permissions dialog box, under Object should appear in, select All apps to share globally. If you want the lookup to be specific to this app only, select This app only. You can also keep your lookup private by selecting Keep private.
- Click Save.
Create a CSV lookup definition
You must create a lookup definition from the lookup table file.
Prerequisites
In order to create the lookup definition, share the lookup table file so that Splunk software can see it.
Review
Steps
- Select Settings > Lookups.
- Click Add new next to Lookup definitions.
- Select a Destination app from the drop-down list.
Your lookup table file is saved in the directory where the application resides. For example:$SPLUNK_HOME/etc/users/<username>/<app_name>/lookups/. - Give your lookup definition a unique Name.
- Select File-based as the lookup Type.
- Select the Lookup file from the drop-down list. For a CSV lookup, the file extension must be .csv.
- (Optional) If the CSV file contains time fields, make the CSV lookup time-bounded by selecting the Configure time-based lookup check box.
Time-based options Description Default Name of time field The name of the field in the lookup table that represents the timestamp. No value (lookups are not time-based by default) Time format The strptime format of the timestamp field. You can include subseconds but the Splunk platform will ignore them. %s.%Q (seconds from unix epoch in UTC and optional milliseconds) Minimum offset The minimum time (in seconds) that the event timestamp can be later than the lookup entry timestamp for a match to occur. 0 seconds Maximum offset The maximum time (in seconds) that the event timestamp can be later than the lookup entry time for a match to occur. 2000000000 seconds - (Optional) To define advanced options for your lookup, select the Advanced options check box.
Advanced options Description Default Minimum matches The minimum number of matches for each input lookup value. 0 matches Maximum matches Enter a number from 1-1000 to specify the maximum number of matches for each lookup value. If time-based, the default value is 1; otherwise, the default value is 1000. Default matches When fewer than the minimum number of matches are present for any given input, the Splunk software provides this value one or more times until the minimum is reached.
Splunk software treats NULL values as matching values and does not replace them with the Default matches value.
No value. Case sensitive match If the check box is selected, case-sensitive matching will be performed for all fields in a lookup table. Selected by default. Batch index query Select this check box if you are using a large lookup file that may affect performance. Unselected. May be set to true at the global level (see limits.conf).Match type A comma and space-delimited list of <match_type>(<field_name>) specification to allow for non-exact matching. The available values for non-exact matching are WILDCARD and CIDR. Specify the fields that use WILDCARD or CIDR in this list.
If you specify a match type of WILDCARD for a field, its values should include wildcard symbols (*). For example, if you set a Match type of WILDCARD(url), the corresponding lookup table should have values like www.splunk.com/* and www.buttercupgames.com/* for the url field.EXACT Filter lookup Filter results from the lookup table before returning data. Create this filter like you would a typical search query using Boolean expressions and/or comparison operators. For CSV lookups, filtering is done in memory.
No value. - Click Save.
Your lookup is defined as a file-based CSV lookup and appears in the list of lookup definitions.
After you create the lookup definition, specify in which apps you want to use the definition.
- Select Settings > Lookups.
- Click Lookup definitions.
- In the Lookup definitions list, click Permissions in the Sharing column of the lookup definition you want to share.
- In the Permissions dialog box, under Object should appear in, select All apps to share globally. If you want the lookup to be specific to this app only, select This app only. You can also keep your lookup private by selecting Keep private.
- Click Save.
Permissions for lookup table files must be at the same level or higher than those of the lookup definitions that use those files.
You can use this field lookup to add information from the lookup table file to your events. You can use the field lookup with the lookup command in a search string. Or, you can set the field lookup to run automatically. For information on creating an automatic lookup, see Create a new lookup to run automatically.
Handle large CSV lookup tables
Lookup tables are created and modified on a search head. The search head replicates a new or modified lookup table to other search heads, or to indexers to perform certain tasks.
- Knowledge bundle replication. When a search head distributes searches to indexers, it also distributes a related knowledge bundle to the indexers. The knowledge bundle contains knowledge objects, such as lookup tables, that the indexers need to perform their searches. See What search heads send to search peers in Distributed Search.
- Configuration replication (search head clusters). In search head clusters, runtime changes made on one search head are automatically replicated to all other search heads in the cluster. If a user creates or updates a lookup table on a search head in a cluster, that search head then replicates the updated table to the other search heads. See Configuration updates that the cluster replicates in Distributed Search.
When a lookup table changes, the search head must replicate the updated version of the lookup table to the other search heads or the indexers, or both, depending on the situation. By default, the search head sends the entire table each time any part of the table changes.
Quarantining large CSV lookup files in search head clusters
To reduce synchronization issues in search head clusters, large CSV lookups are now blocked/skipped from replication within the search head cluster.
Previously, large CSV lookup files could block replication and cause cluster members to go out of sync, in some cases requiring a manual "destructive resync" of cluster members. Now, if a CSV lookup file exceeds 5GB, the cluster automatically places the lookup in quarantine on the cluster member on which it is generated and suspends replication of the lookup, without blocking replication of other objects.
When the size of the quarantined lookup falls below the 5GB limit, the cluster automatically removes the lookup from quarantine, and replication of the lookup across the cluster resumes.
For more information, see Replication synchronization issues in Distributed Search.
Monitor quarantined lookup files
The splunkd health report indicates if any CSV lookup files are in quarantine across the cluster. The replication quarantine status appears under Search Head Clustering > Shc Csv Lookup Replication in the distributed health report status tree. You can use the distributed health report to track quarantined lookup status changes and monitor the number of lookups currently in quarantine.

To access more information on quarantined lookups, including tips to help you remediate oversized lookups, navigate to the local health report on the SHC captain. The replication quarantine status appears under Search Head Clustering > SHC Captain > SHC CSV Lookup Replication in the local health report.

To view Search Head Clustering health report features in Splunk Enterprise you must have the admin role. Search Head Clustering health report features are not visible to the sc_admin role in Splunk Cloud Platform.
For more information on the splunkd health report, see About proactive Splunk component monitoring.
Quarantined lookups can cause a deviation in search results across the cluster, as lookup files on different cluster members can fall out of sync. To avoid this deviation, make sure to monitor and remediate any alerts or notifications you receive on quarantined lookups.
Remediate oversized lookup files
To maintain consistent search results across the cluster, it is important to fix oversized lookups, so they are removed from quarantine as soon as possible. Some actions you can take to remediate oversized lookups include:
- Optimize the lookup search to reduce the amount of data the search writes to the lookup. See lookup in the Search Reference.
- Dedup lookups that contain duplicate information. See Lookup Tables - Dedup on Splunk Answers.
- Move the quarantined lookup to the KV store. See Use lookups with KV store data on the Splunk Developer Portal.
- If a lookup has become obsolete or you want to clear the health report, you can delete the lookup file using the Splunk Web UI. Deleting the lookup on one search head cluster member deletes it from all other cluster members, as the change is replicated across the cluster.
Identify quarantined lookups
To identify which lookup files are in quarantine, run a search using the rest command against the replication/configuration/quarantined-assets endpoint. For example:
| rest /services/replication/configuration/quarantined-assets splunk_server=local | fields user, app, assetName, assetId, quarantineInfo
The search results contain information about currently quarantined lookups, including lookup names, IDs, and the following information under the "quarantineInfo" field:
| Name | Description |
|---|---|
| quarantined_at_host | The search head cluster member on which the lookup is quarantined. |
| quarantined_at | The time at which the lookup was quarantined (seconds since epoch). |
| lookup_size | The size of the quarantined lookup in Bytes. |
For example:

For more information, see rest in the Search Reference.
You can optionally send an HTTP GET request to the replication/configuration/quarantined-assets endpoint using the curl command. For example:
curl -k -u admin:pass https://localhost:8090/services/replication/configuration/quarantined-assets
The request output includes information about lookups currently in replication quarantine. For example:
 <title>quarantined-assets</title>
    <id>https://localhost:8090/services/replication/configuration/quarantined-assets/quarantined-assets</id>
    <updated>1970-01-01T00:00:00+00:00</updated>
    <link href="/services/replication/configuration/quarantined-assets/quarantined-assets" rel="alternate"/>
    <content type="text/xml">
      <s:dict>
        <s:key name="assetId">b4c9340713a5dd8c61105b05acea79fbbd3fc98d</s:key>
        <s:key name="assetURI">/nobody/search/lookups/test.csv</s:key>
        <s:key name="user">nobody</s:key>
        <s:key name="app">search</s:key>
        <s:key name="assetType">lookups</s:key>
        <s:key name="assetName">test.csv</s:key>
        <s:key name="quarantineInfo">[ {quarantined_at_host=https://localhost:8090, quarantined_at=1724885036, lookup_size=30246329, quarantine_reason=large_lookup} ]</s:key>
      </s:dict>
    </content>
Running REST API operations against the replication/configuration/quarantined-assets endpoint requires the admin role.
For endpoint details, see replication/configuration/quarantined-assets.
Set up alerts for quarantined lookups
You can set up an alert to receive notification when there are quarantined CSV lookups in the search head cluster.
To set up an alert for quarantined lookups:
- In the Search and Reporting app, create a saved search that runs a REST API call against the replication/configuration/quarantined-assets endpoint:
See Identify quarantined lookups.| rest /services/replication/configuration/quarantined-assets splunk_server=local | fields user, app, assetName, assetId, quarantineInfo - Save the search as a scheduled alert. Configure the alert to run on a recurring basis, for example, every 24 hours.
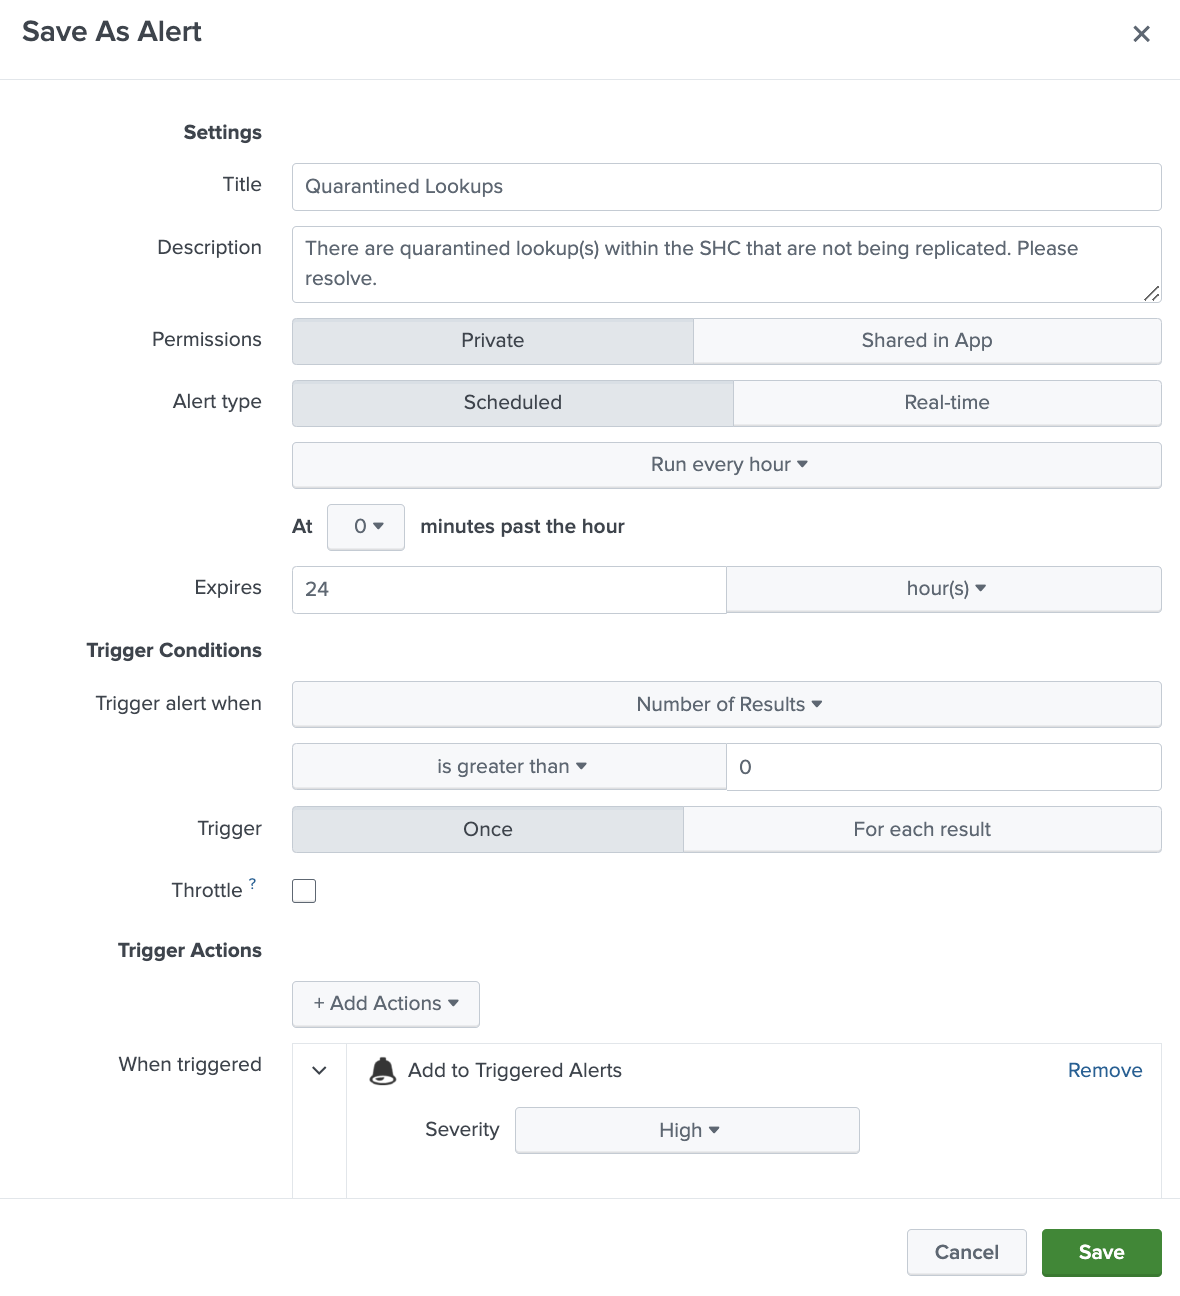
For more information, see Create scheduled alerts in the Alerting Manual.

Deactivate replication quarantine for large CSV lookups
Replication quarantine for large CSV lookups in search head clusters is active by default in Splunk Enterprise 9.4.0 and higher and Splunk Cloud Platform 9.3.2408 and higher.
To deactivate replication quarantine for large CSV lookups, set the value of the conf_replication_quarantiine_large_lookups setting in server.conf to false:
[shclustering]
conf_replication_quarantine_large_lookups=false
For more information, see the server.conf.spec file.
Make the lookup automatic
Instead of using the lookup command in your search when you want to apply a field lookup to your events, you can set the lookup to run automatically. See Define an automatic lookup for more information.
Configure a CSV lookup with .conf files
CSV lookups can also be configured using .conf files. See Configure CSV lookups.
| About lookups | Define an external lookup in Splunk Web |
This documentation applies to the following versions of Splunk® Enterprise: 9.4.0, 9.4.1, 9.4.2
Feedback submitted, thanks!