Add a lookup field
You can add a lookup field to any dataset in your data model. This is a field that is added to the data model through a lookup. A lookup matches fields in events to fields in a lookup table and then adds corresponding fields from that lookup table to those same events.
To create a lookup field, you must have a lookup definition defined in Settings > Lookups > Lookup definitions. The lookup definition specifies the location of the lookup table and identifies the matching fields as well as the fields that are returned to the events.
For more information about lookup types and creation, see About lookups.
Any lookup table files and lookup definitions that you use in your lookup field definition must have the same permissions as the data model. If the data model is shared globally to all apps, but the lookup table file or definition is private, the lookup field will not work. A data model and the lookup table files and lookup definitions that it is associated with should all have the same permission level.
- In the Data Model Editor, open the dataset you'd like to add a lookup field to.
- Click Add Field and select Lookup.
This takes you to the Add Fields with a Lookup page.
- Under Lookup Table, select the lookup table that you intend to match an input field to.
All of the values in the Lookup Table list are lookup definitions that were previously defined in Settings.
When you select a valid lookup table, the Input and Output sections of the page are revealed and populated. The Output section should display a list of all of the columns in the selected Lookup Table. - Under Input, define your lookup input fields. Choose a Field in Lookup (a field from the Lookup Table that you've chosen) and a corresponding Field from the dataset you're editing.
The Input lookup table field/value combination is the key that selects rows in the lookup table. For each row that this input key selects, you can bring in output field values from that row and add them to matching events.
For example, your dataset may have aproductIdfield in your lookup table that matches an auto-extractedProduct IDfield in your dataset event data. The lookup table field and the dataset field should have the same (or very similar) value sets. In other words, if you have a row in your lookup table whereproductIdhas a value ofPD3Z002, there should be events in your dataset where theProduct ID = PD3Z002. Those matching events will be updated with output field/value combinations from the row whereproductIdhas a value ofPD3Z002. See "Example of a lookup field setup," below, for a detailed step-by-step explanation of this process.
In cases where multiple lookup table rows are matched by a particular input key, field values from the first matching row are returned. To narrow down the set of rows that are matched, you can optionally define multiple pairs of input fields. For a row to be selected, all of these input keys must match. You cannot reuse Field in Lookup values when you have multiple inputs. - Under Output, determine which fields from the lookup will be added to eligible events in your dataset as new lookup fields.
You should find a list of fields here, pulled from the columns in the lookup table that you've chosen. Start by selecting the fields that you would like to add to your events. Any lookup fields that you've designated as inputs will be unavailable. You must define at least one output field in order for the lookup field definition to be valid.
If you do not find any fields here there may be a problem with the designated Lookup Table. - Under Field Name, provide the field name that the lookup field should have in your data.
Field Name values cannot include whitespace, single quotes, double quotes, curly braces, or asterisks. - Under Display Name provide the display name for the lookup field in the Data Model Editor and in Pivot.
Display Name values cannot include asterisk characters. - Set appropriate Type and Flags values for each lookup field that you define.
For more information about the Type field, see the subsection "Marking fields as hidden or required" in the Define dataset fields topic. - (Optional) Click Preview to verify that the output fields are being added to qualifying events.
Qualifying events are events whose input field values match up with input field values in the lookup table). See "Preview lookup fields," below, for more information. - If you're satisfied that the lookup is working as expected, click Save to save your fields and return to the Data Model Builder.
The new lookup fields will be added to the bottom of the dataset field list.
Preview lookup fields
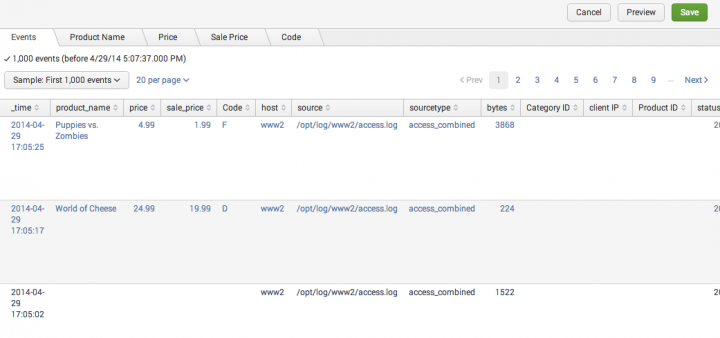
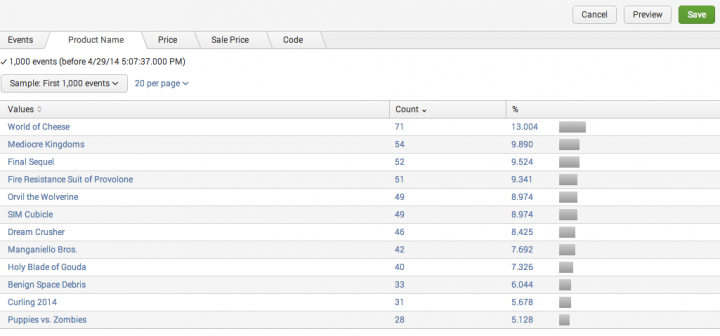
After you set up your lookup field, you can click Preview to see whether the lookup fields are being added to qualifying events (events where the designated input field values match up with corresponding input field values in the lookup table). Splunk Web displays the results in two or more tabbed pages.
The first tab shows a sample of the events returned by the underlying search. New lookup fields should appear to the right of the first column (the _time column). If you do not see any values in the lookup field columns in the first few pages it could indicate that these values are very rare. You can check on this by looking at the remaining preview tab(s).
Splunk Web displays a tab for each lookup field you select in the Output section. Each field tab provides a quick summary of the value distribution in the chosen sample of events. It's set up as a top values list, organized by Count and percentage.
Example of a lookup field setup
Let's say the following things are true:
- You have a data model dataset with an auto-extracted field called Product ID and another auto-extracted field named Product Name. You would like to use a lookup table to add a new field to your dataset that provides the product price.
- You have a
.csvfile calledproduct_lookup. This table includes several fields related to products, includingproductIdandproduct_name(which have very similar value sets to the similarly-named fields in your dataset), as well asprice, which is the field in the lookup table that you want to add to your dataset as a lookup field. - You know that there are a few products that have the same Product Name but different Product ID values and prices. This means you can't set up a lookup definition that depends solely on Product Name as the input field, because it will try to apply the same
pricevalue from the lookup table to two or more products. You'll have to design a lookup field definition that uses both Product Nameand Product ID as input fields, matching each combination of values in your matching events to rows in the lookup table that have the same name/ID combinations.
If this is the case, here's what you do to get price properly added to your dataset as an field.
- In Settings, create a CSV lookup definition that points at the
product_lookup.csvlookup file. Call this lookup definition product_lookup. - Select Settings > Data Models and open the Data Model Editor for the dataset you want to add the lookup field to.
- Click Add Field and select Lookup.
- The Edit Fields with a Lookup page opens.
- Under Lookup Table select product_lookup.
- All of the fields tracked in the lookup table will appear under Output.
- Under Input, define two Field in Lookup/Field in Dataset pairs. The first pair should have a Field in Lookup value of ProductId and a Field in Dataset value of Product ID. The second pair should have a Field in Lookup value of product_name and a Field in Dataset value of Product Name.
- The first pair matches the lookup table's
productIdfield with your dataset's Product ID field. The second pair matches the lookup table'sproduct_namefield with your dataset's Product Name field. Notice that when you do this, under Output the rows for theproductIDandproduct_namefields become unavailable.
- The first pair matches the lookup table's
- Under Output, select the checkbox for the
pricefield.- This setting specifies that you want to add it to the events in your dataset that have matching input fields.
- Give the
pricefield a Display Name of Price.- The
pricefield should already have a Type value of Number.
- The
- Click Preview to test whether
priceis being added to your events.- The preview events appear in table format, and the
pricefield is the second column after the timestamp.
- The preview events appear in table format, and the
- If the
pricefield shows up as expected in the preview results, click Save to save the lookup field.
Now your Pivot users will be able to use Price as a field option when building Pivot reports and dashboards.
| Add an eval expression field | Add a regular expression field |
This documentation applies to the following versions of Splunk® Enterprise: 7.0.0, 7.0.1, 7.0.2, 7.0.3, 7.0.4, 7.0.5, 7.0.6, 7.0.7, 7.0.8, 7.0.9, 7.0.10, 7.0.11, 7.0.13, 7.1.0, 7.1.1, 7.1.2, 7.1.3, 7.1.4, 7.1.5, 7.1.6, 7.1.7, 7.1.8, 7.1.9, 7.1.10, 7.2.0, 7.2.1, 7.2.2, 7.2.3, 7.2.4, 7.2.5, 7.2.6, 7.2.7, 7.2.8, 7.2.9, 7.2.10, 7.3.0, 7.3.1, 7.3.2, 7.3.3, 7.3.4, 7.3.5, 7.3.6, 7.3.7, 7.3.8, 7.3.9, 8.0.0, 8.0.1, 8.0.2, 8.0.3, 8.0.4, 8.0.5, 8.0.6, 8.0.7, 8.0.8, 8.0.9, 8.0.10, 8.1.0, 8.1.1, 8.1.2, 8.1.3, 8.1.4, 8.1.5, 8.1.6, 8.1.7, 8.1.8, 8.1.9, 8.1.10, 8.1.11, 8.1.12, 8.1.13, 8.1.14, 8.2.0, 8.2.1, 8.2.2, 8.2.3, 8.2.4, 8.2.5, 8.2.6, 8.2.7, 8.2.8, 8.2.9, 8.2.10, 8.2.11, 8.2.12, 9.0.0, 9.0.1, 9.0.2, 9.0.3, 9.0.4, 9.0.5, 9.0.6, 9.0.7, 9.0.8, 9.0.9, 9.0.10, 9.1.0, 9.1.1, 9.1.2, 9.1.3, 9.1.4, 9.1.5, 9.1.6, 9.1.7, 9.1.8, 9.1.9, 9.2.0, 9.2.1, 9.2.2, 9.2.3, 9.2.4, 9.2.5, 9.2.6, 9.3.0, 9.3.1, 9.3.2, 9.3.3, 9.3.4, 9.4.0, 9.4.1, 9.4.2


 Download manual
Feedback submitted, thanks!