Manage search jobs
You can use the Jobs page to review and manage any job that you own.
If you have the Admin role, or a role with an equivalent set of capabilities, you can manage the search jobs run by all users of your Splunk implementation.
Opening the Jobs page
- In Splunk Web, to view a list of your jobs select Activity > Jobs. This opens the Jobs page.

The Jobs page displays a list of different types of search jobs.
- Jobs resulting from ad hoc searches or pivots that you have recently run manually.
- Jobs for searches that are run when dashboards are loaded or reports are opened.
- Jobs for scheduled searches.
Refreshing the jobs list
The list of jobs in the Jobs page does not automatically refresh.
- Jobs that are created after you display the Jobs page are not visible until you reload the Jobs page.
- If a job expires while you have the Jobs page open, the job appears in the Jobs page list, but you cannot view the job results.
To refresh the Jobs page, reload the page.
Job actions
You can use the Actions column to perform actions on a job.

Use the Job drop-down to edit the job settings, pause the job, extend the job lifetime, inspect the job, or delete the job.
Use the action icons to pause, stop, share, and export jobs.
To perform these actions on multiple jobs, select the jobs and click Edit Selected. Then select the action that you want to perform.
When you pause a search job, it might take some time for indexers to stop running remote searches and clear out search results that are buffered in memory.
View and compare jobs
You can see a list of the jobs you have recently dispatched or saved for later review. Use the list to compare job statistics such as run time, total count of events matched, size, and so on.
Active job count
In the upper right corner of the Jobs page there is a count of the total number of jobs in the list.
The count reflects the number of jobs at the moment you opened the Jobs page. If a job expires while the Jobs page is open, the job count does not refresh.
Sort the job list
By default, the list of jobs is sorted by the Created at column.
You can sort the list by any column that displays a sort button in the column heading. For example, you can sort the list by the job expiration or by the job owner.
- Click once on the column heading to sort the list in ascending order. Click again to sort the list in descending order.
Filter the job list
You can filter the list of jobs by application, by owner, and by status.
- In the Filter box, type a term or expression that appears in the search criteria to filter the list.
For example, you can specify diskUsage, EMBED AND diskUsage=8*, or label=EMBED AND diskUsage=8* in the Filter box.
View job search results
You can view the results of a search that is listed on the Jobs page.
- Click on the search link to view the results associated with a specific job.
- For ad hoc searches the link is the search criteria.
- For saved searches the link is the name of the report, dashboard panel, or pivot.
The results open in the Search app view.
Check the progress of ongoing jobs
You can check on jobs that are dispatched by scheduled searches, real-time searches, and long-running historical searches.
Use the Status column to check on the progress of ongoing jobs. The Status column shows the percent of the events that have been processed. Current jobs have a status of Running. Jobs that are running in the background have a status of Backgrounded.
Change the per page job count
You can change the number of jobs that appear on each page in the list. The default is to display ten jobs on each page. On the right side of the window, you can display 10, 20 or 50 jobs per page.
Inspect jobs
You can inspect a job to take a closer look at what a search is doing and see where the Splunk software is spending most of its processing time.
Use the Search Job Inspector to view information about the current job, such as the search ID (sid), job execution costs, and search job properties.
- In the Actions column for the specific job, select Job.
- Select Inspect Job.
For more information about the using the Search Job Inspector, see View search job properties.
Extending search job lifetimes
From the Jobs page, there are several ways to change the lifetime of a job. To learn more about lifetimes for specific types of jobs, see Extending job lifetimes.
Quickly extend job lifetimes
You can quickly extend the lifetime of a job.
- In the Actions column for the specific job, select Job.
- Select Extend Job Expiration.
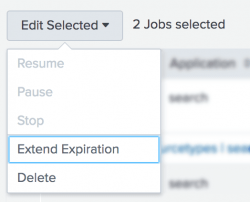
Extend the lifetimes for multiple jobs
You can extend the lifetimes of multiple jobs at the same time.
- Select the jobs whose lifetimes you want to extend.
- Above the job list, click Edit Selected.
- Select Extend Expiration.

Choose the period of time for the lifetime extension
Use this method to select the time period for the extension.
- In the Actions column for the specific job, select Job.
- Select Edit Job Settings.
- Select either 10 minutes or 7 days.
- Click Save.
You can share a job by changing the job permissions, or by sharing a URL to the job.
Change job permissions
You can share a job by changing the permissions on that job. By default, all jobs are set to Private.
- From the Job menu, select Edit Job Settings to display the Job Settings dialog box.
- Change Read Permissions to Everyone.
- Click Save.
You can share a job with other Splunk users by sending them a link to the job.
The users that you send the link to must also have permissions to use the app that the job belongs to.
- In the Actions column, click the Share icon for the job that you want to share.
- In Share Job dialog box, copy the URL in the Link To Job.
- Send the link to the users that you want to share the job results with.
- The permissions on the job are changed to Everyone and the lifetime of the job is extended to 7 days.
You can also obtain the URL from the Job Settings window. If you use this method to share a job, you must change the Read Permissions to Everyone and the Lifetime to 7 days.
Export jobs
You can export the event data from a job in a variety of formats such as CSV, JSON, PDF, Raw Events, and XML. You can then archive the file, or use the file with a third-party charting application. The format options depend on the type of job artifact that you are working with.
- In the Actions column, click the Export icon for the event data that you want to export.
- Click Format and select the format that you want the search results to be exported in.
- In the File Name field, type a name for the export file where the event data will be stored.
- In the Number of Results field, specify the number of results that you want to export.
- Click Export to save the job events in the export file.
The export file is saved in the default download directory for your browser or operating system.
Note: If your search returns a large number of results, you can access all of the results in the Search app. However, the full set of results might not be stored with the search job artifact. When you export search results, the export process is based on the search job artifact, not the results in the Search app. If the artifact does not contain the full set of results, a message appears at the bottom of the Export Results dialog box to tell you that the search will be rerun by the Splunk software before the results are exported.
For more information, see Export search results.
If the Export icon is not visible, the icon has been hidden by your system administrator to prevent data export.
Extend the session timeout when exporting large amounts of data
When you try to export large amounts of data using the Export button, the session might timeout.
Users with the Admin role, or a role with an equivalent set of capabilities, can use the following procedure to extend the session timeout limit.
- Click Settings > Server Settings > General Settings.
- In the Splunk Web section, increase the number in the Session timeout field.
- Click Save.
Increasing the timeout settings allows Splunk Web more time for the connection between your browser and Splunk Web.
Delete jobs
You can delete one or more jobs from the jobs list.
Delete a single job
You can delete a job from the job list.
- In the Actions column for the specific job, select Job.
- Select Delete Job.
Delete multiple jobs
You can delete multiple jobs at one time.
- Select the jobs that you want to delete.
- Above the job list, click Edit Selected.
- Select Delete.
| Share jobs and export results | View search job properties |
This documentation applies to the following versions of Splunk® Enterprise: 7.1.0, 7.1.1, 7.1.2, 7.1.3, 7.1.4, 7.1.5, 7.1.6, 7.1.7, 7.1.8, 7.1.9, 7.1.10, 7.2.0, 7.2.1, 7.2.2, 7.2.3, 7.2.4, 7.2.5, 7.2.6, 7.2.7, 7.2.8, 7.2.9, 7.2.10, 7.3.0, 7.3.1, 7.3.2, 7.3.3, 7.3.4, 7.3.5, 7.3.6, 7.3.7, 7.3.8, 7.3.9, 8.0.0, 8.0.1, 8.0.2, 8.0.3, 8.0.4, 8.0.5, 8.0.6, 8.0.7, 8.0.8, 8.0.9, 8.0.10, 8.1.0, 8.1.1, 8.1.2, 8.1.3, 8.1.4, 8.1.5, 8.1.6, 8.1.7, 8.1.8, 8.1.9, 8.1.10, 8.1.11, 8.1.12, 8.1.13, 8.1.14, 8.2.0, 8.2.1, 8.2.2, 8.2.3, 8.2.4, 8.2.5, 8.2.6, 8.2.7, 8.2.8, 8.2.9, 8.2.10, 8.2.11, 8.2.12, 9.0.0, 9.0.1, 9.0.2, 9.0.3, 9.0.4, 9.0.5, 9.0.6, 9.0.7, 9.0.8, 9.0.9, 9.0.10, 9.1.0, 9.1.1, 9.1.2, 9.1.3, 9.1.4, 9.1.5, 9.1.6, 9.1.7, 9.1.8, 9.1.9, 9.2.0, 9.2.1, 9.2.2, 9.2.3, 9.2.4, 9.2.5, 9.2.6, 9.3.0, 9.3.1, 9.3.2, 9.3.3, 9.3.4, 9.4.0, 9.4.1, 9.4.2
Feedback submitted, thanks!