Get Windows Data into Splunk Cloud Platform
This topic guides you through the steps to get Windows data into Splunk Cloud Platform.
Administrator requirements
Splunk Cloud Platform administrators must meet the following prerequisites to get Windows data into Splunk Cloud Platform:
- Local Admin access on your Windows machines to install the Splunk Universal Forwarder.
- Permissions to open the Windows ports tcp/8089 inbound and tcp/9997 outbound, required for Step 1.
If you don't know this information or have these permissions, work closely with your organization's Windows administrator to complete these steps.
Customers are responsible for the setup, configuration, and maintenance of third-party services and resources, which includes payment. See Network connectivity and data transfer in the Splunk Cloud Platform Service Description.
Before you begin
To get Windows data into Splunk Cloud Platform, you need a solid understanding of various Splunk concepts. The table lists these concepts and provides links to more information.
| Product | Concept | See |
|---|---|---|
| Splunk and Splunk Cloud Platform | indexes source types deployment server universal forwarder |
Fundamental Splunk and Splunk Cloud Platform concepts |
| Splunk Applications and Add-ons | In this configuration, you use the Splunk Universal Forwarder app to get data in, and the Splunk Add-on for Windows to simplify the process of getting data in. A Splunk app is an application that runs on the Splunk platform and typically addresses several use cases. Add-ons support and extend the functionality of the Splunk platform and the apps that run on it, usually by providing inputs for a specific technology or vendor. The Splunk Add-on for Windows allows a Splunk software administrator to collect:
|
For more information about:
|
Overview
In this procedure, you'll get your Windows applications, security, and system data into your Splunk Cloud Platform instance. There are many other types of Windows data you may want to include in your production environment, but you will likely want these logs at a minimum, and you can later add other types of logs.
To get Windows data into Splunk Cloud Platform, complete the following high-level steps:
- Set up your Windows environment.
- Set up your Splunk Cloud Platform environment.
- Configure indexes on your Splunk Cloud Platform instance.
You create an index for each of the types of data you want to bring into you Splunk Cloud deployment. - Configure your deployment server.
The deployment server allows you to centrally manage the Splunk Forwarders in your environment. Using the deployment server you can configure what data gets collected and where to send it. In this case, you use the deployment server to send data to your Splunk Cloud instance. - Configure apps and add-ons on your deployment server.
You configure the Splunk Universal Forwarder app on the deployment server, and you configure the Splunk Add-on for Windows on your deployment server. Then you set up server classes so that you can push the configurations to the forwarders on your Windows machines. - Configure Universal Forwarders on your Windows Machines.
Forwarders are used to collect data and forwarder data to your Splunk Cloud Platform instance. - Verify that data is flowing to your Splunk Cloud Platform instance.
After configuring the deployment server, add-on and forwarders, check to see if data is flowing to your Splunk Cloud Platform instance.
The following graphic shows how add-on settings and forwarder settings are configured on the deployment server and pushed to groups of forwarders on the customer site. When you have configured all your settings, you can push updates to all your forwarders from the deployment server:

Step 1: Set up your Windows environment
Complete the following steps to set up your Windows environment.
- On the server that will host your deployment server, open tcp/8089 inbound to allow communication with the deployment server from deployment clients. This can be a Linux or a Windows server.
- Open port tcp/9997 outbound on your network firewall to allow communication with the Splunk Cloud indexers.
If you have security concerns that prevent you from opening multiple ports on your firewall, you may want to create an intermediate forwarding tier to limit the number of open ports. For more information about this topic, see https://www.splunk.com/pdfs/technical-briefs/splunk-validated-architectures.pdf.
Step 2: Set up your Splunk Cloud Platform environment
Complete the following steps to set up your Splunk Cloud Platform environment.
- Confirm that you are assigned the
sc_adminrole on your Splunk Cloud Platform instance. - Request that Splunk Support install the Splunk Add-on for Microsoft Windows on your Splunk Cloud Platform instance. Ensure you allow adequate time to complete this task before you attempt to get data in.
- Request a 0 MB deployment server license from Splunk Support. Ensure you allow adequate time to complete this task.
Step 3: Configure indexes on your Splunk Cloud Platform instance
Create indexes to store the events you send from your Windows machines. It's a best practice to create separate indexes for different types of data. This can be useful if you want different storage settings for different types of data. For example, you may need to store wineventlogs for a specified time period for compliance purposes.
In this step, you create the following indexes:
- wineventlog: Store windows event logs
- perfmon: Store windows performance data
- msad: Store Microsoft Active Directory data
- dns: If collecting, store dns data
- dhcp: If collecting, store dhcp data
Complete the following steps to create an index.
- From your Splunk Cloud Platform instance, go to Settings > Indexes.
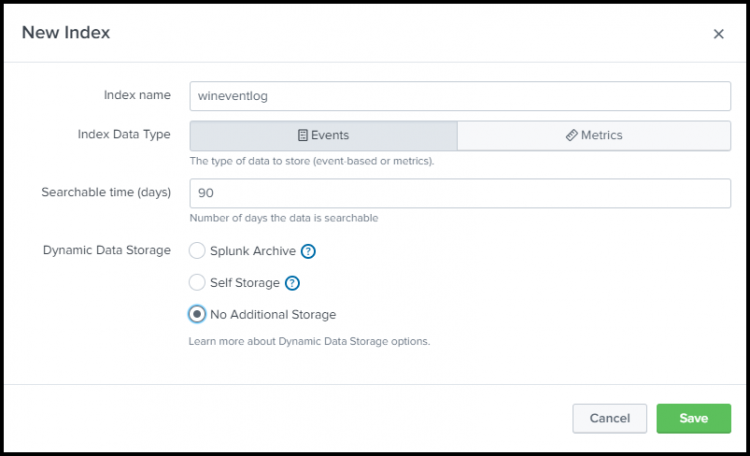
- Click New Index.
- For the index name, enter wineventlog.
- For index data type, select Events.
- For searchable time (days), enter a value that indicates the number of days the data is searchable. The image shows an example of 90 days of searchable storage.
- Storage is based on your subscription type. For more information on an appropriate storage value per your subscription type, see Storage in the Splunk Cloud Platform Service Description. Be sure to refer to the correct service description version for your deployment.
- Optionally, you can extend your storage for longer if you have different requirements. Discuss your storage requirements with your Splunk account representative.
- Click No Additional Storage, and click Save:
You can also set up different types of storage for expired Splunk Cloud Platform data (such as self-storage or archiving).
- Repeat these steps for each of the following indexes:
- perfmon
- msad
- dns
- dhcp

Step 4: Configure your Splunk Deployment Server
Complete the following steps to configure the deployment server (Windows OS) with the deployment server license and the Universal Forwarder App.
- Download a Splunk Enterprise instance as your deployment server.
From Splunk.com download an instance of Splunk Enterprise and install it on its own Windows machine.Do not install on the same machine as a Universal Forwarder.
- Configure HTTPS for Splunk Web.
From the Splunk Enterprise instance you installed, go to Settings > Server settings > General Settings.
In the field Enable SSL (HTTPS) in Splunk Web, click Yes, and click Save.
This is a best practice for security. For additional security you can add your own certificate instead of using the default certificates.

- Download the Universal Forwarder credentials to install the Universal Forwarder App.
Log into your Splunk Cloud Platform instance. Under Apps, click Universal Forwarder, then click Download Universal Forwarder Credentials.
- Upload the Universal Forwarder credentials on your deployment server.
On your deployment server (the Splunk Enterprise instance you will use as a deployment server), go to Apps > Manage Apps > Install Apps from file.
Click Upload to upload the Universal Forwarder app.
- Configure the licensing for the deployment server.
From Settings > Licensing use the license to configure the Splunk instance as a deployment server.This is the license you requested from Splunk Support in Step 2.
- Click Restart later.


Step 5: Configure Apps and Add-Ons on your Deployment Server
Add the Universal Forwarder app and the Splunk Add-on for Windows to your deployment server so that it can push forwarder and add-on configurations to all of the forwarders you install.
Complete the steps in the following sections to configure apps and add-ons on your deployment server.
Download and install the add-on
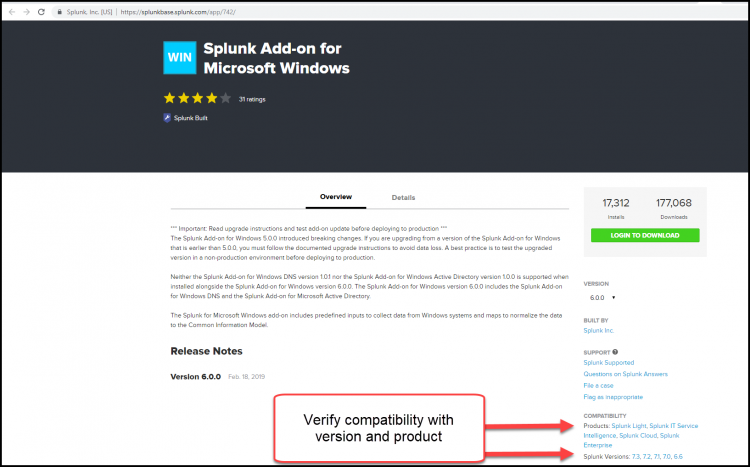
- Go to Splunkbase and download the Splunk Add-on for Microsoft Windows.
As a best practice, use the COMPATIBILITY field on the left side to verify that the add-on is valid for Splunk Cloud Platform and the version you have installed.
- On your deployment server, click Apps > Manage Apps > Install Apps from file, then click Upload to upload the Splunk Add-on for Microsoft Windows you downloaded from splunkbase.
-
Verify these folders are in the right directory by going to Windows > Program Files > Splunk > etc > apps and checking for the following folders:
- 100_<splunk cloud stack name>_splunkcloud
- Splunk_TA_windows
-
Copy these folders to the following directory: Windows > Program Files > Splunk > etc > deployment-apps
After copying the folders, make sure that no local folder exists under the Splunk Forwarder app Windows > Program Files > Splunk > etc > deployment-apps > 100_<splunk cloud stack name>_splunkcloud. If a local folder exists, delete it. This folder gets created when the app is installed but you need a unique outputs.conf for each forwarder. This gets recreated when the Universal Forwarder restarts. -
Perform a verification step:
Return to the Forwarder Management console by going to Settings > Forwarder management. The Universal Forwarder app and the Splunk Add-On for Microsoft Windows should be listed under the Apps tab.

Configure and customize the Windows data collection add-ons
- Navigate to Windows > Program Files > Splunk > etc > deployment-apps.
- Make copies of the Splunk_TA_windows folder for each of the types of Windows instances that you want to get data from.
- Rename each of the folders so that they represent your different Windows servers. For this example, create the following folders:
- Splunk_TA_windows_DomainController
- Splunk_TA_windows_server
- Splunk_TA_windows_client
- Splunk_TA_windows_GlobalCatalogServer
- Navigate to Windows > Program Files > Splunk > etc > deployment-apps > Splunk_TA_windows_server.
-
In the folder, create a new folder called local.
This is a Splunk best practice and ensures that your configuration changes are saved during an upgrade. Also, this provides a way to revert back to the original configurations if some settings are misconfigured. - From Windows > Program Files > Splunk > etc > deployment -apps > Splunk_TA_windows_server > default, copy the file inputs.conf into your local folder.
-
Using a file editor, open the inputs.conf file for editing.
Tip: Use Wordpad or Notepad++ rather than Notepad, which does not handle word wrapping correctly by default. -
Review the Source Types for Windows Add-Ons in the documentation to ensure that your sources are represented by this add-on.
In this instance, you configure the add-on to get data in for the following Windows Event Logs:- Application
- Security
- System
-
To get the Application log data in, modify the inputs.conf file as follows:
- For WinEventLog://Application, set
disabled = 0. This enables the input. - Add an entry for the location of the index by adding the following line to the stanza:
index=wineventlog. This is the index you previously configured).
[WinEventLog://Application]

disabled = 0

start_from = oldest

current_only = 0

checkpointInterval = 5

renderXml=true

index=wineventlog
- For WinEventLog://Application, set
- To get the Security Log data in, modify the inputs.conf file as follows:
- For WinEventLog://Security, set
disabled = 0. - Add an entry for the location of the Security log files by adding the following stanza:
index=wineventlog.
[WinEventLog://Security]

disabled = 0

start_from = oldest

current_only = 0

evt_resolve_ad_obj = 1

checkpointInterval = 5

blacklist1 = EventCode="4662" Message="Object Type:(?!\s*groupPolicyContainer)"

blacklist2 = EventCode="566" Message="Object Type:(?!\s*groupPolicyContainer)"

renderXml=true

index=wineventlog
- For WinEventLog://Security, set
- Save the inputs.conf file.
- Perform a verification step:
Return to the Forwarder Management console by going to Settings > Forwarder management. The Universal Forwarder app and the Splunk Add-On for Microsoft Windows and the modified ones you created should be listed under the Apps tab.
Create and configure a server class inside the Forwarder Management Console
- Under the Server Classes tab, click New Server Class.
-
Enter outputs as the server class name and click Save.
In this case, name the server class outputs because it sets the outputs.conf file for the forwarders. - When you save these changes, you are taken to a screen to add apps or a client. Click Add Apps and select the Universal Forwarder app.
- The name of the Universal Forwarder app is unique to your Splunk Cloud instance (example: 100_<stack_name>_splunkcloud).
Click the name to add it to the right side and then click Save. - Under Actions for the Universal Forwarder app, click Edit.
- Select the Enable App and Restart Splunkd the checkbox and click Save.
Setting Restart Splunkd lets you to restart the forwarder after you push changes to the apps via the deployment server. - Navigate to the Server Classes tab.
- For the outputs server class, click Edit > Edit Clients.
- In the Include (whitelist) box, enter a wildcard (*) so that the Universal Forwarder app is deployed to all of your Universal Forwarders as they get installed and phone home to the deployment server.
- Repeat steps 1-9 for another server class called Windows servers.
- For step 2 customize for Windows servers.
- For step 3 customize to the Splunk_TA_windows_Server app.
- Perform a verification step:
When you view the apps from the deployment server, you should see that the app and Restart Splunkd are enabled.
Step 6: Install the Splunk Universal Forwarder on your Windows Servers
Install a Universal Forwarder on each of the Windows servers from which you want data. The easiest way to do this is to run the installer on your server.
Complete the following steps.
- From splunk.com, download the Universal Forwarder to your Windows server.
- Once the download is complete, click on the file to start the install.
- Clear the checkbox Uncheck if you want to use Splunk Cloud.
- Set a username and password.
- In the Deployment Server field, enter the name of the deployment server.
For example, win2016-splk-ds. As a best practice, include the full DNS name. For the port, enter port 8089 to allow the Universal Forwarder to communicate with the deployment server. - Click Next, and click Install.
The forwarder is installed on your server, and you have instructed it to check the deployment server for configuration settings. Once the forwarder is running, it checks with the deployment server and downloads any apps you have configured. In this case, it downloads the Universal Forwarder app and the Splunk Add-on for Windows. - Repeat these steps for each of the Windows machines where you want to send data to Splunk Cloud Platform.
- Perform a verification step:
To verify that your forwarders are configured correctly, you can return to your deployment server, and from the Forwarder Management page, check to see if your clients have checked in. If the clients (forwarders) have checked in, you can see them listed in the Clients tab on the Forwarder Management page.
Step 7: Verify that Data is Flowing to Splunk Cloud Platform
Complete the following steps to verify that data is flowing to Splunk Cloud Platform.
- From your Splunk Cloud instance, go to Apps > Search and Reporting.
- In the search field, enter index=_internal host!= "*.splunkcloud.com" .
This search allows you view events from any host that is not a splunkcloud.com instance. So, you should be able to see any other hosts that are sending data to your Splunk Cloud Platform instance. - For the time range, select presets > last 30 days.
This allows you to start seeing data more quickly because the oldest events populate first. - Click the search icon. Events from your Windows machines should display.
- In the left pane, a list of fields displays. Under the Host field you can see which forwarders are sending data to Splunk Cloud Platform.
What's next?
The table lists additional topics of interest in the Splunk Cloud Platform Getting Data In manual.
See also
| For more information about | See |
|---|---|
| Getting, managing, and monitoring Windows data | The The Get Windows data section |
| Testing and troubleshooting data input | The Improve the data input process section |
| Get *nix data into Splunk Cloud Platform | Forward data from files and directories to Splunk Cloud Platform |
This documentation applies to the following versions of Splunk Cloud Platform™: 8.2.2112, 8.2.2201, 8.2.2202, 8.2.2203, 9.0.2205, 9.0.2208, 9.0.2209, 9.0.2303, 9.0.2305, 9.1.2308, 9.1.2312, 9.2.2403, 9.2.2406, 9.3.2408, 9.3.2411 (latest FedRAMP release)
Feedback submitted, thanks!