Onboarding for AWS in Data Manager
Data Manager helps you set up hundreds of AWS accounts for data ingestion into Splunk Cloud within a matter of 25 to 30 minutes.
Logging in and getting started with Data Manager
Complete the following steps to get started:
- Log into Splunk Cloud using Splunk-provided credentials.
- Save the email that contains the credentials. It contains a Forgot Password link, in case you need to reset your password.
- Change your password at the prompt.
- Sign the terms and conditions.
- Start onboarding or take the product tour.
Data Manager walks you through adding existing data sources so that you can monitor and investigate any alerts that impact the security state of your environment. It also helps you to see which services you are ingesting, but not yet using, so that you can expand your security coverage.
If you are using Splunk Security Analytics for AWS, after the data is in, you can see Work With Your Data and Use Case topics for details about available dashboards regarding data breach, misconfiguration, insufficient identity, insider threats, user and authentication activity, and risk based alerting.
Stages of onboarding
Data Manager walks you through various stages depending if you're onboarding a single AWS account or multiple AWS accounts.
The onboarding steps are described in detail within Data Manager. The details are not duplicated here.
Onboard a single account
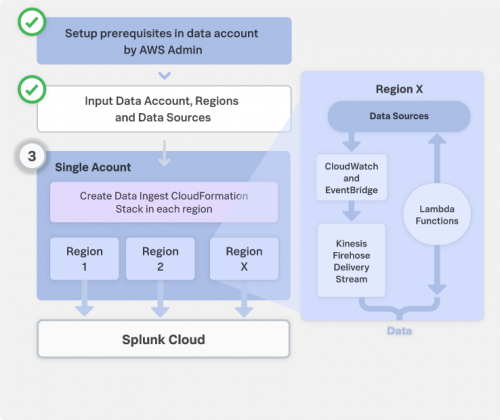
Onboarding a single AWS account consists of the following stages:
- AWS Admin completes the setup prerequisites in the data account
- Configure the data account, regions, and data sources
- Create a data ingestion CloudFormation stack in each region
- Summary
Onboard multiple accounts
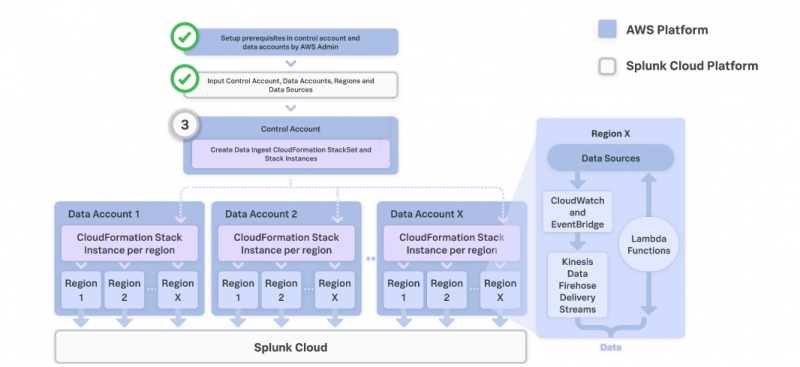
Onboarding multiple AWS accounts consists of the following stages:
- AWS Admin completes the setup prerequisites in the control account and data accounts
- Configure the control account, data accounts, regions, and data sources
- Create a control account CloudFormation StackSet to manage the data accounts
- Create data account CloudFormation stack instances per region
- Summary
Summary of CloudFormation stack templates
A high-level summary of CloudFormation stack templates follows.
The onboarding steps are described in detail within Data Manager. The details are not duplicated here.
- Splunk provides CloudFormation templates to establish the stack set execution role and the Data Manager read role.
- The read role allows Splunk to read metadata from cloudtrail, securityhub, guardduty, cloudformation, firehose, s3, lambda, events, logs.
- The template also creates five other IAM roles to allow firehose, cloudwatch, lambda, s3, logs and events to interact amongst themselves.
- You apply the templates.
Deploy CloudFormation templates
Data Manager uses us-east-1 for setting up resources, such as IAM Roles, that do not need to be configured in all the regions that you select for data onboarding. When creating and deleting resources, the resources in us-east-1 are created first and they are deleted last. Even though you may not have selected the us-east-1 region for data ingestion, the CloudFormation templates create a stack or stackset in this region anyway. This is normal and not a cause for alarm.
Deploying templates takes approximately ten minutes.
- Splunk provides a nested stack set template, which takes a couple of minutes to prepare.
- You download the template when the download button is enabled.
- You apply the template in the control account to start setting up resources across all the list of data accounts, for data ingestion into Splunk through firehose.
- Data starts flowing within five minutes.
The template preparation period varies depending on the number of data sources you selected during onboarding. After you specify the data sources that need to be onboarded, the backend synchronously creates one HTTP Event Collector (HEC) token for every dataset as part of the final download ingest templates operation.
You see this as a disabled download button in the UI until all the tokens are created. If you hover over the download button, you see the message regarding template preparation. There is also an information banner with status and tips. The template download button is enabled when all tokens are created for data ingestion through firehose.
Click Finish to navigate to the Data Management home page and see your data input.
This documentation applies to the following versions of Data Manager: 1.4.0


 Download manual
Feedback submitted, thanks!