Configure the Splunk App for Data Science and Deep Learning
The Splunk App for Data Science and Deep Learning (DSDL) is built on Splunk Machine Learning Toolkit (MLTK) Docker containers. Before you can begin using DSDL you must set up at least one container environment.
Prerequisite
Install the Splunk App for Data Science and Deep Learning.
Configure how DSDL connects to a container environment
Choose the container environment deployment that meets your needs:
- Single-instance deployment with Docker or Kubernetes and the Splunk platform running on the same instance.
- Side-by-side deployment where the Splunk platform instance communicates with another instance that serves as the Docker or Kubernetes host.
Use the Setup page to configure how DSDL connects to Docker, Kubernetes, or OpenShift. You can also use this page to configure certificate settings and configure a connection to the Splunk Observability suite. You can define up to two environments. For example, you can set up Docker for development and set up Kubernetes for production.
Perform the following steps to configure the options you want to use:
- Log in to the Splunk App for Data Science and Deep Learning.
- Click the Configuration tab and choose Setup from the drop-down menu.
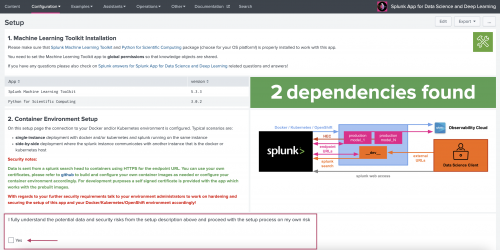
- The page checks that you have met the app prerequisites. The Splunk Machine Learning Toolkit and Python for Scientific Computing add-on are required.
- Read the on-screen security notes and check the corresponding box to acknowledge you have read and understand these notes.
- The remaining fields on the page are now available and you can connect the Splunk search head where DSDL is installed to your preferred container environment.

Configure DSDL for local development or testing with Docker
Perform the following steps to use the Splunk App for Data Science and Deep Learning for local development or testing with Docker.
- On the Setup page, the Docker Settings input fields include both required and optional fields. You can refer to the example settings at the bottom of the Docker input fields section for guidance on what information is needed for both single-instance and side-by-side deployments.
- Enter values for the Docker Host, Endpoint URL, and External URL fields. Optionally enter information for the Docker logging fields.
- Click Test & Save when ready. An error or confirmation message appears. Once you see a confirmation message you can open a new container and begin leveraging tools like JupyterLab Notebooks to write code, build models, test, and experiment with your data.
- If your instance is connected to the internet, and can access the public Docker hub repository, the Docker image is automatically pulled in the first time you start a development container.

You can manually pull the Docker image using the CLI and Docker pull commands. See examples in the next section.
Set up Docker in an air gapped environment
If your Docker environment is air gapped you can make MLTK containers accessible using the following steps:
- From an internet connected Docker instance, pull the desired MLTK containers from Dockerhub as shown in the following examples:
docker pull phdrieger/mltk-container-golden-image-cpu:5.0.0
docker pull phdrieger/mltk-container-golden-image-gpu:5.0.0
docker pull phdrieger/mltk-container-rapids:5.0.0
docker pull phdrieger/mltk-container-spark:5.0.0
docker pull phdrieger/mltk-container-river:5.0.0
- Save the Docker images to a TAR file as shown in the following example:
docker save --output splunk-mltk-container-golden-image-cpu.tar phdrieger/mltk-container-golden-image-cpu:5.0.0
To learn more about saving using Docker, see https://docs.docker.com/engine/reference/commandline/save/.
- Copy the TAR files to your air gapped Docker host environment.
- Load the Docker images from the TAR files as shown in the following example:
docker load --input splunk-mltk-container-golden-image-cpu.tar
- Verify that your
mltk-container-*is available by running Docker images. - Start your container from the container management dashboard.
If you use Kubernetes or OpenShift, contact your cluster administrator for guidance on pulling the available container images into the local repository to have it available within your air-gapped cluster. Alternatively, you can locally build the container images yourself and transfer them into your container runtime environment.
|
PREVIOUS Install the Splunk App for Data Science and Deep Learning |
NEXT Splunk App for Data Science and Deep Learning certificate settings and JupyterLab password |
This documentation applies to the following versions of Splunk® App for Data Science and Deep Learning: 5.0.0
Feedback submitted, thanks!