Part 6: Suppress risk notables to reduce alert noise
Some risk notables might represent benign alerts. You can suppress these risk notables to reduce the excessive alert noise to focus on risk notables that represent real threat.
Suppress risk notables
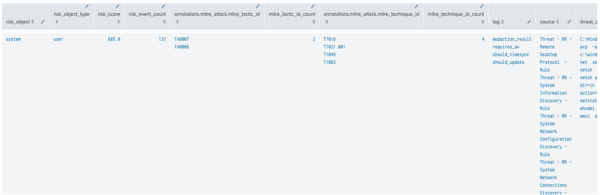
- From the results of the risk incident rule "Risk Threshold Exceeded For Object Over 24 Hour Period", identify the risk notables that indicate harmless system alerts.
- Open the "Risk Threshold Exceeded For Object Over 24 Hour Period" risk incident rule in the Correlation Search Editor.
- Go to the SPL of the risk incident rule.
- Modify the SPL of the risk incident rule "Risk Threshold Exceeded For Object Over 24 Hour Period" by appending
AND not risk_object = "system"to the SPL of the search:| tstats `summariesonly` mode(All_Risk.risk_object) as risk_object, sum(All_Risk.calculated_risk_score) as risk_score, count(All_Risk.calculated_risk_score) as risk_event_count,values(All_Risk.annotations.mitre_attack.mitre_tactic_id) as annotations.mitre_attack.mitre_tactic_id, dc(All_Risk.annotations.mitre_attack.mitre_tactic_id) as mitre_tactic_id_count, values(All_Risk.annotations.mitre_attack.mitre_technique_id) as annotations.mitre_attack.mitre_technique_id, dc(All_Risk.annotations.mitre_attack.mitre_technique_id) as mitre_technique_id_count, values(All_Risk.tag) as tag, values(source) as source, dc(source) as source_count, values(All_Risk.risk_object) as all_risk_objects, values(All_Risk.cim_entity_zone) as cim_entity_zone from datamodel=Risk.All_Risk by All_Risk.normalized_risk_object,All_Risk.risk_object_type | `drop_dm_object_name("All_Risk")` | eval "annotations.mitre_attack"='annotations.mitre_attack.mitre_technique_id', risk_threshold=100 | where risk_score > $risk_threshold$ AND not risk_object = "system" | `get_risk_severity(risk_score)`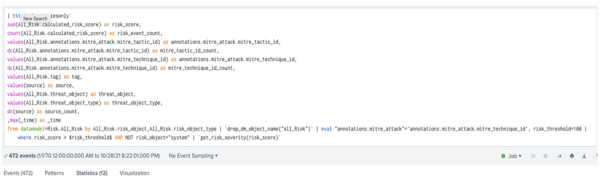
- Run the search: Go to Search, then select Search. This reduces the number of risk notables in the search results since you have removed the system account from alerting.


See also
For more information on throttling notables, see the product documentation:
Suppress false positives using dynamic throttling
Next step
Congratulations. You have completed the Risk-based Alerting (RBA) Tutorial.
To learn more, see the Use Splunk Enterprise Security Risk-based Alerting manual.
Also, review additional RBA resources.
Additional RBA resources
See Additional resources for information about:
- The RBA community
- Links to Quick Reference information
- Links to the Splunk Enterprise Security documentation
- How to provide feedback
- Other security and RBA resources:
|
PREVIOUS Part 5: Review risk notables for triaging |
This documentation applies to the following versions of Splunk® Enterprise Security: 7.2.0, 7.3.0, 7.3.1
Feedback submitted, thanks!