Import custom algorithms
The ML-SPL API has been refactored as of the 2.2.0 release. Developers who want to import custom algorithms into the Splunk Machine Learning Toolkit are strongly encouraged to upgrade to the 2.2.0 release to take advantage of the new API.
The Machine Learning Toolkit contains 27 algorithms that you can use to create custom machine learning models. See the Algorithms section of this manual for information about the algorithms packaged with the Machine Learning Toolkit. You can also extend the Machine Learning toolkit with over 300 open source Python algorithms from the sci-kit learn, pandas, statsmodel, numpy, and scipy libraries. These open source algorithms are available to the Machine Learning Toolkit through the Python for Scientific Computing add-on.
The Machine Learning Toolkit exposes algorithms in the Python for Scientific Computing add-on using the fit and apply commands, which supply additional functionality like argument parsing and model persistence. Although it is not necessary to use these abstractions when importing additional algorithms, it is recommended. To import a new algorithm to use with fit and apply, you must select an algorithm that supports the fit and apply (or transform) methods. Most of the required methods such as fit, apply, and summary have already been created in other algorithms included with the Machine Learning Toolkit, so you can copy and paste those classes/methods into your code then modify them according to your requirements, rather than writing them from scratch.
Note that any algorithms that have been imported from the Python for Scientific Computing add-on into the Machine Learning Toolkit are overwritten when the Machine Learning Toolkit app is updated to a new version. Prior to upgrading the Machine Learning Toolkit, you must save your custom algorithms and re-import them manually after the upgrade.
Import an algorithm from Python for Scientific Computing
These are the high level steps to import a new algorithm from Python for Scientific Computing to the Machine Learning Toolkit.
- Update the
$SPLUNK_HOME/etc/apps/Splunk_ML_Toolkit/bin/algos/__init__.pyfile with the name of the algorithm you want to add. - Create a python script file (
.pyfile) for the algorithm in$SPLUNK_HOME/etc/apps/Splunk_ML_Toolkit/bin/algos. - Check the source file for the algorithm and import the libraries that are required in the
.pyfile for the algorithm to run. - Update the
.pyfile based on the functions of the algorithm available in Splunk ML-SPL.- Init function. This is where you specify the input parameter of the algorithm.
- Preprocess Fit, Fit, and Partial Fit function. Preprocess Fit is used to clean and filter the data before sending it to the algorithm. Call the Fit function of the algorithm to fit a model and apply it to the cleansed data. Call the Partial Fit function to incrementally update a model.
- Transform/Apply/Predict Function. This is where you clean the data to be predicted or transformed and apply the trained model to get the required results. This is also where you specify what the output data frame looks like.
- Summary function. The summary command is used to inspect the trained model and show the features of the model created.
- Register Codec function. This function saves the model of the algorithm. To determine which codecs to use in the function, run the algorithm in the Machine Learning Toolkit. If it fails, add the missing libraries and functions in the codec file based on the errors in the logs.
Note: The name of the main class in the.pyfile must be the same as the name used in the__init__.pyfile.
- Restart the Splunk platform in order for the changes to take effect.
See the next section for a specific example of importing an algorithm. For a video tutorial of this example, see: https://www.youtube.com/watch?v=Ixg96J9JC8w&t=150s.
Example of importing the MinMaxScaler algorithm
In this example, we use the MinMaxScaler algorithm from scikit-learn, which can rescale a numeric data column based on a provided range. This algorithm supports the fit and apply (transform) methods. For more information, see the scikit-learn documentation for MinMaxScaler at http://scikit-learn.org/stable/modules/generated/sklearn.preprocessing.MinMaxScaler.html.
- Navigate to the following path:
$SPLUNK_HOME/etc/apps/Splunk_ML_Toolkit/bin/algosand update the__init__.pyfile with the name of the algorithm you want to add. For example, “MinMaxScaler”.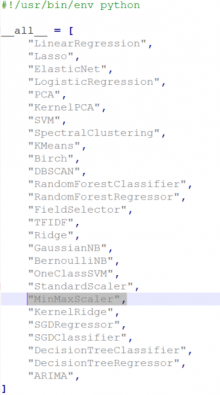
- Create a python script file for the algorithm. Save the
.pyfile to the following directory:$SPLUNK_HOME/etc/apps/Splunk_ML_Toolkit/bin/algos. Since the MinMaxScaler algorithm is used for rescaling data, we’ll use the code from theStandardScaler.pyfile, which has a similar function. So for this example, we copyStandardScaler.pyand save it asMinMaxScaler.py. - Check the source file for the algorithm and import the libraries that are required in the .py file for the algorithm to run. For this example, we referenced http://scikit-learn.org/stable/modules/generated/sklearn.preprocessing.MinMaxScaler.html. For MinMaxScaler, you need to import the following libraries:
- _MinMaxScaler: The main algorithm library.
- base: One of the common libraries for all estimators in scikit-learn.
- Codec: For storing the model after running the fit command.
- Pandas: A popular python library for data structures and data analysis.
See this page to learn more about classes and methods for any algorithm in scikit-learn package: http://scikit-learn.org/stable/modules/classes.html
- Update the
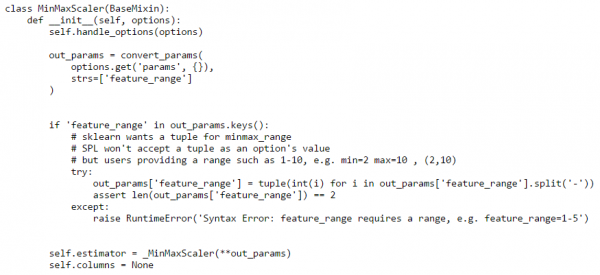
.pyfile based on the functions of the algorithm that are available in Splunk ML-SPL.- Init function: This is where you specify the input parameter of the algorithm. For the MinMaxScaler algorithm the user needs to input the Min and Max values. Since SPL won’t accept tuple as an input, we need to take the range input as the string and then convert it to a tuple before sending it to the MinMaxScaler algorithm.
Note: Make sure the name of the variable you are using for the parameters is the same as the variable name used in the scikit learn algorithm unless you have set an alias. - Preprocess Fit, Fit, and Partial Fit function: Preprocess Fit is used to clean and filter the data before sending it to the algorithm. Call the Fit function of the algorithm to fit a model and apply it to the cleansed data. Call the Partial Fit function to incrementally update a model.
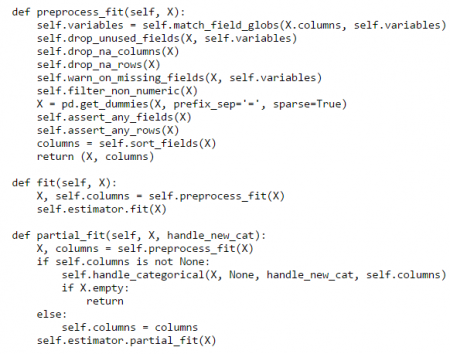
- Transform/Apply/Predict Function: This is where you clean the data to be predicted or transformed and apply the trained model to get the required results. This is also where you specify what the output data frame looks like.

- Summary function: The summary command is used to inspect the trained model and show the features of the model created. For our algorithm,
field,minandscaleparameters will be shown as the summary result.
- Register Codec function: This function saves the model of the algorithm. To determine which codecs to use in the function, run the algorithm in the Machine Learning Toolkit. If it fails, add the missing libraries and functions in the codec file based on the errors in the logs.

- Init function: This is where you specify the input parameter of the algorithm. For the MinMaxScaler algorithm the user needs to input the Min and Max values. Since SPL won’t accept tuple as an input, we need to take the range input as the string and then convert it to a tuple before sending it to the MinMaxScaler algorithm.
- After the files have been updated, restart the Splunk platform.
- Open the Splunk Machine Learning Toolkit and use your newly imported algorithm in a search as in the example below which uses the
fitcommand with the MinMaxScaler algorithm.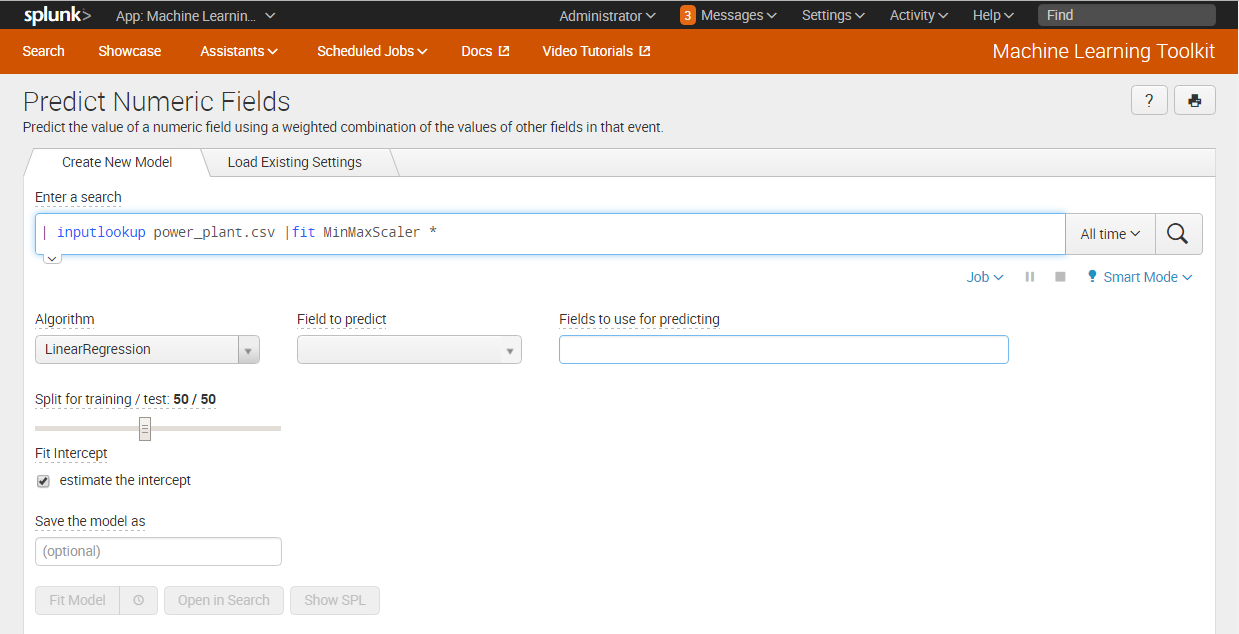
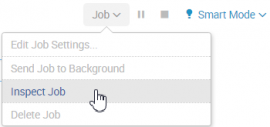
- If you get any errors, check the error logs in the Job panel on the top right. Select Inspect Job and then click the link search.log.


For reference, you can download a copy of the MinMaxScaler.py file used in this example. You can also view a video tutorial of this example at: https://www.youtube.com/watch?v=Ixg96J9JC8w&t=150s.
| Algorithms | Custom visualizations |
This documentation applies to the following versions of Splunk® Machine Learning Toolkit: 2.0.1, 2.1.0
Feedback submitted, thanks!