Update common peer configurations and apps
The peer update process described in this topic ensures that all peer nodes share a common set of key configuration files. You must manually invoke this process to distribute and update common files, including apps, to the peer nodes. The process also runs automatically when a peer joins the cluster.
For information on peer configuration files, see Manage common configurations across all peers. That topic details exactly which files must be identical across all peers. In brief, the configuration files that must be identical in most circumstances are indexes.conf, props.conf, and transforms.conf. Other configuration files can also be identical, depending on the needs of your system. Since apps usually include versions of those key files, you should also maintain a common set of apps across all peers.
The set of configuration files and apps common to all peers, which is managed from the master and distributed to the peers in a single operation, is called the configuration bundle. The process used to distribute the configuration bundle is known as the configuration bundle method.
To distribute new or edited configuration files or apps across all the peers, you add the files to the configuration bundle on the master and tell the master to distribute the files to the peers.
Structure of the configuration bundle
The configuration bundle consists of the set of files and apps common to all peer nodes.
On the master
On the master, the configuration bundle resides under the $SPLUNK_HOME/etc/master-apps directory. The set of files under that directory constitute the configuration bundle. They are always distributed as a group to all the peers. The directory has this structure:
$SPLUNK_HOME/etc/master-apps/
     _cluster/
          default/
          local/
     <app-name>/
     <app-name>/
     ...
Note the following:
- The
/_clusterdirectory is a special location for configuration files that need to be distributed across all peers:- The
/_cluster/defaultsubdirectory contains a default version ofindexes.conf. Do not add any files to this directory and do not change any files in it. This peer-specific defaultindexes.confhas a higher precedence than the standard defaultindexes.conf, located under$SPLUNK_HOME/etc/system/default. - The
/_cluster/localsubdirectory is where you can put new or edited configuration files that you want to distribute to the peers.
- The
- The
/<app-name>subdirectories are optional. They provide a way to distribute any app to the peer nodes. Create and populate them as needed. For example, to distribute "appBestEver" to the peer nodes, place a copy of that app in its own subdirectory:$SPLUNK_HOME/etc/master-apps/appBestEver. - To delete an app that you previously distributed to the peers, remove its directory from the configuration bundle. When you next push the bundle, the app will be deleted from each peer.
- The master only pushes the contents of subdirectories under
master-apps. It will not push any standalone files directly undermaster-apps. For example, it will not push the standalone file/master-apps/file1. Therefore, be sure to place any standalone configuration files in the/_cluster/localsubdirectory.
You explicitly tell the master when you want it to distribute the latest configuration bundle to the peers. In addition, when a peer registers with the master (for example, when the peer joins the cluster), the master distributes the current configuration bundle to it.
When the master distributes the bundle to the peers, it distributes the entire bundle, overwriting the entire contents of any configuration bundle previously distributed to the peers.
The master-apps location is only for peer node files. The master does not use the files in that directory for its own configuration needs.
On the peers
On the peers, the distributed configuration bundle resides under $SPLUNK_HOME/etc/slave-apps. This directory is created soon after a peer is enabled, when the peer initially gets the latest bundle from the master.
Except for the different name for the top-level directory, the structure and contents of the configuration bundle are the same as on the master:
$SPLUNK_HOME/etc/slave-apps/
     _cluster/
          default/
          local/
     <app-name>/
     <app-name>/
     ...
Leave the downloaded files in this location and do not edit them. If you later distribute an updated version of a configuration file or app to the peers, it will overwrite any earlier version in $SPLUNK_HOME/etc/slave-apps. You want this to occur, because all peers in the cluster must be using the same versions of the files in that directory.
For the same reason, do not add any files or subdirectories directly to $SPLUNK_HOME/etc/slave-apps. The directory gets overwritten each time the master redistributes the configuration bundle.
When Splunk software evaluates configuration files, the files in the $SPLUNK_HOME/etc/slave-apps/[_cluster|<app-name>]/local subdirectories have the highest precedence. For information on configuration file precedence, see Configuration file precedence in the Admin Manual.
Settings that you should not distribute through the configuration bundle
The $SPLUNK_HOME/etc/slave-apps directory on the peers is read-only. This is necessary and beneficial behavior, because each time you distribute a new bundle, the directory gets overwritten in its entirety. You would thus otherwise lose any changes made to settings in that directory. Also, the cluster relies on the settings in that directory being identical across all peers.
Therefore, if you distribute a setting through the configuration bundle method that the peer needs to update automatically in some way, the peer will do so by creating a new version of the app under $SPLUNK_HOME/etc/apps. Since you cannot have two apps with the same name, this generates "unexpected duplicate app" errors in splunkd.log.
A common cause of this behavior is distributing SSL passwords through the configuration bundle. Splunk Enterprise overwrites the password with an encrypted version upon restart. But if you distribute the setting through the configuration bundle, the peers cannot overwrite the unencrypted password in its bundle location under $SPLUNK_HOME/etc/slave-apps. Therefore, upon restart after bundle push, they instead write the encrypted version to $SPLUNK_HOME/etc/apps, in an app directory with the same name as its name under $SPLUNK_HOME/etc/slave-apps.
For example, do not push the following setting in inputs.conf:
[SSL]
password = <your_password>
If the setting is in an app directory called "newapp" in the configuration bundle, upon restart the peer will create a "newapp" directory under $SPLUNK_HOME/etc/apps and put the setting there. This results in duplicate "newapp" apps.
Best practice for distributing app.conf in the configuration bundle
If you add a new reload.<conf_file_name> = simple parameter to app.conf in the configuration bundle, you must first push app.conf to the peer nodes, before you push updates to the configuration file referenced in the new parameter. After you push the app.conf file, subsequent changes to the referenced configuration file in the app context will not require a peer restart.
For example, if you add reload.inputs = simple to app.conf, then push app.conf to peer nodes, when you next push an update to inputs.conf in the specific app context, peer nodes will reload and not require a restart.
To distribute app.conf in the configuration bundle:
- For each app that you want to distribute, determine if
app.confcontains a newreload.<conf_file_name> = simpleparameter. - Remove any configuration files referenced in
reload.<conf_file_name> = simplefrom the configuration bundle. - Push the modified configuration bundle containing
app.confto the set of peers. See Apply the bundle to the peers. - Return the referenced configuration file to the appropriate app directory in the configuration bundle.
- Make any changes to the configuration file that you want to distribute to peer nodes.
- Push the configuration bundle to the peers.
For more information on reload.<conf_file_name> = simple, see app.conf in the Admin Manual.
Distribute the configuration bundle
To distribute new or changed files and apps across all peers, follow these steps:
- Prepare the files and apps and test them.
- Move the files and apps into the configuration bundle on the master node.
- (Optional) Validate the bundle and check restart.
- Apply the bundle to the peers.
The master pushes the entire bundle to the peers. This overwrites the contents of the peers' current bundle.
1. Prepare the files and apps for the configuration bundle
Make the necessary edits to the files you want to distribute to the peers. It is advisable that you then test the files, along with any apps, on a standalone test indexer to confirm that they are working correctly, before distributing them to the set of peers. Try to combine all updates in a single bundle, to reduce the impact on the work of the peer nodes.
For more information on how to configure the files, see Manage common configurations across all peers and Configure the peer indexes in an indexer cluster.
If the configuration bundle subdirectories contain any indexes.conf files that define new indexes, you must explicitly set each index's repFactor attribute to auto. This is necessary for indexes.conf files that reside in app subdirectories, as well as any indexes.conf file in the _cluster subdirectory.
For more information, see The indexes.conf repFactor attribute.
2. Move the files and apps into the configuration bundle on the master node
When you are ready to distribute the files and apps, copy them to $SPLUNK_HOME/etc/master-apps/ on the master:
- Put apps directly under the
master-appsdirectory. For example,$SPLUNK_HOME/etc/master-apps/<app-name>. - Put standalone files in the
$SPLUNK_HOME/etc/master-apps/_cluster/localsubdirectory.
3. (Optional) Validate the bundle and check restart
You can validate the bundle and check whether applying the bundle will require a restart of the peer nodes, without applying the bundle. Once you confirm that the bundle is valid across all peer nodes, you can then apply it as a separate step.
Validation is useful for ensuring that the bundle will apply across all peer nodes without problems. The validation process also provides information that is useful for debugging invalid bundles.
The ability to check restart is useful for admins who want to defer bundle distribution until a period of low activity or a maintenance window, and avoid possible restart-related indexing or search interruption. See Restart or reload after configuration bundle changes?
You can validate the bundle and check restart using Splunk Web or the CLI.
Use Splunk Web to validate the bundle and check restart
Use the Validate and Check Restart button to validate the bundle and check if peer nodes will require a restart. This button performs the same function as the CLI command: splunk validate cluster-bundle --check-restart. See Use the CLI to validate the bundle and check restart.
To validate the bundle and check restart:
- On the master node, in Splunk Web, click Settings > Indexer Clustering.
The Master Node dashboard opens. - Click Edit > Configuration Bundle Actions.
- Click Validate and Check Restart > Validate and Check Restart.
A message appears that indicates bundle validation and check restart success or failure.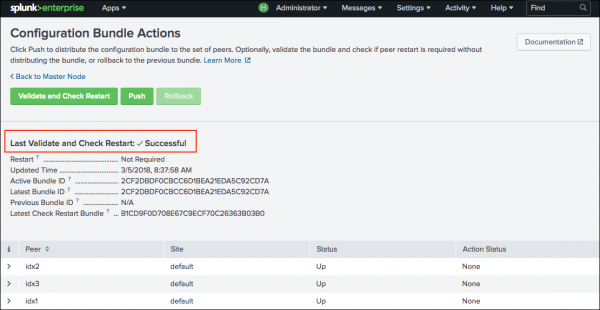
If bundle validation and check restart succeeds, then the bundle is acceptable for distribution to the peer nodes. Information about the validated bundle appears in the UI, including whether a restart of peer nodes is required. The UI also displays bundle checksums, which you can use to identify and track the active bundle, the previous bundle, and the latest check restart bundle.
You can distribute the bundle from the master to the peer nodes using either Splunk Web or the CLI. See 4. Apply the bundle.
If validation and check restart fails, then the bundle is not acceptable for distribution to the peers. In this case, review the bundle details for information that might help you troubleshoot the issue. Make sure that the configuration bundle structure is correct for distribution to peer nodes. See Structure of the configuration bundle.

Use the CLI to validate the bundle and check restart
To validate the bundle only, run splunk validate cluster-bundle:
splunk validate cluster-bundle
This command returns a message confirming that bundle validation has started. In certain failure conditions, it also indicates the cause of failure.
To validate the bundle and check whether a restart is necessary, include the --check-restart parameter:
splunk validate cluster-bundle --check-restart
This version of the command first validates the bundle. If validation succeeds, it then checks whether a peer restart is necessary.
To view the status of bundle validation, run the splunk show cluster-bundle-status command:
splunk show cluster-bundle-status
This command indicates validation success. In the case of validation failure, it provides insight into the cause of failure. It also indicates if peer restart is required.
Here is an example of the output from the splunk show cluster-bundle-status command after a successful validation:
master
	 cluster_status=None
	 active_bundle
		checksum=576F6BBB187EA6BC99CE0615B1DC151F
		timestamp=1495569737 (in localtime=Tue May 23 13:02:17 2017)
	 latest_bundle
		checksum=576F6BBB187EA6BC99CE0615B1DC151F
		timestamp=1495569737 (in localtime=Tue May 23 13:02:17 2017)
	 last_validated_bundle
		checksum=1E0C4F0A7363611774E1E65C8B3932CF
		last_validation_succeeded=1
		timestamp=1495574646 (in localtime=Tue May 23 14:24:06 2017)
         last_check_restart_bundle
                 checksum=1E0C4F0A7363611774E1E65C8B3932CF
                 last_check_restart_result=restart required
                 timestamp=1495574646 (in localtime=Tue May 23 14:24:06 2017)

Peer 1	 1D00A8C2-026B-4CAF-90D6-5D5D39445569	 default
	 active_bundle=576F6BBB187EA6BC99CE0615B1DC151F
	 latest_bundle=576F6BBB187EA6BC99CE0615B1DC151F
	 last_validated_bundle=1E0C4F0A7363611774E1E65C8B3932CF
	 last_bundle_validation_status=success
         last_bundle_checked_for_restart=1E0C4F0A7363611774E1E65C8B3932CF
         last_check_restart_result=restart required
	 restart_required_apply_bundle=0
	 status=Up
...
The last_validated_bundle identifies the newly validated bundle. Notice that it differs from the active_bundle, which identifies the bundle that was most recently applied and is currently active across the peer nodes.
The last_validation_succeeded=1 field indicates that validation succeeded.
On the master, the last_check_restart_result=restart required field indicates that a restart is required on at least one of the cluster peers.
On the peers, the last_check_restart_result=restart required field indicates that a restart of that individual peer is required.
If you validate the bundle without applying it, the contents of the $SPLUNK_HOME/etc/master-apps directory on the master will differ from the contents of the $SPLUNK_HOME/etc/slave-apps directory on the peer nodes until you do apply the bundle. This has no effect on the operation of the cluster, but it is important to be aware that the difference exists.
4. Apply the bundle to the peers
To apply the configuration bundle to the peers, you can use Splunk Web or the CLI.
You cannot initiate a configuration bundle push if a bundle push is currently in progress.
Use Splunk Web to apply the bundle
To apply the configuration bundle to the peers:
- On the master, in Splunk Web, click Settings > Indexer clustering.
The Master Node dashboard appears. - Click Edit > Configuration Bundle Actions.
The configuration bundle actions dashboard opens, showing information on the last successful bundle push.
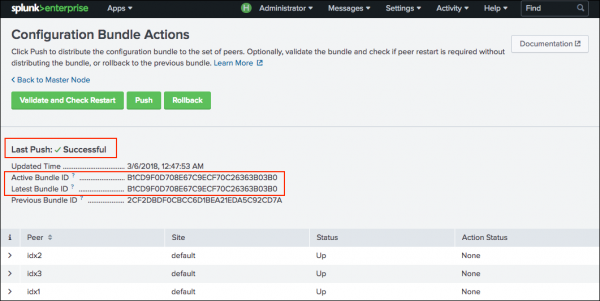
- Click Push.
A pop-up window warns you that the distribution might, under certain circumstances, initiate a restart of all peer nodes. For information on which configuration changes cause a peer restart, see Restart or reload after configuration bundle changes?. - Click Push Changes.
The screen provides information on the distribution progress. Once the distribution completes or aborts, the screen indicates the result.- In the case of a successful distribution, after each peer successfully validates the bundle, the master coordinates a rolling restart of all the peer nodes, if necessary.
- In the case of an aborted distribution, it indicates which peers could not receive the distribution. Each peer must successfully receive and apply the distribution. If any peer is unsuccessful, none of the peers will apply the bundle.
When the push is successful, the peers use the new set of configurations, now located in their local
$SPLUNK_HOME/etc/slave-apps.Leave the files in
$SPLUNK_HOME/etc/slave-apps.

For more information on the distribution process, see the following section on applying the bundle through the CLI.
Use the CLI to apply the bundle
- To apply the configuration bundle to the peers, run this CLI command on the master:
splunk apply cluster-bundle
It responds with this warning message:
Caution: Under some circumstances, this command will initiate a rolling restart
of all peers. This depends on the contents of the configuration bundle. For
details, refer to the documentation. Do you wish to continue? [y/n]:
For information on which configuration changes cause a rolling restart, see Restart or reload after configuration bundle changes?.
- To proceed, respond to the message with
y. You can avoid this message by appending the flag--answer-yesto the command:splunk apply cluster-bundle --answer-yes
The
splunk apply cluster-bundlecommand causes the master to distribute the new configuration bundle to the peers, which then individually validate the bundle. During this process, each peer validates the settings for allindexes.conffiles in the bundle. After all peers successfully validate the bundle, the master coordinates a rolling restart of all the peer nodes, if necessary.
The download and validation process usually takes just a few seconds to complete. If any peer is unable to validate the bundle, it sends a message to the master, and the master displays the error on its dashboard in Splunk Web. The process will not continue to the next phase - reloading or restarting the peers - unless all peers successfully validate the bundle.
If validation is not successful, you must fix any problems noted by the master and rerun
splunk apply cluster-bundle.
Once validation is complete, the master tells the peers to reload or, if necessary, it initiates a rolling restart of all the peers. For details on how rolling restart works, see Perform a rolling restart of an indexer cluster. To set searchable rolling restart as the default mode for rolling restarts triggered by a bundle push, see Use searchable rolling restart with configuration bundle push.
When the process is complete, the peers use the new set of configurations, located in their local$SPLUNK_HOME/etc/slave-apps.
Leave the files in
$SPLUNK_HOME/etc/slave-apps.
Once an app has been distributed to the set of peers, you launch and manage it on each peer in the usual manner, with Splunk Web. See Managing app configurations and properties in the Admin Manual.
The apply cluster-bundle command takes an optional flag, --skip-validation, for use in cases where a problem exists in the validation process. You should only use this flag under the direction of Splunk Support and after ascertaining that the bundle is valid. Do not use this flag to circumvent the validation process unless you know what you are doing.
You can also validate the bundle without applying it. This is useful for debugging some validation issues. See 3. (Optional) Validate the bundle.
Use the CLI to view the status of the bundle push
To see how the cluster bundle push is proceeding, run this command from the master:
splunk show cluster-bundle-status
This command tells you whether bundle validation succeeded or failed. It also indicates the restart status of each peer.
Restart or reload after configuration bundle changes?
Some changes to files in the configuration bundle require that the peers restart. In other cases, the peers can reload the configuration files, avoiding any interruption to indexing or searching. The bundle reload phase on the peers determines whether a restart is required and directs the master to initiate a rolling restart of the peers only if necessary.
Determine when restart or reload occurs
The following summarizes reload and restart behavior when pushing configuration changes to indexer cluster peers:
Reload occurs when:
- You make changes to any configuration file listed under the
[triggers]stanza inapp.conf, with the exception of certain changes toindexes.conf. - You make any of these changes in
indexes.conf:- Adding new index stanzas
- Enabling or disabling an index with no data
- Changing any attributes not listed as requiring restart in Determine which indexes.conf changes require restart.
- A
server.conffile contains only theconf_replication_include <conf_file_name> = trueattribute under theshclusteringstanza and the file contains no other attributes.
Restart occurs when:
- You make changes to any configuration file not listed in the
[triggers]stanza inapp.conf. This includes custom configuration files, such as those found in apps and add-ons, for exampleSplunk_TA_aws, and any other configuration files in Splunk Enterprise that do not have an explicit reload trigger setting inapp.conf. - You make any of the changes to
indexes.confdescribed in Determine which indexes.conf changes require restart. - You make any changes to a
server.conffile that contains attributes other thanconf_replication_include <conf_file_name> = true. - You delete an existing app from the configuration bundle.
For more information, see When to restart Splunk Enterprise after a configuration file change in the Admin Manual.
Configuration file reload considerations
Splunk apps can contain a combination of Splunk Enterprise core configuration files and custom configuration files, such as those created by app developers for private apps and public apps on Splunkbase.
Most Splunk Enterprise core configuration files reload by default when configuration changes occur, with a few exceptions outlined in the preceding section on this page. These files have a reload trigger setting in app.conf that specifies the appropriate reload handler for the file.
Custom configuration files do not reload by default and require a restart when configuration changes occur. A custom configuration file is by definition any configuration file that does not have a corresponding .spec file in $SPLUNK_HOME/etc/system/README. This includes custom configuration files found in third party apps, for example aws_settings.conf, service_now.conf, eventgen.conf, and so on.
If you want to avoid restarts when pushing changes to custom configuration files and Splunk Enterprise configuration files that do not have a reload trigger setting in app.conf, you can add a reload.<conf_file_name> setting specifying the file name and an appropriate reload handler under the [triggers] stanza in the app's app.conf file.
For detailed information on configuring reload triggers for configuration files, see app.conf in the Admin Manual.
Use searchable rolling restart with configuration bundle push
Searchable rolling restart lets you perform a rolling restart of peer nodes with minimal interruption of in-progress searches. You can set searchable rolling restart in server.conf as the default mode for all rolling restarts triggered by a configuration bundle push. For instructions, see Set searchable rolling restart as default mode for bundle push.
For more information, see Perform a rolling restart of an indexer cluster.
Rollback the configuration bundle
You can rollback the configuration bundle to the previous version. This action allows you to recover from a misconfigured bundle.
The rollback action toggles the most recently applied configuration bundle on the peers with the previously applied bundle. You cannot rollback beyond the previous bundle.
For example, say that the peers have an active configuration bundle "A" and you apply a configuration bundle "B", which then becomes the new active bundle. If you discover problems with B, you can rollback to bundle A, and the peers will then use A as their active bundle. If you rollback a second time, the peers will return again to bundle B . If you rollback a third time, the bundles will return again to A, and so on. The rollback action always toggles the two most recent bundles.
You can rollback the configuration bundle using Splunk Web or the CLI.
Rollback the configuration bundle using Splunk Web
- On the master, in Splunk Web, click Settings > Indexer Clustering.
The Master Node dashboard opens. - Click Edit > Configuration Bundle Actions.
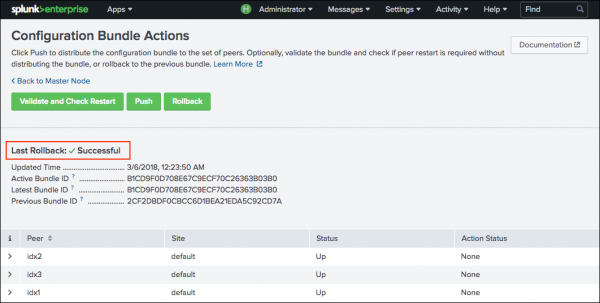
- Click Rollback.
A message appears that indicates rollback success or failure.
If no previous configuration bundles exists, the Rollback button will be disabled.

Rollback the configuration bundle using the CLI
To rollback the configuration bundle, run this command from the cluster manager:
splunk rollback cluster-bundle
As with splunk apply cluster-bundle, this command initiates a rolling restart of the peer nodes, when necessary.
You can use the splunk show cluster-bundle-status command to determine the current active bundle. You can use the cluster/master/info endpoint to get information about the current active and previous active bundles.
If the master-apps folder gets corrupted, resulting in rollback failure, a message specifying the failure and the workaround appears on the master node dashboard, as well as in splunkd.log. To remediate, follow the instructions in the message. This includes removing the $SPLUNK_HOME/etc/master-apps.dirty marker file, which indicates failure, and manually copying over the active bundle, as specified in the message.
On Windows, the rollback operation fails if there are open file handles to $SPLUNK_HOME/etc/master-apps and its contents.
Distribution of the bundle when a peer starts up
After you initially configure a Splunk instance as a peer node, you must restart it manually in order for it to join the cluster, as described in Enable the peer nodes. During this restart, the peer connects with the master, downloads the current configuration bundle, validates the bundle locally, and then restarts again. The peer only joins the cluster if bundle validation succeeds. This same process also occurs when an offline peer comes back online.
If validation fails, the user must fix the errors and run splunk apply cluster-bundle from the master.
Use deployment server to distribute the apps to the master
Although you cannot use deployment server to directly distribute apps to the peers, you can use it to distribute apps to the master node's configuration bundle location. Once the apps are in that location, the master can distribute them to the peer nodes, using the configuration bundle method described in this topic.
In addition to the deployment server, you can also use third party distributed configuration management software, such as Puppet or Chef, to distribute apps to the master.
To use the deployment server to distribute files to the configuration bundle on the master:
- Configure the master as a client of the deployment server, as described in Configure deployment clients in Updating Splunk Enterprise Instances.
- On the master, edit deploymentclient.conf and set the
repositoryLocationattribute to themaster-appslocation:[deployment-client] serverRepositoryLocationPolicy = rejectAlways repositoryLocation = $SPLUNK_HOME/etc/master-apps
- On the deployment server, create and populate one or more deployment apps for download to the master's configuration bundle. Make sure that the apps follow the structural requirements for the configuration bundle, as outlined earlier in this topic. For information on creating deployment apps, see Create deployment apps in Updating Splunk Enterprise Instances .
- Create one or more server classes that map the master to the deployment apps. For information on creating server classes, see Create server classes in Updating Splunk Enterprise Instances.
- Each server class must include the
stateOnClient = noopsetting:[serverClass:<serverClassName>] stateOnClient = noop
Do not override this setting at the app stanza level.
- Download the apps to the master node.
Once the master receives the new or updated deployment apps in the configuration bundle, you can distribute the bundle to the peers, using the method described in the current topic.
Take steps to ensure that the master does not restart automatically after receiving the deployment apps. Specifically, when defining deployment app behavior, do not change the value of the
restartSplunkdsetting from its default offalseinserverclass.conf. If you are using forwarder management to define your server classes, make sure that the "Restart splunkd" field on the Edit App screen is not checked.
For detailed information on the deployment server and how to perform necessary operations, read the Updating Splunk Enterprise Instances manual.
This documentation applies to the following versions of Splunk® Enterprise: 8.0.1, 8.0.2, 8.0.3, 8.0.4, 8.0.5, 8.0.6, 8.0.7, 8.0.8, 8.0.9, 8.0.10
Feedback submitted, thanks!