You can share a search job with other Splunk users, or export the event data to archive or to use with a third-party charting application.
Your Splunk administrator controls how searches are shared. See Change how a search is shared.
- By default, sharing a search job is turned on. You can share a job with other Splunk users by sending them a link to the job.
- If your Splunk administrator has turned off search job sharing, you can share the actual search instead.
When you share a job, you are sharing the results of a specific run of a search.
There are several ways that you can share a specific job with other Splunk platform users. You can change the permissions for a search job to share that job with other users. You can also share a job by sending the URL for a search job to another Splunk platform user.
You can only change permissions or share a link to the current job.
Change job permissions
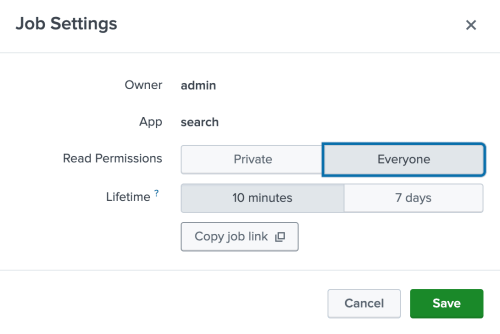
You can share a job by changing the permissions on that job. By default, all jobs are private and have a lifetime of 10 minutes.
- From the Job menu, select Edit Job Settings to display the Job Settings dialog box.
If the Edit Job Settings option is turned off, sharing a job has been turned off by the Splunk administrator. However, you can share the search itself. See Share a search. - Change Read Permissions to Everyone.
- Select Save
The following image shows the menu selections required to change job permissions:
You can share a search job with other Splunk users by sending them a link to the job. This is helpful when you want another user to see the results returned by the job.
The users that you send the link to must have permissions to use the app that the job originated from.
There are two methods you can use to obtain a job link. You can use the Share icon or the Job menu.
You can share a search job by using the Share icon:
- Select the Share icon, which is one of the search action icons.
- Select Copy job link to copy the URL.
- Send the link to the users that you want to share the job results with.
![]()
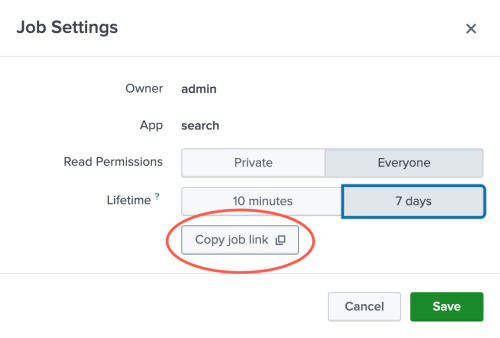
When you share a search job, the job lifetime and permissions are automatically extended. The job lifetime is extended to 7 days and that the read permissions is changed to Everyone. There is a link to manage the job in the Job Settings window. There is also a button to copy the link to the search job.
You can share a search job by using the Job menu:
- Select Edit Job Settings to display the Job Settings dialog box.
If the Edit Job Settings option is turned off, sharing a job has been turned off by the Splunk administrator. However, you can share the search itself. See Share a search. - Change Read Permissions to Everyone. If the permissions for a job are set to Private, other users cannot access the job with the link.
- Change Lifetime to 7 days.
- Select Copy job link to copy the URL.
- Send the link to the users that you want to share the job results with.
Your Splunk administrator controls how searches are shared. If your Splunk administrator has turned off search job sharing, you can share the actual search instead.
The link you share copies the search into the Search bar in the Search app. If the user that you share the link with has the proper permissions, such as access to the index and source and the role they are assigned, they can run the search personally.
- Select the Share icon, which is one of the search action icons.
- In the Share Job dialog box, select Copy search query link to copy the URL.
- Send the link to the users that you want to share the search with.
Export job results to a file
You can export your job results in a variety of formats such as CSV, JSON, PDF, Raw Events, and XML. You can then archive the file, or use the file with a third-party charting application. The format options depend on the type of job artifact that you are working with.
- If the search generates calculated data that appears on the Statistics tab, you cannot export using the Raw Events format.
- If the search is a saved search, such as a report, you can export using the PDF format.
The export file is saved in the default download directory for your browser or operating system.
There are several methods that you can use to export search results. A few of these methods include Splunk Web, CLI, SDKs, and REST. Some of the methods are optimized for speed, while others are good for extremely large event sets.
For a complete list of the export methods and links to the specific steps, see Export search results.
By default, a user can share a search job with other users. However, a Splunk administrator can turn off job sharing, which turns on the ability to share the actual search itself.
- Splunk Cloud Platform
- To change the setting for job sharing, request help from Splunk Support. If you have a support contract, file a new case using the Splunk Support Portal at Support and Services. Otherwise, contact Splunk Customer Support.
- Splunk Enterprise
- Prerequisites
- Have the permissions to change the default job sharing setting. Only users with file system access, such as system administrators, can change the job sharing default using configuration files.
- Know how to edit configuration files. Review the steps in How to edit a configuration file in the Splunk Enterprise Admin Manual.
- Decide which directory to store configuration file changes in. You can have configuration files with the same name in your default, local, and app directories. Read Where you can place (or find) your modified configuration files in the Splunk Enterprise Admin Manual.
Never change or copy the configuration files in the default directory. The files in the default directory must remain intact and in their original location. Make changes to the files in the local directory.
- Steps
- Open or create a local web-features.conf file at $SPLUNK_HOME/etc/system/local.
- Under the
[feature:share_job]stanza, setenable_share_job_controltofalse. Changing this setting tofalseturns off sharing a link to a search job and turns on sharing a link to the actual search itself. - Restart your Splunk platform instance.
| Extending job lifetimes | Manage search jobs |
This documentation applies to the following versions of Splunk® Enterprise: 9.1.0, 9.1.1, 9.1.2, 9.1.3, 9.1.4, 9.1.5, 9.1.6, 9.1.7, 9.2.0, 9.2.1, 9.2.2, 9.2.3, 9.2.4, 9.3.0, 9.3.1, 9.3.2, 9.4.0


 Download manual
Feedback submitted, thanks!