Extract fields and assign tags
Extract fields
Field extractions are important for data normalization and advanced reporting. Normalization requires that the fields be properly extracted so that the name or value can be looked up and replaced with a standardized value. Additionally, advanced reporting requires that the fields be normalized for display in charts, tables, and graphs.
Note: The _time, host, source, and sourcetype fields are inherent in all objects that have been indexed by Splunk. You do not need to do any field extractions for these fields to be present in your data.
How to create field extractions
Information about field extraction is contained in several different files. Follow these steps to create a new field extraction.
To create a field extraction:
1. Analyze the logs to import and determine how the events are formatted (do they contain name/value pairs, are they separated by commas, and so on).
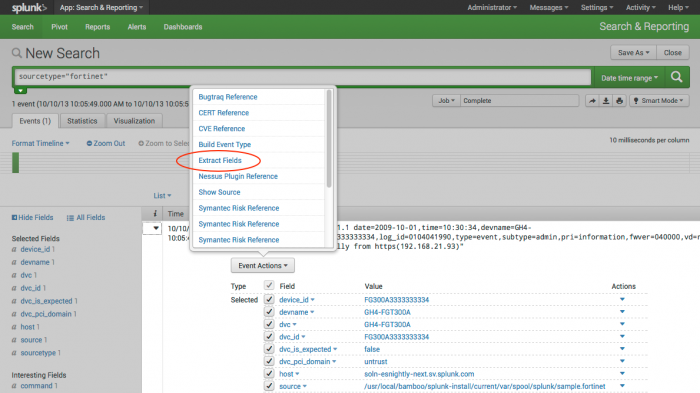
2. Create regular expressions that can extract the data (these regular expressions will be used in the next step). Search for your source type and then select "Extract fields" from an event.
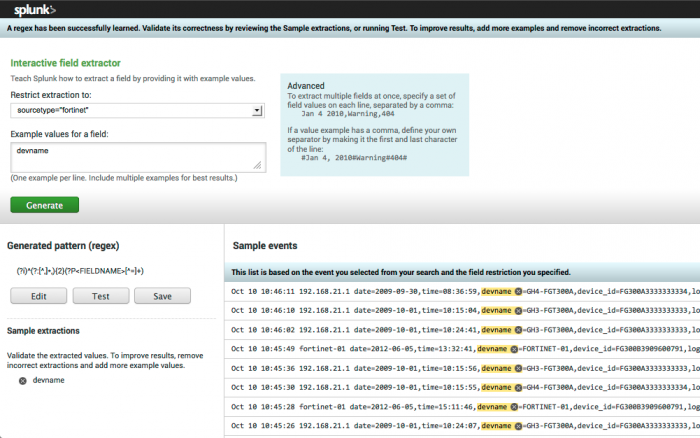
Use the interactive field extractor tool to create the regular expressions (regex) for your fields.
Note: The data source may require parsing which is beyond the capabilities of IFX to complete, in which case the data and the partially correct regular expression can be copied into an external tool for further editing.
When the completed regular expression correctly matches the samples for this field, click Save and enter the name of the field.
Repeat this process for each of the fields needed to use the new data. These extractions are saved in $SPLUNK_HOME/etc/users/$USERNAME$/$APPNAME$/local/props.conf. For instance, if this work is done as admin in the Search app, the path will be $SPLUNK_HOME/etc/users/admin/search/local/props.conf.
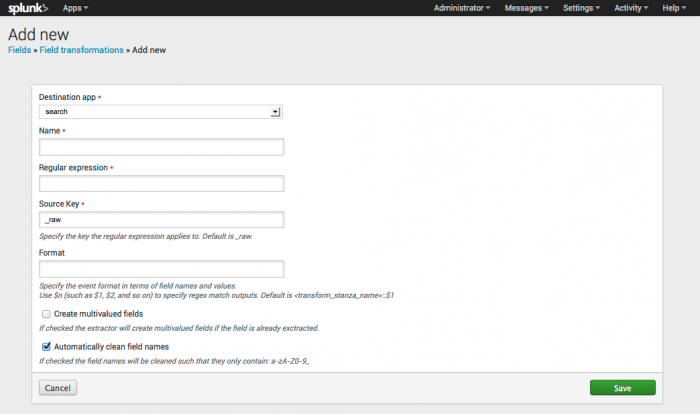
3. Create field transformations (using the regular expression created in the previous step) to extract the data. Field transformations can be created using the field transformation editor in Splunk (Settings > Fields > Field transformations > Add New).
Add the information (including the regex you created) for using the field with your app. Click Save. You can also create field transformations by directly editing the transforms.conf file under the respective application (for example, $SPLUNK_HOME$/etc/apps/TA-nessus/local/transforms.conf).
4. Create the field extraction in order to apply the transformation to the data. Field extractions can be created using the extraction editor in Splunk (Settings > Fields > Field extractions > Add New).
You can also create field extractions by creating REPORT statements in the props.conf file. See "Extract fields interactively with IFX" and "Create and maintain search-time field extractions through configuration files" in the core Splunk documentation for more information.
5. Review the data model information in this manual and determine what fields are necessary for the type of data you want to import.
6. Identify the locations of equivalent fields in the data to import. Make sure that the fields you are going to use for the lookup are properly extracted. For example, it may be necessary to extract the field "action=Deny" as "orig_action=Deny" and then perform a list lookup to create a new field "action" with the normalized field (such as "action=blocked").
7. Create the CSV lookup file that maps the original value to the value necessary per the Common Information Model. Upload the lookup from Settings > Lookups > Lookup table Files > Add new in Splunk Home or by uploading to the relevant application directory directly on the file system (for example, $SPLUNK_HOME$/etc/apps/TA-acme/lookups/actions.csv).
8. Create the lookup table definition using the configuration panel Settings > Lookups > Lookup definitions > Add New or by editing transforms.conf.
9. Create lookup statements using the configuration panel (Home > App Configuration > Lists and Lookups > Add New) or by editing props.conf.
This is the structure of the lookup statement:
Note: The OUTPUTNEW will cause the lookup to be applied only if none of the output fields exist already; use OUTPUT to overwrite existing values. Additional details about the LOOKUP operation can be found in the Splunk "props conf example" documentation.
For more about how to create field extractions, see "Create field extractions" in the Data Source Integration Manual. See "Add fields from external data sources" in the core Splunk product documentation for more information about adding fields.
Assign tags
Tags are used to differentiate the results of events created by a device that is logging into Splunk. For instance, if is a firewall, it may have a tag of "authentication" which normalizes "_authentication". Tags are used by Splunk to categorize information and specify the dashboards in which the information appears.
Tags categorize events so you can search for all related events regardless of source. For example, web-applications, VPN servers, and email servers all have authentication events yet the authentication events for each type of device are considerably different. Tagging all of the authentication related events appropriately makes them much easier to find and allows correlation searches to use the events automatically.
How to create tags
Tags are defined using tags.conf and eventtypes.conf (for example, $SPLUNK_HOME$/etc/apps/TA-nessus/default/tags.conf and $SPLUNK_HOME$/etc/apps/TA-nessus/default/eventtypes.conf respectively). The event types are used to identify the type of event and the tags in tags.conf key off of the event type to assign the tag.
To create new tags:
1. Determine what tags are necessary for your data. Refer to the data models that use similar domain data to choose what tags from the Common Information Model are needed.
2. Create the appropriate event types using the Event types manager in Splunk Enterprise (Settings > Event types) and cloning a similar event type to the one you want. You can also edit the eventtypes.conf file directly.
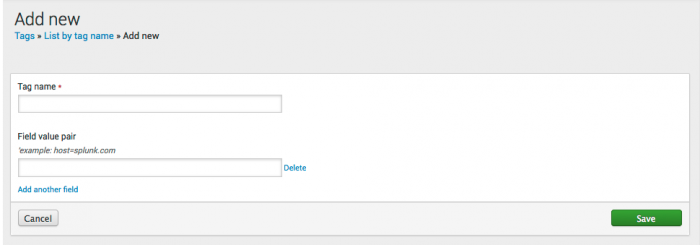
3. Create the appropriate tags in the Tags in Splunk Enterprise (Settings > Tags > List by tag name > Add New). You can also edit the tags.conf file directly.
Repeat this process for each of the tags needed to use the new data. These tag modifications are also saved in $SPLUNK_HOME/etc/users/$USERNAME$/$APPNAME$/local/eventtypes.conf.
For more information about how to create tags, see "Create tags (if necessary)" in the Data Source Integration Manual.
| Normalize data | How do I know if I'm using CIM correctly? |
This documentation applies to the following versions of Splunk® Common Information Model Add-on: 3.0, 3.0.1, 3.0.2


 Download manual
Feedback submitted, thanks!