Migrate from the Splunk App for AWS to the Content Pack for Amazon Web Services Dashboards and Reports
The Content Pack for Amazon Web Services Dashboards and Reports replicates the dashboards and reports available in the Splunk App for AWS. Migrate from the legacy app to the content pack to take advantage of a consolidated experience within one app, either ITSI or IT Essentials Work. In addition, you can upgrade all content packs by upgrading the one app, the Splunk App for Content Packs.
On July 15, 2022, the Splunk App for AWS reached its end of life. Splunk no longer maintains or develops this product. The functionality in this app migrated to the Content Pack for Amazon Web Services Dashboards and Reports.
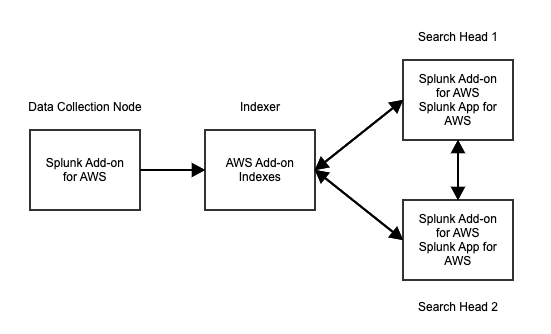
If you are currently using the Splunk App for AWS, your deployment might look like the following image:
| Product | Data collection node (forwarder) | Indexer | Search head |
|---|---|---|---|
| Splunk Add-on for AWS | ✓ | ✓ | ✓ |
| Splunk App for AWS | ✓ |
To review dashboards included with the Content Pack for Amazon Web Services Dashboards and Reports before you migrate, see Dashboard reference for the Content Pack for Amazon Web Services Dashboards and Reports.
Migration steps for cloud environments
For Migration on Cloud, file a ticket on the Splunk Support Portal, see Support and Services. Splunk Cloud TechOps will provide assistance for the migration from Splunk App for AWS to Content Pack for Amazon Web Services Dashboards and Reports.
Migration steps for on-premises standalone or distributed environments
If you're using an on-prem environment, you can perform the migration from the Splunk App for AWS to the Content Pack for Amazon Web Services Dashboards and Reports yourself.
Before migration
Before migrating to Content Pack for AWS Dashboards and Reports, make sure to follow the steps below in order to make a backup of your custom configurations and lookups.
- Make a backup of the following directories in the splunk_app_aws package present in the
$SPLUNK_HOME/etc/appson each search head: /localdirectory which contains all the local configurations of the conf files/lookupsdirectory which contains the CSV lookups/metadata/local.metawhich contains the updated permissions for the Knowledge Objects.- Make a backup of the KV Store lookups present in the app.
- Identify the KV Store captain from different search heads. (Perform this step if the you are using a Search Head Cluster environment). For Single Search Head deployment, the only search head will be KV store captain:
$SPLUNK_HOME/bin/splunk show kvstore-status - Login to the KVStore Captain search head and run the following command.
$SPLUNK_HOME/bin/splunk backup kvstore -archiveName splunk_app_aws_kvstore_backup -appName splunk_app_aws - Identify the latest backup in
$SPLUNK_HOME/var/lib/splunk/kvstorebackupand copy thesplunk_app_aws_kvstore_backup.tar.gzbackup file to $SPLUNK_HOME/tmp. This archive file is required to restore the App KV Store lookup data during migration.
Migrate from Splunk App for AWS to Content Pack for AWS Dashboards and Reports
Follow the steps below to migrate from Splunk App for AWS to Content Pack for AWS Dashboards and Reports. Only perform this migration procedure after you've completed the prerequisites in the Before migration sub-section to back up your existing lookups and custom configurations.
- Perform the following steps on each search head present in your deployment to disable the Splunk App for AWS
- Create an app.conf file in your local directory if it is not present, then navigate to
{SPLUNK_HOME}/etc/apps/splunk_app_aws/local/app.confand edit the "state" property of "install" stanza as shown below:
[install]
state = disabled
- Restart the instance:
$SPLUNK_HOME/bin/splunk restart - Install IT Service Intelligence (ITSI) or IT Essentials Work on the same search head with AWS data according to your type of deployment. Refer to these topics in the Splunk IT Service Intelligence Install and Upgrade Manual:
- Install Splunk IT Service Intelligence on a single instance
- Install Splunk IT Service intelligence in a distributed environment
- Install IT Service Intelligence in a search head cluster environment
- Install IT Essentials Work
- Install the Splunk App for Content Packs according to your type of deployment:
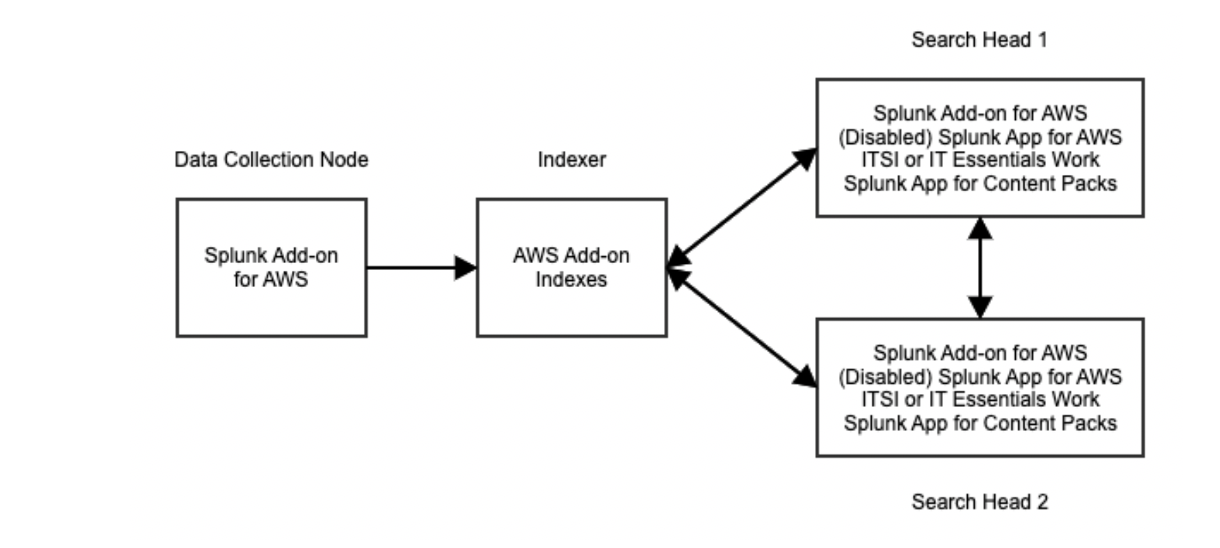
After following the previous steps, the deployment looks like the following image:
| Product | Data collection node (forwarder) | Indexer | Search head |
|---|---|---|---|
| Splunk Add-on for AWS | ✓ | ✓ | ✓ |
| Splunk App for AWS | Disabled | ||
| ITSI or IT Essentials Work | ✓ | ||
| Splunk App for Content Packs | ✓ |
After migration
After migration, perform the following procedure:
- Restore the backup of the KV Store lookup.
- Identify the KV Store captain from different Search Heads. (Perform this step if the you are using Search Head Cluster environment). For Single Search Head Deployment, the only search head will be KV store captain:
$SPLUNK_HOME/bin/splunk show kvstore-status - If the KV Store captain has changed, then move the KV Store backup file from old KV Store Captain to current KV Store Captain. Run the following command on the search head where KVStore backup was taken as part of the "Before migration" sub-section (Perform this step if the you are using Search Head Cluster environment):
scp /path_of_splunk_app_aws_kvstore_backup.tar.gz {SPLUNK_USER}@{$search_head_ip}:/{SPLUNK_HOME}/tmp - Login to KV Store Search Head captain instance and update the owner of the backup tar file:
chown splunk:splunk $SPLUNK_HOME/tmp/splunk_app_aws_kvstore_backup.tar.gz - On your current KV Store captain, untar the backup tar file.
tar -xzvf $SPLUNK_HOME/tmp/splunk_app_aws_kvstore_backup.tar.gz - Rename the folder:
mv $SPLUNK_HOME/tmp/splunk_app_aws $SPLUNK_HOME/tmp/DA-ITSI-CP-aws-dashboards - Tar the upgraded folder name:
tar -czf $SPLUNK_HOME/tmp/DA-ITSI-CP-aws-dashboards_kvstore_backup.tar.gz DA-ITSI-CP-aws-dashboards - Move the
$SPLUNK_HOME/tmp/DA-ITSI-CP-aws-dashboards_kvstore_backup.tar.gzfile in$SPLUNK_HOME/var/lib/splunk/kvstorebackup. - Restore the backup:
splunk restore kvstore -archiveName DA-ITSI-CP-aws-dashboards_kvstore_backup.tar.gz -appName DA-ITSI-CP-aws-dashboards - Perform the following steps on each search head present in your deployment:
- Move the following directories from the App package to the DA-ITSI-CP-aws-dashboards folder that was backed up before you started migration:
/localdirectory collected from the app which contains all the local configurations of the app/lookupsdirectory/metadata/local.metadirectory- Remove the
app.conffile from local directory. - Restart the instance:
$SPLUNK_HOME/bin/splunk restart
Install and configure the content pack
You can now install the content pack and make configurations:
- Make sure that the AWS data collected using the Splunk Add-on for AWS is searchable from the search head where you installed the Splunk App for Content Packs.
- Install and configure the Content Pack for Amazon Web Services Dashboards and Reports.
Access the dashboards in the content pack
You can now access the dashboards from the content pack:
- Log into your Splunk platform instance and open ITSI or IT Essentials Work.
- Go to Dashboards on the main navigation bar and choose Dashboards from the drop-down menu.
- From the list of dashboards, those with the suffix - AWS are from the Content Pack for Amazon Web Services Dashboards and Reports. Select the dashboard title to open the dashboard.
Configure the Content Pack for Amazon Web Services Dashboards and Reports in a new environment
The second option for migrating from the Splunk App for AWS to the Content Pack for Amazon Web Services Dashboards and Reports is to configure the content pack in a new environment.
To configure the content pack in a new environment, create a test environment and perform these steps to set up the Content Pack for Amazon Web Services Dashboards and Reports:
- After installing the Splunk App for Content Packs, install the content pack in your test environment.
- Once you complete testing the content pack in your test environment, install the content pack in your production environment.
To learn how to install the content pack, see Install and configure the Content Pack for Amazon Web Services Dashboards and Reports.
| Install and configure the Content Pack for Amazon Web Services Dashboards and Reports | Use the Content Pack for Amazon Web Services Dashboards and Reports |
This documentation applies to the following versions of Content Pack for Amazon Web Services Dashboards and Reports: 1.2.2, 1.3.0


 Download manual
Feedback submitted, thanks!