Onboarding for Azure data in Data Manager
Data Manager helps you set up hundreds of Azure accounts for data ingestion into your Splunk Cloud platform deployment.
Stages of onboarding
The onboarding steps are described in detail within Data Manager. The details are not duplicated here.
Onboard Microsoft Entra ID accounts
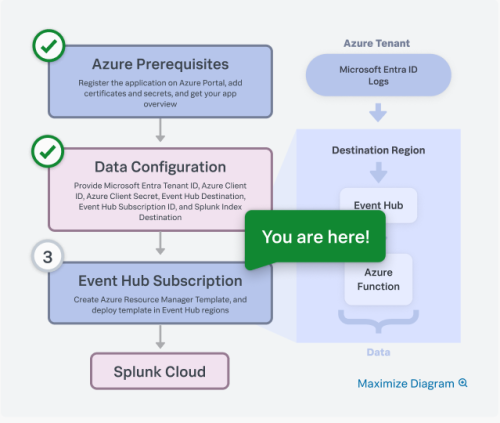
Onboarding a Microsoft Entra ID account consists of the following stages:
- Azure Admin completes the setup prerequisites by creating an application on the Azure portal.
- Configure the Data sources, Tenant ID, Client ID, Client Secret, Event Hub subscription ID, Event Hub region, and Destination.
- Deploy the Azure Resource Manager (ARM) Template on your Event Hub subscription.
- Click Review Data Input to navigate to the Data Management home page and see your data input.
Onboard Azure Activity Log accounts
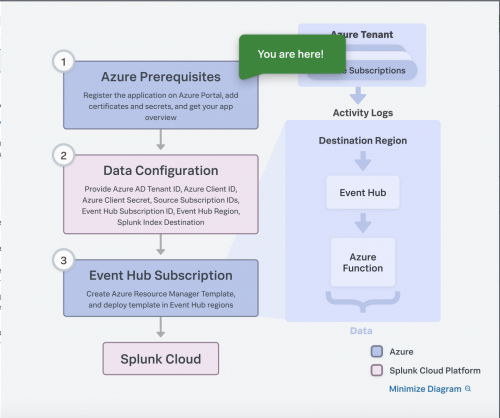
Onboarding an Azure Activity Log account consists of the following stages:
- Azure Admin completes the setup prerequisites by creating an application on the Azure portal.
- Configure the Data sources, Tenant ID,Client ID, Client Secret, Source Subscription IDs, Event Hub Subscription ID, Event Hub Region, and Splunk Index Destination.
- Deploy the Azure Resource Manager (ARM) Template on your Event Hub subscription.
- Click Review Data Input to navigate to the Data Management home page and see your data input.
Onboard Azure Event Hubs
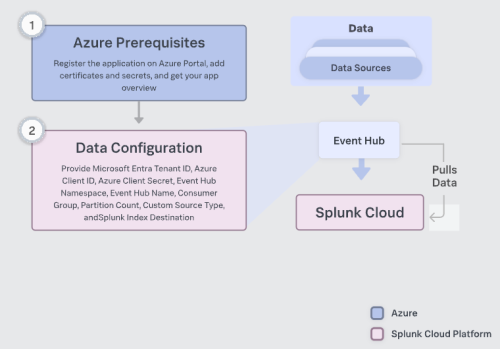
Onboarding an Azure Event Hub consists of the following stages:
- Azure Admin completes the setup prerequisites by creating an application on the Azure portal.
- Configure the Data sources, Tenant ID, Client ID, Client Secret, Event Hub Namespace, Event Hub Name, Consumer Group, Partition Count, Custom Source Type, and Splunk Index Destination.
- To view the validation status of the data input information, click Review Data Input.
- After the validation completes, in the Review Data Input Page, click Finish Setup and Monitor Configuration.
| Azure prerequisites for Data Manager | About Azure Resource Manager templates |
This documentation applies to the following versions of Data Manager: 1.12.0, 1.12.1, 1.12.2


 Download manual
Feedback submitted, thanks!