Onboarding for Azure data in Data Manager
Data Manager helps you set up hundreds of Azure accounts for data ingestion into Splunk Cloud within a matter of 25 to 30 minutes.
Logging in and getting started with Data Manager
Complete the following steps to get started:
- Log into Splunk Cloud using Splunk-provided credentials.
- Save the email that contains the credentials. It contains a Forgot Password link, in case you need to reset your password.
- Change your password at the prompt.
- Sign the terms and conditions.
- Start onboarding or take the product tour.
Data Manager walks you through adding existing data sources so that you can monitor and investigate any alerts that impact the security state of your environment. It also helps you to see which services you are ingesting, but not yet using, so that you can expand your security coverage.
If you are using Splunk Security Analytics for AWS, after the data is in, you can see Work With Your Data and Use Case topics for details about available dashboards regarding data breach, misconfiguration, insufficient identity, insider threats, user and authentication activity, and risk based alerting.
Stages of onboarding
The onboarding steps are described in detail within Data Manager. The details are not duplicated here.
Onboard Azure Active Directory accounts
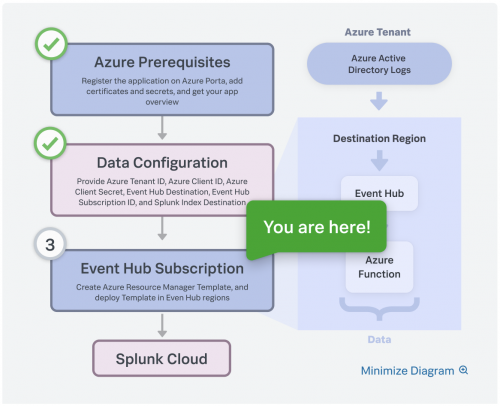
Onboarding an Azure Active Directory account consists of the following stages:
- Azure Admin completes the setup prerequisites by creating an application on the Azure portal.
- Configure the Data sources, Tenant ID, Client ID, Client Secret, Event Hub subscription ID, Event Hub region, and Destination.
- Deploy the Azure Resource Manager (ARM) Template on your Event Hub subscription.
- Click Review Data Input to navigate to the Data Management home page and see your data input.
Onboard Azure Activity Log accounts
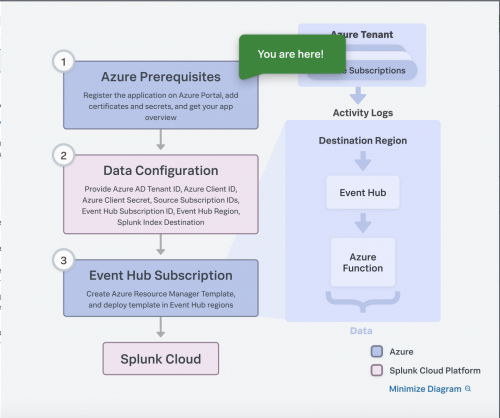
Onboarding an Azure Activity Log account consists of the following stages:
- Azure Admin completes the setup prerequisites by creating an application on the Azure portal.
- Configure the Data sources, Tenant ID,Client ID, Client Secret, Source Subscription IDs, Event Hub Subscription ID, Event Hub Region, and Splunk Index Destination.
- Deploy the Azure Resource Manager (ARM) Template on your Event Hub subscription.
- Click Review Data Input to navigate to the Data Management home page and see your data input.
| Azure prerequisites for Data Manager | Verify the data input for Azure in Data Manager |
This documentation applies to the following versions of Data Manager: 1.6.0


 Download manual
Feedback submitted, thanks!