Part 3: Create the correlation search in guided mode
After you define the title, app context, and description of the search, it is time to build it. The best way to build a correlation search with syntax that parses and works as expected is to use guided search creation mode.
Open the guided search creation wizard
- From the correlation search editor, click Guided for the Mode setting.
- Click Continue to open the guided search editor.
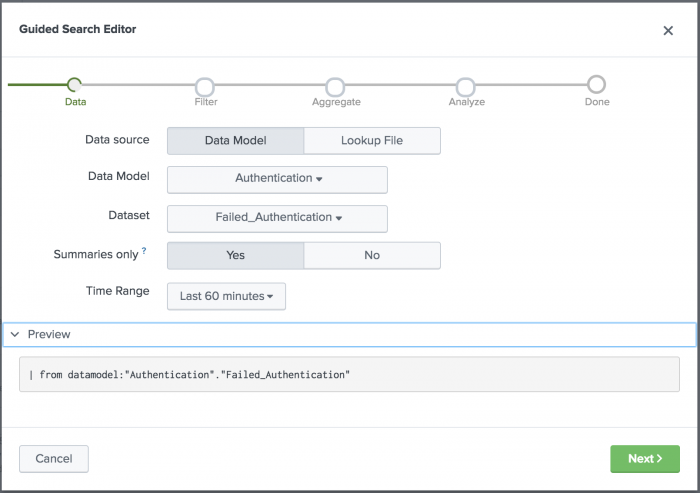
Select the data source for the search
Start your correlation search by choosing a data source.
- For the Data source field, select the source for your data.
- Select Data Model if your data is stored in a data model. The data model defines which objects, or datasets, the correlation search can use as a data source.
- Select Lookup File if your data is stored in a lookup. If you select a lookup file for the Source, then you need to select a lookup file by name.
- In the Data model list, select the data model that contains the security-relevant data for your search. Select the Authentication data model because it contains login-relevant data.
- In the Dataset list, select the Failed_Authentication dataset. The Excessive Failed Logins search is looking for failed logins, and that information is stored in this data model dataset.
- For the Summaries only field, click Yes to restrict the search to accelerated data only.
- Select a Time range of events for the correlation search to scan for excessive failed logins. Select a preset relative time range of Last 60 minutes. The time range depends on the security use case for the search. Excessive failed logins are more of a security issue if they occur during a one hour time span, whereas one hour might not be a long enough time span to catch other security incidents.
- Click Preview to review the first portion of the search.

- Click Next to continue building the search.
Filter the data with a where clause
Filter the data that the correlation search examines for a match using a where clause. The search applies the filter before applying statistics.
The Excessive Failed Logins search by default does not include any where clause filters, but you can add one if you want to focus on failed logins for specific hosts, users, or authentication types.
The search preview shows you if the correlation search string can be parsed. The search string appends filter commands as you type them, letting you see if the filter command is a valid where clause. You can run the search to see if it returns the results that you expect. If the where clause filters on a data model dataset such as Authentication.dest, enclose the data model dataset with single quotes. For example, a where clause that excludes authentication events where the destination is local host would look as follows: | where 'Authentication.dest'!="127.0.0.1".
Analyze your data with statistical aggregates
Analyze your data with statistical aggregates. Each aggregate is a function that applies to a specific attribute in a data model or field in a lookup file. Use the aggregates to identify the statistics that are relevant to your use case.
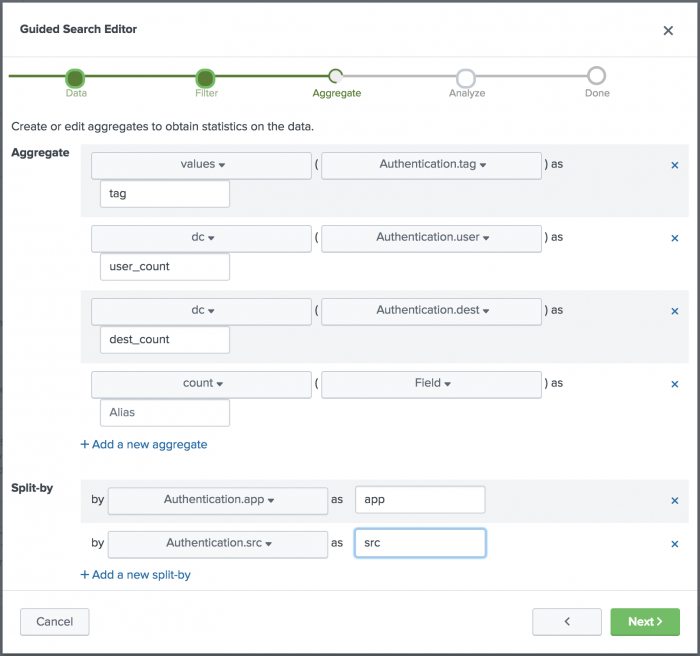
For example, the Excessive Failed Logins correlation search uses four statistical aggregate functions to surface the important data points needed to define alerting thresholds. For this search, the aggregates identify the following:
- Tags associated with the authentication attempts.
- Number of users involved.
- Number of destinations involved.
- Total count of attempts.
To replicate this search, create the aggregates.
Create the tags aggregate
Identify the successes and failures in authentication attempts with tags.
- Click Add a new aggregate.
- Select the values function from the Function list.
- Select Authentication.tag from the Field list.
- Type
tagin the Alias field.
This aggregate retrieves all the values for the Authentication.tag dataset.
Create the user count aggregate
Identify the number of distinct users involved.
- Click Add a new aggregate.
- Select the dc function from the Function list.
- Select Authentication.user from the Field list.
- Type
user_countin the Alias field.
This aggregate retrieves a distinct count of users.
Create the destination count aggregate
Identify the number of distinct destinations involved.
- Click Add a new aggregate.
- Select the dc function from the Function list.
- Select Authentication.dest from the Field list.
- Type
dest_countin the Alias field.
This aggregate retrieves a distinct count of devices that are the destination of authentication activities.
Create a total count aggregate
Identify the overall count.
- Click Add a new aggregate.
- Select the count function from the Function list.
- Leave the attribute and alias fields empty.
This aggregate identifies the total count for statistical analysis.
Fields to split by
Identify the fields that you want to split the aggregate results by. Split-by fields define the fields that you want to group the aggregate results by. For example, you care more about excessive failed logins if the users were logging into the same application and from the same source. In order to get more specific notable events and to avoid over-alerting, define split-by fields for the aggregate search results.
Split the aggregates by application.
- Click Add a new split-by.
- From the Fields list, select Authentication.app.
- Type
appin the Alias field.
Split the aggregates by source.
- Click Add a new split-by.
- From the Fields list, select Authentication.src.
- Type
srcin the Alias field.
Click Next to define the correlation search match criteria.
You can find information on split-by fields in the Splunk platform documentation.
- For Splunk Enterprise, see Optional arguments in the Splunk Enterprise Search Reference.
- For Splunk Cloud Platform, see Optional arguments in the Splunk Cloud Platform Search Reference.
Define the correlation search match criteria for analysis
Identify the criteria that define a match for the correlation search. The correlation search performs an action when the search results match predefined conditions. Define the statistical function to use to look for a match.
For Excessive Failed Logins, when a specific user has six or more failed logins from the same source and attempting to log in to the same application, the correlation search identifies a match and takes action.
- In the Field list, select the function count. The Field list is populated by the attributes used in the aggregates and with the fields used in the split-by.
- In the Comparator list, select Greater than or equal to.
- In the Value field, type 6.
- Click Next.
Test the correlation search string
The guided mode wizard ensures that your search string parses and produces events. You can run the search to see if it returns the preliminary results that you expect.
- Open a new tab in your browser and navigate to the Splunk platform Search page.
- Run the correlation search to validate that it produces events that match your expectations.
- If your search does not parse, but parsed successfully on the filtering step, return to the correlation search guided editor aggregates and split-bys to identify errors.
- If your search parses but does not produce events that match your expectations, adjust the elements of your search as needed.
- After you validate your search string on the search page, return to the guided search editor and click Done to return to the correlation search editor.
Next Step
| Part 2: Create a correlation search | Part 4: Schedule the correlation search |
This documentation applies to the following versions of Splunk® Enterprise Security: 5.1.0, 5.1.1, 5.2.0, 5.2.1, 5.2.2, 5.3.0, 5.3.1, 6.0.0, 6.0.1, 6.0.2, 6.1.0, 6.1.1, 6.2.0, 6.3.0 Cloud only, 6.4.0, 6.4.1, 6.5.0 Cloud only, 6.5.1 Cloud only, 6.6.0, 6.6.2


 Download manual
Feedback submitted, thanks!