Part 2: Raise the risk score of watchlisted users using risk factors
In Part 1 of this tutorial, you learned about uploading the tutorial data into the Splunk platform index. In Part 2, you will identify watchlisted users in the tutorial dataset and raise their risk scores.
Search the dataset for watchlisted users
First, you must identify watchlisted users. Watchlisted users might include employees who have turned in their 2-week notice prior to resignation from the company or are on a performance improvement plan. These users are more likely to engage in malicious activities.
Splunk Enterprise Security uses asset and identity lookups to correlate user and system data that helps place users or systems on watchlists based on attributes such as their IP address, MAC Address, host name, fully qualified domain name, and so on.
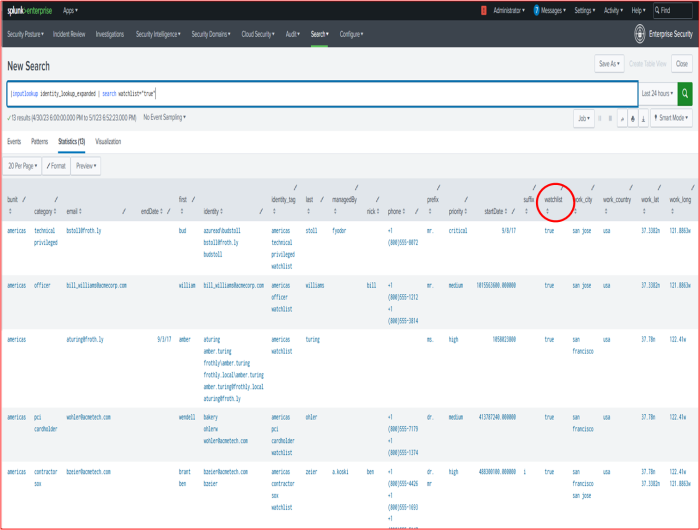
To identify watchlisted users, you can review the watchlist identity lookup, which gets compared to the identity framework in Splunk Enterprise Security and identifies such users. When there is an identity match, Splunk Enterprise Security sets the watchlist field to true. You can create multiple watchlists within Enterprise Security.
Follow these steps to review the identity lookup for watchlisted users:
- Navigate to the Splunk Enterprise Security app.
- Select the Search menu, and then select Search.
- Enter the following search to review the list of watchlisted users:
The following screenshot shows the watchlisted users in the tutorial dataset:|inputlookup identity_lookup_expanded | search watchlist="true"
Raise the risk scores using risk factors for watchlisted users
Now that you have identified the list of watchlisted users, you can raise their risk scores using risk factors so that it becomes easier to drill-down on the threat.
Raise the risk score for the user or system by 2 by creating a risk factor called "Frothly User Watchlist". With risk factors you can elevate the priority of watchlisted users or systems and reduce the risk of irregular behavior.
Follow these steps to create a risk factor:
- In the Splunk Enterprise Security app, select Configure, then select Content.
- Select Content Management.
- From the Create New Content drop-down list, select Risk Factors.
This opens the Risk Factor Editor. - Select Add Risk Factor.
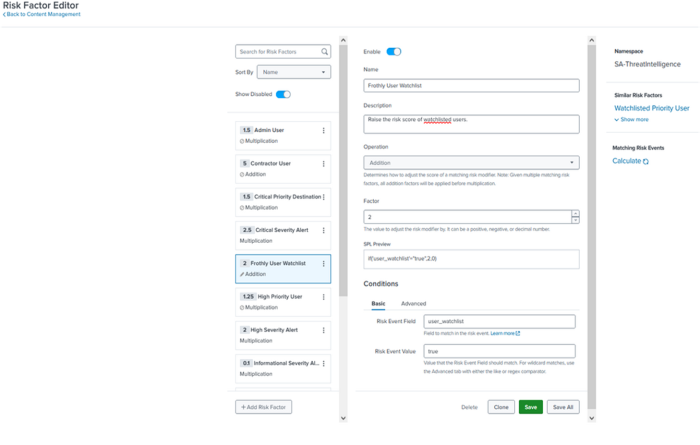
- In the center pane, add the following information to create the risk factor.
- In the Name field, enter "Frothly User Watchlist" as the name of the new risk factor:
- In the Description field, provide a description for the new risk factor: For example, enter: "Raise the risk score of watchlisted users".
- In the Operation drop-down list, select Addition to raise the original risk score.
- For the Risk Event field in the Conditions panel, enter user_watchlist.
- For the Risk Event Value field, enter true.
- Select Save to save your changes.
The following screen image shows the Risk Factor Editor:
In the event of a breach, you can correlate and triage incidents by identifying who among the watchlisted users owns the asset or manages the user involved in the incident and significantly improve the response times for investigations.
See also
For more information on risk factors, see the following topics in the Use Splunk Enterprise Security Risk-based Alerting manual:
Next step
Now that you have raised the risk score of watchlisted users, you can create a risk incident rule. See Create a risk incident rule.
| Part 1: Getting started | Part 3: Create a risk incident rule |
This documentation applies to the following versions of Splunk® Enterprise Security: 7.2.0, 7.3.0, 7.3.1, 7.3.2, 7.3.3


 Download manual
Feedback submitted, thanks!