Install a Windows universal forwarder from an installer
You can install the universal forwarder on a Windows host with the Windows universal forwarder installer package. This method of installation is best for the following:
- Small deployments.
- Proof-of-concept test deployments.
- System images or virtual machines for eventual cloning.
You can install the universal forwarder in other ways as well.
- You can install from the command line, using the
msiexecinstaller. The command-line installation provides more configuration options for data inputs and other settings. Install from the command line if you do not want the forwarder to run immediately after installation. See Install a Windows universal forwarder from the command line. - You can install from a ZIP file. This method of installation has some limitations. See Install a Windows universal forwarder from a ZIP file.
Prerequisites to installing the universal forwarder on Windows
Before you install the Windows universal forwarder, read the following prerequisites.
Determine if you will forward data to Splunk Enterprise or to Splunk Cloud Platform
Installation procedures differ depending on the destination Splunk platform. See the following topics for installation instructions:
- Install the universal forwarder for use with on-premises Splunk instances. This method is the most common and following the procedures results in an installation that works with an on-premises instance of Splunk Enterprise.
- Install the universal forwarder for use with Splunk Cloud Platform. Use this method if you want to connect the forwarder to a Splunk Cloud deployment.
Choose the Windows user that the universal forwarder should run as
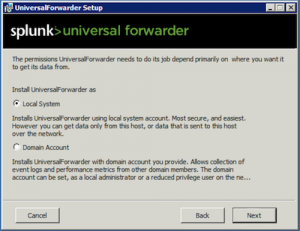
When you install the universal forwarder, you can select the Windows user that the forwarder uses to get data. You have two choices.
- Local System. If you specify the Local System user during the installation process, the universal forwarder collects any kind of data that is available on the local host. It cannot collect data from other hosts.
- Domain account. This option installs the forwarder as the Windows user you specify. The forwarder has the permissions that have been assigned to that user, and collects data that the user has read access to. It does not collect data from resources that the Windows user does not have access to. If you need to collect data from those resources, you must give the Windows user access to those resources.
Install the forwarder as a Domain account to do any of the following:
- Read Event Logs remotely
- Collect performance counters remotely
- Read network shares for log files
- Access the Active Directory schema, using Active Directory monitoring
Choose and configure the user that the universal forwarder should run as before installing the forwarder for remote Windows data collection. If you do not, installation can fail.
If you install as a domain user, specify a user that has access to the data you want to monitor. See Choose the Windows user Splunk should run as in the Splunk Enterprise Installation Manual for concepts and procedures on the user requirements that must be in place before you collect remote Windows data.
If you install as a domain user, you can choose whether or not the user has administrative privileges on the local machine. If you choose not to give the user administrative privileges, the universal forwarder enables "low-privilege" mode. See Install the universal forwarder in low-privilege mode.
Configure your Windows environment for remote data collection
If your monitoring needs require that you install the universal forwarder to collect remote Windows data, then configure your Windows environment for the proper installation of the forwarder.
The configuration process includes adding or editing Active Directory security groups and granting the Windows universal forwarder user access to those groups. It can also include creating and updating Group Policy Objects (GPOs) to provide further security and access for the user.
For step-by-step instructions on how to modify your Windows network, domain, or Active Directory forest, see Prepare your Windows network for a Splunk Enterprise installation as a network or domain user in the Splunk Enterprise Installation Manual.
- Create and configure security groups with the user you want the universal forwarder to run as.
- (Optional) Configure the universal forwarder account as a managed service account.
- Create and configure Group Policy objects (GPOs) for security policy and user rights assignment.
- Assign appropriate user rights to the GPO.
- Deploy the GPOs with the updated settings to the appropriate objects.
Have credentials for the Splunk administrator user ready
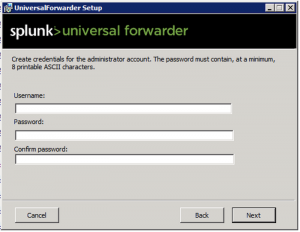
When you install the universal forwarder, you must create credentials for the Splunk administrator user. The installer does not create credentials for the user. Think of a username and password and be ready to supply them when you perform the installation. If you do not supply at least a password during a silent installation, the universal forwarder can install without any users defined, which prevents login. You must then create a user-seed.conf file to fix the problem and restart the forwarder.
Install the universal forwarder for use with on-premises Splunk Enterprise instances
The Windows universal forwarder installer installs and configures the universal forwarder to send data to an on-premises Splunk Enterprise instance. It offers you the option of migrating your checkpoint settings from an existing forwarder.
Do not install or run the 32-bit version of the Splunk universal forwarder for Windows on a 64-bit Windows system or an unsupported version of Windows. Do not install the universal forwarder over an existing installation of full Splunk Enterprise.
Universal forwarder installation options
When you install the universal forwarder on Windows, you can install with the default settings or customize installation options prior to installing.
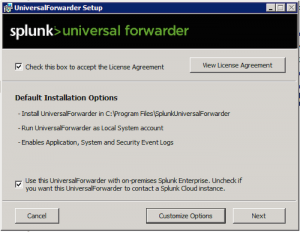
If you choose not to customize options, the installer does the following:
- Installs the universal forwarder in
\Program Files\SplunkUniversalForwarderon the system drive (the drive that booted your Windows host.) - Installs the universal forwarder with the default management port of TCP/8089.
- Configures the universal forwarder to run as the Local System user.
- Prompts you to create a Splunk administrator password. You must complete this step before installation can continue.
- Enables the Application, System, and Security Windows Event Log data inputs.
To understand the ramifications of the Windows user that the universal forwarder runs as, see Choose the user Splunk Enterprise should run as in the Installation Manual.
Install the forwarder with the default options
- Download the universal forwarder from splunk.com.
- Double-click the MSI file to start the installation.
- (Optional) To view the license agreement, click the "View License Agreement" button.
- Select the Check this box to accept the License Agreement check box.
- To change any of the default installation settings, click the "Customize Options" button and see Customize options. Otherwise, click Install to install the software with the defaults.
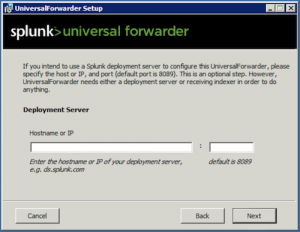
- (Optional) In the Deployment Server pane, enter a host name or IP address and management port for the deployment server that you want the universal forwarder to connect to and click Next.
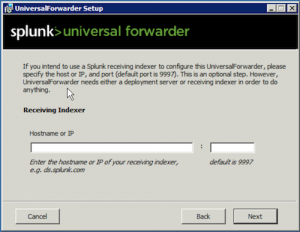
- (Optional) In the Receiving Indexer pane, enter a host name or IP address and the receiving port for the receiving indexer that you want the universal forwarder to send data to and click Next.
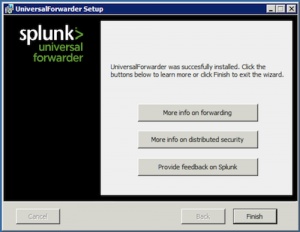
- Click Install to proceed. The installer runs and displays the Installation Completed dialog. The universal forwarder starts automatically.
- From the Control Panel, confirm that the
SplunkForwarderservice runs.
Perform at least one of the following two steps, or the universal forwarder cannot send data anywhere.
Customize Options
If you chose "Customize options" in the Universal forwarder setup dialog box, the installer presents you with the following options.
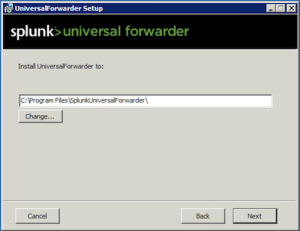
The installer puts the universal forwarder into the C:\Program Files\SplunkUniversalForwarder directory by default.
- (Optional) Click Change to specify a different installation directory.
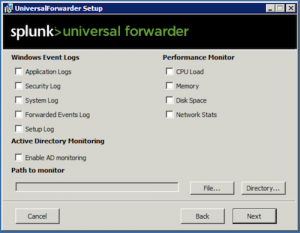
domain\username format only, or the installation can fail. You can enable inputs later, by editing inputs.conf within the universal forwarder directory. See "Considerations for enabling data inputs in the installer" later in this topic about what happens when you enable inputs in this dialog.
You must complete this action, as installation of the universal forwarder cannot proceed without it. If you do not specify a username, the universal forwarder installer creates the admin user during the installation process.
Perform at least one of the next two steps. While both are optional, the forwarder does nothing if you perform neither step because it does not have a configuration.
- (Optional) Enter the hostname or IP address and receiving port of the receiving indexer (receiver) and click Next.
- Click Install to proceed with the installation.
Install the universal forwarder for use with Splunk Cloud Platform
An installation of the universal forwarder for Splunk Cloud iPlatform is similar to an installation for on-premises versions of Splunk Enterprise.
- Download the universal forwarder from splunk.com.
- Double-click the MSI file to start the installation:
- Check the Check this box to accept the License Agreement checkbox.
- Uncheck the Use this UniversalForwarder with on-premises Splunk Enterprise... checkbox.
- To change any of the default installation settings, click the Customize Options button and proceed to the Customize options for a cloud install procedure. Otherwise, click Next.
- (Optional) In the Deployment Server pane, enter a host name or IP address and management port for the deployment server that you want the universal forwarder to connect to and click Next.
- (Optional) In the Receiving Indexer pane, enter a host name or IP address and the receiving port for the receiving indexer that you want the universal forwarder to send data to and click Next.
- Click Install. The installer runs and displays the Installation Completed dialog. The universal forwarder automatically starts.
Note: Perform at least one of the following two steps, or the universal forwarder cannot send data anywhere.
Customize options for a Splunk Cloud Platform installation
Follow these instructions if you need to perform a detailed configuration of the universal forwarder for use with Splunk Cloud Platform.
- (Optional) In the Destination Folder dialog box, click Change to specify a different installation directory.
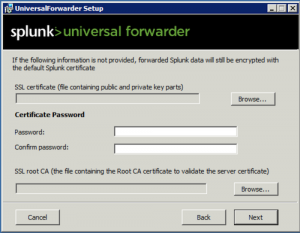
- In the Certificate Information dialog box, click Next. Do not specify any parameters.
- Specify whether you want the universal forwarder to run as the Local System user or a domain user and click Next. If you specified Local System, the installer skips the second screen and takes you directly to the "Enable Windows Inputs" dialog box.
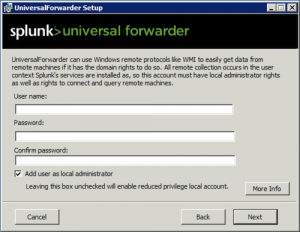
- If you specified Domain account, the installer displays a second dialog box, where you enter domain and user information. Enter the user name and password into the User name and Password fields. Specify the user name in
domain\usernameformat, or the installation can fail. - Enter the password again in the Confirm password field.
- To add the domain user you specified to the local Administrators group, select the "Add user as local administrator" check box and click Next. The installer adds the domain user you specified to the local Administrators group. If you do not select the "Add user as local administrator" check box, the universal forwarder installs in "low-privilege" mode. See "Run the universal forwarder in low-privilege mode" later in this topic for additional information and caveats.
- (Optional) Select one or more Windows inputs from the list and click Next.
- If you have an on-premises deployment server and you want to use it, fill in the appropriate information and click Next. Otherwise, do not specify any parameters here.
- Click Next. Do not specify any parameters here.
- Click Install to proceed with the installation. The installer runs and displays the Installation Completed dialog box. The universal forwarder automatically starts.
- From Windows Control Panel, confirm that the
SplunkForwarderservice runs.
Install the universal forwarder in "low-privilege" mode
When you specify a domain user during an installation and do not give that user local administrator rights, the forwarder installs and runs in "low-privilege" mode.
There are some caveats to doing this:
- You do not have administrative access to any resources on either the host or the domain when you run the universal forwarder in low-privilege mode.
- You might need to add the domain user to additional domain groups in order to access remote resources. Additionally, you might need to add the user to local groups to access local resources that only privileged users would have access to.
- You cannot collect Windows Management Instrumentation (WMI) data as a non-admin user.
| Consolidate data from multiple hosts | Install a Windows universal forwarder from the command line |
This documentation applies to the following versions of Splunk® Universal Forwarder: 7.2.2, 7.2.3, 7.2.4, 7.2.5, 7.2.6, 7.2.7, 7.2.8, 7.2.9, 7.2.10, 7.3.0, 7.3.1, 7.3.2, 7.3.3, 7.3.4, 7.3.5, 7.3.6, 7.3.7, 7.3.8, 7.3.9, 8.0.0, 8.0.1, 8.0.2, 8.0.3, 8.0.4, 8.0.5, 8.0.6, 8.0.7, 8.0.8, 8.0.9, 8.0.10, 8.1.0, 8.1.1, 8.1.2, 8.1.3, 8.1.4, 8.1.5, 8.1.6, 8.1.7, 8.1.8, 8.1.9, 8.1.10, 8.1.11, 8.1.12, 8.1.13, 8.1.14, 8.2.0, 8.2.1, 8.2.2, 8.2.3, 8.2.3.1
 Download manual
Feedback submitted, thanks!