On October 22 2021, the Splunk App for Microsoft Exchange will reach its end of life. After this date, Splunk will no longer maintain or develop this product. The functionality in this app is migrating to a content pack in Data Integrations. Learn about the Content Pack for Microsoft Exchange.
This documentation does not apply to the most recent version of Splunk® App for Microsoft Exchange (EOL).
For documentation on the most recent version, go to the latest release.
Deploy the Splunk Add-on for Windows
After you deploy the Splunk Add-on for Windows to the deployment clients that you have configured to connect to the deployment server, the deployment clients begin collecting Windows data and sending it to the indexer.
Place the add-on in the deployment apps directory on the deployment server
The deployment server must be made aware of the Splunk Add-on for Windows.
- Open a command prompt on the deployment server/indexer.
- Copy the entire Splunk Add-on for Windows folder from its current location to the deployment apps directory.
> Copy-Item -Path C:\Downloads\Splunk_TA_Windows -Destination "C:\Program Files\Splunk\etc\deployment-apps\Splunk_TA_Windows" -Recurse
- Tell the deployment server to reload its deployment configuration.
> cd \Program Files\Splunk\bin
> .\splunk reload deploy-poll
- From a web browser, log into Splunk Enterprise on the deployment server.
- In the system bar, select Settings > Forwarder Management.
- Click the Apps tab. You should see the Splunk_TA_Windows add-on in the list of apps.
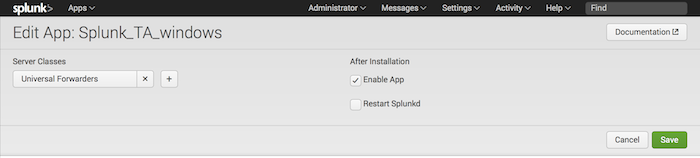
- In the "Splunk_TA_Windows" add-on entry in the list, click Edit. The "Edit App: Splunk_TA_Windows" page loads.
- Click "+" under "Server Classes".
- Select the "Universal Forwarders" server class that you created during the initial setup phase. Splunk Enterprise displays the deployment clients that will receive the add-on in the lower half of the page.
- Confirm that the deployment client that you set up previously appears in the list.
- Click Save. Splunk Enterprise saves the configuration, the Forwarder Management menu reappears, and the deployment server deploys the Splunk_TA_Windows add-on to the deployment client.

Next Step
You have deployed the Splunk Add-on for Windows onto your deployment client. In the future, you can use this procedure to deploy the add-on to additional clients.
Last modified on 28 July, 2016
| Download and configure the Splunk Add-on for Windows | Confirm and troubleshoot Windows data collection |
This documentation applies to the following versions of Splunk® App for Microsoft Exchange (EOL): 3.1.0, 3.1.1, 3.1.2, 3.1.3, 3.2.0, 3.2.1, 3.3.0
Feedback submitted, thanks!