Install and configure a Splunk Enterprise Indexer
This topic discusses installing the basic building block of a Splunk App for Microsoft Exchange deployment: a Splunk Enterprise indexer.
In this procedure, you install the indexer and then configure it to receive data from other Splunk Enterprise instances.
Install the indexer
For information on the Splunk Enterprise system requirements, see System requirements in the Installation Manual. For installation instructions for a specific operating system, see Installation instructions in the Installation Manual.
- Prepare a host that meets or exceeds the Splunk Enterprise system requirements.
- Write down the host name and IP address for the host that you are preparing.
- Confirm that no firewall blocks any network traffic into or out of this host.
- Download the Splunk Enterprise software onto the host.
- Install the correct version of the Splunk software for the operating system that the host runs.
- After installation, confirm that the Splunk Enterprise software functions. At a minimum:
- The software should start without error. If it doesn't, try troubleshooting it.
- You should be able to perform a basic search using the Search app. Learn how. If that doesn't work, figure out why.
- If everything checks out, configure the indexer to have the correct indexes for the Splunk App for Microsoft Exchange.
Configure indexes
The indexer must have the indexes for the Splunk App for Microsoft Exchange defined before you can begin indexing the data. The Splunk Add-on for Microsoft Exchange Indexes defines those indexes. Every indexer in a Splunk App for Microsoft Exchange environment needs this configuration file.
- Download the latest version of the Splunk Add-on for Microsoft Exchange Indexes.
- When prompted, choose an accessible location to save the download. Do not attempt to run the download.
- Extract the package content to $SPLUNK_Home/etc/apps directory.
- Restart Splunk Enterprise. From the same PowerShell window:
> cd \Program Files\Splunk\bin
> .\splunk restart
Configure receiving
The Splunk App for Microsoft Exchange depends on an indexer that can receive data from other hosts. Without this capability, the app cannot function. You will now enable receiving on this indexer.
To configure the indexer to receive data from other Splunk Enterprise instances:
- Log into Splunk Enterprise on the indexer.
- In the system bar, click Settings > Forwarding and Receiving. Splunk Enterprise loads the "Forwarding and Receiving" page.
- Under "Receive Data" click Configure Receiving.
- Click New.
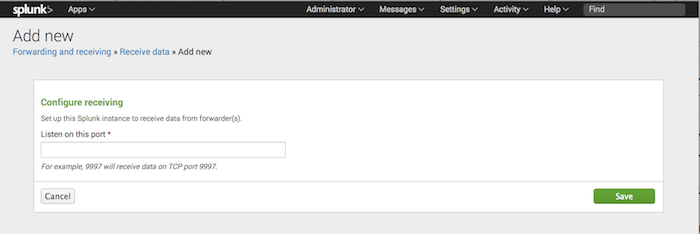
- In the Listen on this port field, enter the port number that you want Splunk Enterprise to listen on for incoming data from other Splunk instances. The conventional port number is 9997.
- Click Save. Splunk Enterprise saves the port number and enables receiving on the indexer.

Next Steps
With the indexer set up, you have begun the process of building out a Splunk App for Microsoft Exchange deployment.
Confirm that you have written down the host name or IP address and port number of the indexer. You need it for the next step of the setup process.
Before you proceed, read our documentation on apps. You will create a simple app in the next step.
| How to deploy the Splunk App for Microsoft Exchange | Create the "send to indexer" app |
This documentation applies to the following versions of Splunk® App for Microsoft Exchange (EOL): 3.5.0, 3.5.1, 3.5.2, 4.0.0, 4.0.2, 4.0.3
Feedback submitted, thanks!