Configure the Splunk App for Microsoft Exchange
After you install the Splunk App for Microsoft Exchange components, you must configure the app before you can use it.
When the Splunk App for Microsoft Exchange first runs, it checks your Splunk Enterprise environment to confirm that all data and supporting apps and add-ons that it needs are available. This process is known as the "First time run" process. The Splunk App for Microsoft Exchange inhibits use until you have successfully installed the required supporting apps and all the data it needs is accessible.
You can run this process at any time after the initial run by selecting "Guided Setup" from the "Tools and Settings" menu within the app.
First-time run
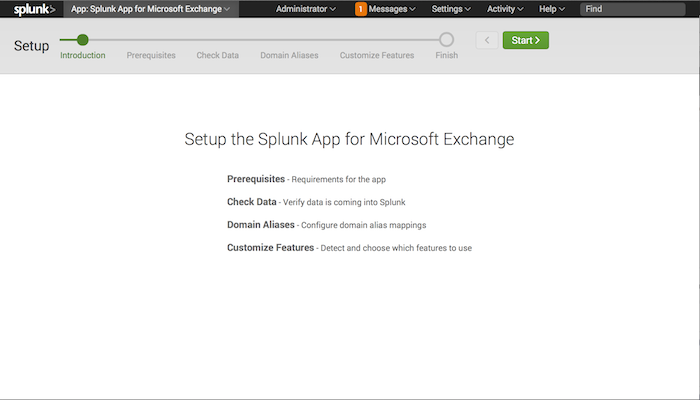
This process runs the moment you load the Splunk App for Microsoft Exchange for the first time.
- To start the first-time run process, click Start. The Splunk App for Microsoft Exchange loads the Prerequisites page and begins detecting basic prerequisites for the app.
Prerequisites
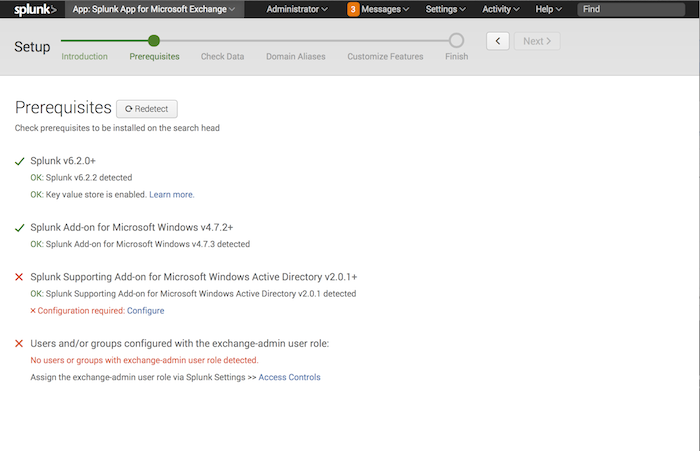
The Splunk App for Microsoft Exchange detects the following prerequisites:
- The Splunk Enterprise version. As described in the platform and hardware requirements, the app runs on Splunk Enterprise version 6.2 and later.
- App key value store status. As part of checking the Splunk Enterprise version, the app also checks to see if you have the app key value store enabled. If it is not enabled, it asks you to do so.
- The Splunk Add-on for Windows version. The app requires the latest version of the Splunk Add-on for Windows (Splunk-TA-Windows) to be installed on the same instance that it resides.
- The Supporting Add-on for Active Directory version. The Splunk App for Microsoft Exchange needs the latest version of this required add-on installed on the same instance that it resides.
- Splunk user credentials. The app checks for the presence of the
exchange-adminrole for the user that has logged into the instance. If that role is not present, the app asks you to add it.
If you have not satisfied one or more prerequisites, it appears in red with an 'X' next to it. The app provides assistance on how to correct the problem. This can range from downloading and installing add-ons, enabling app key value store, or configuring the logged in Splunk Enterprise user, for example.
To correct the problem:
- Follow the guidance provided. You might need to download and install an app or visit a different page within the Splunk Enterprise instance.
- Return to the Splunk App for Microsoft Exchange Prerequisites setup page, if necessary.
- Click the "Redetect" button next to the "Prerequisites" title. If you have satisfied the prerequisite, it then turns green. Once you satisfy all prerequisites, the "Next" button at the top of the page activates.
- Click Next to proceed to the next step of the setup process.
Check Data
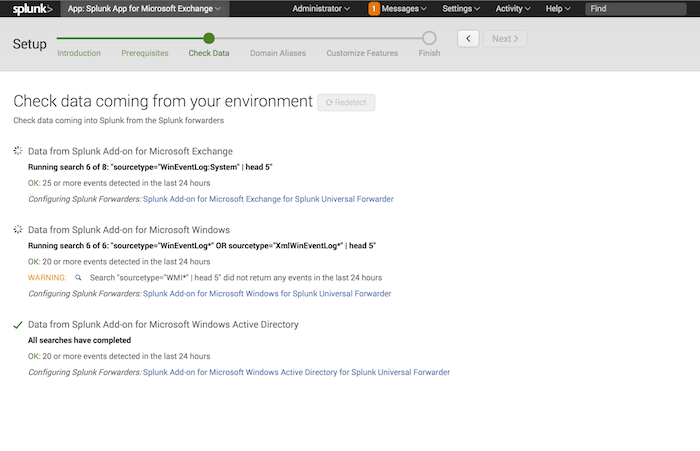
The second phase of the setup experience confirms that the data that the app needs to function is present. In this phase, the app checks for:
- Data from the Splunk App for Microsoft Exchange. The app confirms that data from your Exchange servers exists on the indexer.
- Data from the Splunk Add-on for Windows. The app checks to see that Windows data has been gathered from the Windows servers in your deployment and is available.
- Data from the Splunk Supporting Add-on for Active Directory. This check confirms that the app sees Active Directory data coming in from the SA-LDAPsearch supporting add-on.
The app checks for a certain number of events that have occurred in the past 24 hours. If no events have occurred for a certain type, the app warns you of this and highlights the type in red. Other data types are not required for a successful deployment and appear as warnings in yellow.
When you encounter either an error or a warning, the likely case is that data is not coming in from the forwarders. To resolve this problem:
- Review your forwarder configurations and, if necessary, follow the steps in the previous data collection chapters in this manual to confirm that you have enabled the appropriate data inputs and that the forwarders send out that data.
- Once you have confirmed the forwarder setup, return to the Splunk App for Microsoft Exchange Check Data setup page.
- Click Redetect. If you have corrected the problem successfully, the data type turns green. Once you have all data types flowing in successfully, the "Next" button at the top of the page activates.
- Click Next to proceed to the next step in the setup process.
Domain Aliases
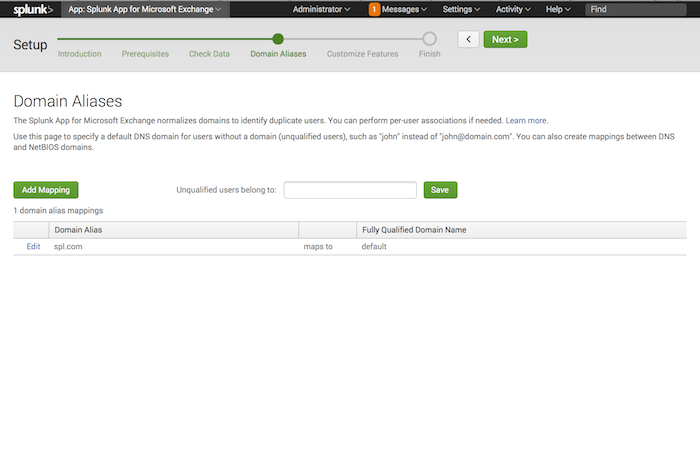
The third phase of the setup experience lets you set up and configure domain aliases to identify duplicate users. The page lets you configure a fully-qualified domain name that a specific Active Directory domain should map to, as well as what Domain Name Service (DNS) name it should use for users that do not have any domain specified (otherwise known as "unqualified users").
This page must have at least one mapping, known as the default mapping. If you do not have at least one mapping, the app warns you when you try to proceed to the next page in the setup process.
Create domain alias mappings
To create a domain alias mapping:
- Click Add Mapping. The New Mapping dialog appears.
- In the "New Mapping" dialog, enter the Domain Alias of the domain you want to map, and enter the fully qualified DNS name that this domain should map to in the Fully Qualified Domain Name field.
- Click Save. The app saves the new configuration and updates the Domain Alias page with the new mapping.
Set unqualified user mapping
Next, to specify what fully-qualified domain name that unqualified users should map to:
- Double-click the Unqualified users belong to field.
- Choose the entry that you want from the list. This list comes from the list of mappings you have created in "Create domain alias mapping."
- Click Save. The Splunk App for Microsoft Exchange saves the mapping.
- After you have created at least one domain alias mapping and assigned at least one default domain for unqualified users, click Next to proceed to the next step of the setup process.
Customize Features
If you're using TA-Windows version 6.0.0 or later, you don't need TA_AD and TA_DNS. TA_AD and TA_DNS are merged with TA-Windows version 6.0.0.
This page displays the list of dashboard panels that come with the Splunk App for Microsoft Exchange. Each panel displays information about specific features for Microsoft Exchange, Windows, and Active Directory.
Based on the information that the app gathered earlier in the setup process, it activates or deactivates panels in each of the three panel groups:
- Exchange: This panel group contains options based on incoming Exchange data that the Splunk App for Microsoft Exchange detected in the setup process. The Splunk App for Microsoft Exchange enables these panels if it finds that Exchange data has been collected.
- Windows: This panel group contains options based on incoming Windows data that the Splunk App for Microsoft Exchange detected in the setup process. The Splunk App for Microsoft Exchange enables these panels if it detects that Windows data has been collected.
- Active Directory: This panel group contains options based on incoming Active Directory data that the Splunk App for Microsoft Exchange detected in the setup process. The Splunk App for Microsoft Exchange enables these panels if it detects that Active Directory data has been collected.
If there is no data present for a panel that you have enabled, the Splunk App for Microsoft Exchange displays the panel within the app but does not show any data on the page.
You can perform the following actions on this page:
- To enable an entire panel group, click the checkbox next to Exchange, Windows, or Active Directory checkboxes at the top of the page.
- (Optional) Select the individual panels you would like the app to display.
- (Optional) Deselect individual panels that you would not like the app to display.
- (Optional) Click the Detect Features button at the bottom of the page to perform the redirection process again.
- If you are satisfied with the feature set that the app has detected, click Next to complete app setup.
Detect Features
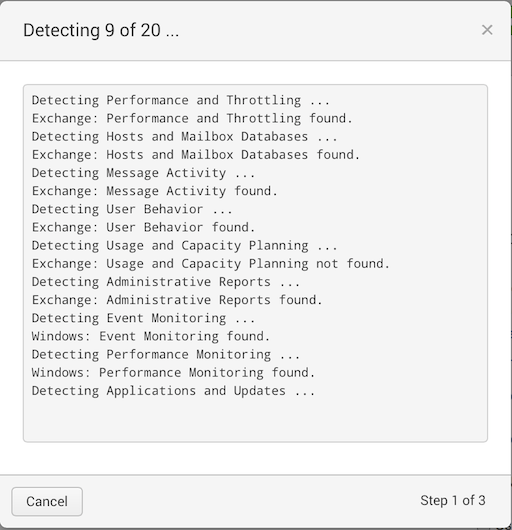
The "Detect Features" process runs automatically as part of the setup process when you first install the app. As it detects features, it displays a dialog box that shows you its progress:
During the process, the app:
- Detects for presence of data for its dashboard panels.
- Builds lookup tables that allow it to function properly.
You can stop this detection process if needed by clicking the "Cancel" button. It is a good idea, however, to allow the process to run at least once, especially if it is the first time that the app has run the process.
Once the process has completed, the app enables dashboard panels for all the features that it has detected data. Click the Close button to return to the "Customize Features" page.
Completing setup
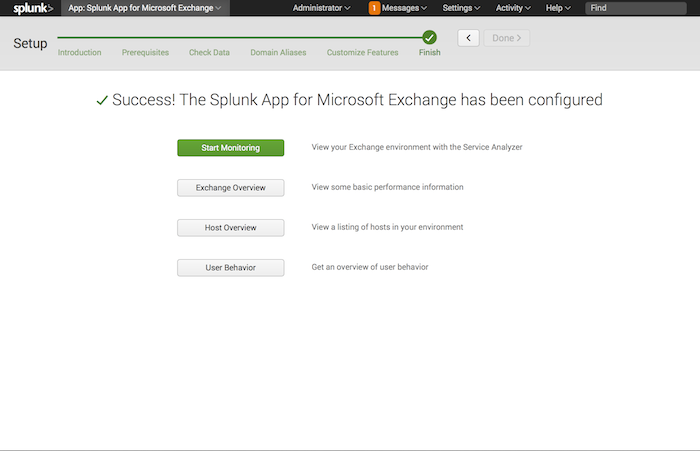
After you customize dashboard panels for the app, it presents the "Success! Splunk App for Microsoft Exchange has been configured" page.
Here you have several choices:
- Click the green Start Monitoring button to proceed to the Service Analyzer page.
- Click Exchange Overview to head over to the Exchange Overview page.
- Click Host Overview to view a listing of hosts in your Splunk App for Microsoft Exchange deployment.
- Click User behavior to explore the user behavior dashboard panels within the app.
| Log in and get started | Use the Splunk App for Microsoft Exchange |
This documentation applies to the following versions of Splunk® App for Microsoft Exchange (EOL): 4.0.4
 Download manual
Feedback submitted, thanks!