Customize the menu bar in with the Edit Navigation view. Add new dashboards, reports, views, links to filtered dashboards, or links to the web to your menu bar. You must have administrator privileges to make changes to the menu bar navigation.
You can add views to the menu bar as part of a collection that groups several views together or as an individual item on the menu bar. For example, Incident Review is an individual dashboard in the menu bar, and each report domain, such as R1: Network Traffic is a collection.
persists customizations you made to the navigation from previous versions.
Check for updated views
Views and collections that are new, updated, or deprecated in the version of the app that you have installed are highlighted with small icons that indicate the relevant changes.
After installing a new version of or a new version of an app that provides views and collections for use in , visit the Edit Navigation view to check for updates in those views and collections.
- On the menu bar, select Configure > General > Navigation.
- If any content has been updated, the message "Some content updates available" appears at the top of the navigation editor.
- Look for icons on the views on the editor pane to find content that has been added, updated, or deprecated. These same icons also appear in the Add a New View and Add a New Collection menus.
Set a default view for
To see a specific view or link when you or another user opens , set a default view.
- On the menu bar, select Configure > General > Navigation.
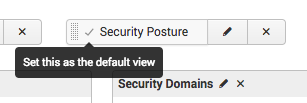
- Locate the view or link that you want to be the default view.
- Click the checkmark icon that appears when you mouse over the view to Set this as the default view.
- Click Save to save your changes
- Click OK to refresh the page and view your changes.

- On the menu bar, select Configure > General > Navigation.
- Click and drag views or collections of views to change the location of the views or collections of views in the menu.
- Click the X next to a view or collection to remove it from the menu.
- Click the
 icon to edit the name of a collection.
 - Click the
 icon to add a divider and visually separate items in a collection.
 - Click Save to save your changes
- Click OK to refresh the page and view your changes.
You can add a new view to the menu bar without adding it to a collection.
- On the menu bar, select Configure > General > Navigation.
- Click Add a New View.
- Leave View Options set to the default of View.
- Click Select a View from Unused Views.
- Select a dashboard or view from the list.
- Click Save. The dashboard appears on the navigation editor.
- If you are finished adding items to the menu, click Save to save your changes
- Click OK to refresh the page and view your changes.
Use a collection to organize several views or links together in the menu bar.
- On the menu bar, select Configure > General > Navigation.
- Click Add a New Collection.
- Type a Name. For example, Audit.
- Click Save. The collection appears on the navigation editor.
You must add a view or link to the collection before it appears in the menu navigation.
Configure a custom report
The Splunk App for PCI Compliance provides reports for different aspects of your PCI compliance. Each report (or dashboard) in the Splunk App for PCI Compliance has an XML file, such as pci_malware_activity.xml, that describes the information used in the report, which notable events provide the data, and how that data is displayed. These reports are included as part of the app.
To add a custom report to your deployment, you need to first create the XML file for your report. See About the Dashboard Editor in the Dashboards and Visualizations manual.
Choose the domain that the report applies to
A report is associated, or categorized, with a domain within the app. In the Splunk App for PCI Compliance, these categories are shown in the Reports tab. The categories include:
- R1: Network Traffic
- R2: Default Configuration
- R3: Protect Data at Rest
To have the new report show up in the correct place in the app navigation (or correct location in the menu bar), you must choose the category domain that the report applies to.
To add your custom report to the app, you need to add it to the navigation. You must associate the new report with a domain.
Add views to an existing collection. In this case, each PCI domain is a collection.
- On the menu bar, select Configure > General > Navigation.
- Locate the collection that you want to add views to.
- Click the
 icon.
icon. - Leave View Options set to the default of View.
- Click Select a View from Unused Views.
- Select a view from the list.
- Click Save. The view appears on the navigation editor.
- If you are finished adding items to the menu, click Save to save your changes
- Click OK to refresh the page and view your changes.
You can add a link to the menu bar of . For example, add a link to a specifically-filtered view of Incident Review or to an external ticketing system.
- On the menu bar, select Configure > General > Navigation.
- Click Add a New View to add it to the menu, or locate an existing collection and click the icon to add the link to an existing collection of views.
- Select Link from View Options.
- Type a Name to appear on the menu. For example, Splunk Answers.
- Type a link. For example, https://answers.splunk.com/
- Click Save.
- If you are finished adding items to the menu, click Save to save your changes
- Click OK to refresh the page and view your changes.
To restore the default navigation of the menu bar:
- On the menu bar, select Configure > General > Navigation.
- In the upper right corner, click Restore Default Configuration.
- Click OK to confirm.
- Scroll to the bottom of page and click Save.
Email a report
You can configure the Splunk App for PCI compliance to email a report by attaching the report to the email as an HTML file or by including it inline in the email body. See Define actions for your scheduled report with the Edit Schedule dialog in the Reporting Manual.
| Configure Interesting Ports list | Configure and deploy indexes |
This documentation applies to the following versions of Splunk® App for PCI Compliance: 3.5.0, 3.6.0, 3.6.1, 3.7.0, 3.7.1, 3.7.2, 3.8.0, 3.8.1, 4.0.0, 4.0.1, 4.1.0, 4.1.1, 4.3.0, 4.4.0, 4.4.1, 4.5.0 Cloud only, 4.6.0, 4.6.2
Feedback submitted, thanks!