Use adaptive response relay to send notable events from Splunk ES to Splunk Phantom
Adaptive response relay allows adaptive response actions to queue on a heavy forwarder before they sent to Splunk Phantom. For example, you can use adaptive response relay to schedule a time when resources are more available to send notable events from Splunk Enterprise Security (ES) or Splunk Cloud to Splunk Phantom.
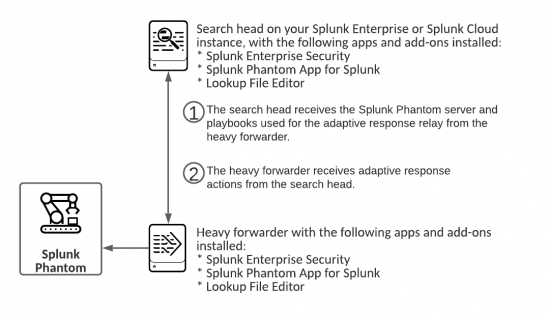
How adaptive response relay sends notable events from Splunk ES to Splunk Phantom
The search head receives the Splunk Phantom server information and playbooks from the heavy forwarder. The heavy forwarder receives the adaptive response actions form the search head.
To get started, perform the following tasks:
- On the search head where you already have Splunk ES and the Splunk Phantom App for Splunk installed
- Obtain and install the Lookup File Editor on Splunkbase.
- In the Lookup File Editor app, click on
cam_workers.csvand verify that the worker set is hf1 and cam_workers is set to ["hf1"]. Change the value accordingly if they are not.
- Install a Splunk heavy forwarder. On the heavy forwarder:
- install Splunk ES and the Splunk Phantom App for Splunk (this add-on).
- Rename the heavy forwarder server to hf1.
Set up adaptive response relay on your Splunk instances
Configure the heavy forwarder and search head to be able to exchange data with each other.
- On the search head, go to
https://<yoursplunkserver>/en-US/splunkd/__raw/alerts/modaction_queue/keyand record the API key. - On the search head, follow the instructions in Configure your Splunk Cloud ES search head with an API key.
- On the heavy forwarder, follow the instructions in Configure your on-premises heavy forwarded with an API key.
- On the search head, set up the receiving port:
- In Splunk Web, go to Settings > Forwarding and receiving.
- In the Receive data section, click + Add new.
- Enter 9997 in the Listen on this port field to set up port 9997 as the receiving port.
- Click Save.
- On the heavy forwarder, set up forwarding to the search head:
- In Splunk Web, go to Settings > Forwarding and receiving.
- In the Configure forwarding section, click + Add new.
- In the Host field, enter the IP address and port number (9997) of the search head. For example:
192.168.11.12:9997
- Click Save.
- On the heavy forwarder, follow the instructions in Configure your on-premises heavy forwarder with a modular action relay to set up a modular action relay.
- On the search head, follow the instructions in Configure your Splunk Cloud ES search head with a modular action worker to set up the Lookup File Editor and add a
cam_worker. - On both the search head and heavy forwarder, add an action response configuration in the Splunk Phantom App for Splunk.
- Navigate to the Splunk Phantom App for Splunk.
- Click Alert Action Configuration.
- Click Add to create a new configuration.
- Give the configuration a name, and specify the credentials to the heavy forwarder.
- Click Add.
Synchronize adaptive response relay data between the heavy forwarder and search head
Perform the following tasks so that data between the Splunk instances is synchronized.
- Perform the following tasks on the heavy forwarder:
- Navigate to the Splunk Phantom App for Splunk.
- Click the Configurations tab.
- In the ES - Adaptive Response Relay section, click Push Relay Data (on HF). This causes the heavy forwarder to read the
phantom.conffile and obtain the server configs that are marked for adaptive response relay and playbook configurations and push this data to the search head. Any events containing the corresponding data are also pushed to the search head. See Connect the Splunk Phantom App for Splunk and the Splunk Platform to a Splunk Phantom server for information about how to mark a server to be used for adaptive response relay.
- Perform the following tasks on the search head:
- Navigate to the Splunk Phantom App for Splunk.
- Click the Configurations tab.
- In the ES - Adaptive Response Relay section, click Poll Relay Data (on SH). This causes the search head to run the following search and obtain the server configurations and playbooks:
index=main source=*/var/log/splunk/phantom_ar_relay.log
Only the most recent 1,000 playbooks can be obtained using adaptive response relay.
| Configure how you want to handle multivalue fields in Splunk ES notable events | Backup and restore configuration files for Splunk Phantom App for Splunk |
This documentation applies to the following versions of Splunk® Phantom App for Splunk: 4.0.10, 4.0.35

 Download manual
Feedback submitted, thanks!