Integrate Splunk Intelligence Management with Splunk Enterprise Security deployments to improve detection and triage
You can configure Splunk intelligence Management app to integrate with Splunk Enterprise Security deployments to perform the following tasks:
- Detect: Automate the matching of highly-scored indicators into your detection tool to optimize detection workflows for better accuracy. You can also customize data ingest preferences to reduce false positive rate.
- Investigate: Display Splunk Intelligence Management's enrichment data in your existing workflows and applications for more context into indicators and events.
- Triage: Automatically prioritize events based on normalized scores from your internal and external data sources. Connect those indicators and events with detection, incident response, and orchestration tools to trigger further actions.
Use the following videos to learn how to configure Splunk Intelligence Management and integrate with Splunk Enterprise Security deployments:
- Splunk Intelligence Management integration with Splunk Enterprise Security
- Configure the Splunk Intelligence Management app for Splunk Enterprise Security
Requirements to install Splunk Intelligence Management app for Splunk Enterprise Security
Ensure that you meet the following requirements to install Splunk Intelligence Management app for Enterprise Security:
- Software requirements
- Log data requirements
- User account requirements
- Network requirements
- Requirements for Splunk Cloud Users
- Requirements for distributed Splunk deployments
- Requirements for Splunk search head clusters
Software requirements
- Install Splunk Enterprise version 8.0 or higher.
- Splunk Enterprise version 7.0 or higher is supported on Splunk Intelligence Management version 2.0.3.
- Splunk Intelligence Management version 2.0.4 deprecates interoperability with Splunk Enterprise 7.0 and Python 2.
- (Optional) Install Splunk Enterprise Security version 6.0 or higher. You must also install the following software with Splunk Enterprise Security:
- Splunk Common Information Model (CIM) version 4.0 or higher
- Splunk Datasets Add-on version 1.0 or higher
You can download and install the *Splunk Common Information Model and *Splunk Datasets Add-on app from Splunkbase.
Log requirements
You must have Common Information Model (CIM) compliant logs from relevant sources such as Proxy, Firewall, Antivirus, SSH logs, and so on.
The logs must be mapped to the Splunk Common Information Model so that Splunk Enterprise Security can generate notable events when it finds a Splunk Intelligence Management indicator in the logs.
If you have a support contract, file a case using the Splunk Support Portal to help map the logs. See Support and Services.
See Common Information model overview for information on the Common Information Model.
User account requirements
You must have the following Splunk user accounts on each search head:
- (Required) admin
- (Recommended for Splunk Enterprise users) power
ess_adminor higher is required for Splunk Enterprise Security users
Additionally, you must have themodify_notable_eventpermission to perform the "Enrich" adaptive response action manually.
Network requirements
You must meet the following network requirements to install Splunk Intelligence Management app for Enterprise Security:
- Run
ModinputandModactionon the search heads that have installed the Splunk application. - The app instance that runs on the search head for Splunk Intelligence Management must make REST API calls to the Splunk application at
localhost, port 8089on the search head. - The Splunk app installed on the search head must accept incoming traffic on
port 8089, from"localhost" / loopback. Modinputandmodactionmake HTTP REST API calls to Splunk Intelligence Management's API.- Search head should have the ability to make REST API calls to Splunk Intelligence Management through
port 443using TLS 1.2. See Splunk Intelligence Management security compliance.
Requirements for Splunk Cloud users
You must install modinput to run on the search head.
Usually, Splunk Cloud does not run modinput on search heads. However, Splunk Intelligence Management app is an exception.
For more information on why the Splunk Intelligence Management app runs on search heads, rather than heavy forwarders or IDMS, see Splunk Intelligence Management Unified app on Splunkbase.
Requirements for distributed Splunk deployments
Splunk Enterprise Security knowledge objects reside only on search-heads. Correlation, threat-gen, and lookup-gen searches must be completely processed on search-heads and cannot be distributed to an indexer or indexer cluster.
The modinput for Splunk Intelligence Management App for Enterprise Security runs on the search head. The app adds cyber threat observables to KV Stores on the search head. Searches that use observables, which are added to KV Stores by the app, must be processed on the search head.
If you have a support contract, file a case using the Splunk Support Portal to help map the logs. See Support and Services.
For more information on distributed Splunk deployments, see Splunk Distributed Search documentation.
Requirements for Splunk search head clusters
Replicate configuration files
The Splunk Intelligence Management App for Enterprise Security ships with a customserver.confconfiguration file that enables the search head cluster to replicate the necessary configuration files to all nodes in the cluster. Sometimes, a Splunk administrator might need to manually copy the contents of theserver.conffile to a differentserver.conffile. See Replication include list.
Replicate KV Store
You can download observables from Splunk Intelligence Management to the search-head only on the cluster Captain node. The search head cluster must be configured to replicate observables that are added to the Captain's KV Stores to all the nodes in the cluster. The cluster Captain must also be the Captain of the KV Store. For more information, see
Sticky Sessions
If a user's interaction with the search heads passes through a proxy or load balancer, you must enable a sticky session to ensure a consistent user experience. See Questions related to Sticky Sessions with Splunk Search Heads on Splunk Answers.
Password configuration files
Do not copy passwords.conf configuration files from one Splunk host to another. The Splunk Intelligence Management App for Enterprise Security does not have a passwords.conf file. See Questions related to App Fails to Decrypt Encrypted Credentials on Splunk Answers.
Use the deployer to distribute the app to other nodes
Use the deployer for the Splunk Intelligence Management App for Enterprise Security to distribute the Splunk Intelligence Management App for Enterprise Security to all nodes in the search head cluster.
Any Splunk application that is built using the Splunk Addon Builder fails if the app deployer distributes a passwords.conf file to the nodes in the search head cluster.
Do not configure the Splunk Intelligence Management App for Enterprise Security on your deployer node and push the configuration to the nodes of the search head cluster - you'll encounter the passwords.conf problem. Using Deployer (not deployment server) to Distribute Apps and Configuration Updates
Install the Splunk Intelligence Management App for Enterprise Security
Installing the Splunk Intelligence Management App for Enterprise Security typically takes approximately 15-30 minutes. Installation time is based on your Splunk environment and the number of Splunk Intelligence Management enclaves that you specify during configuration.
Prepare the Splunk Intelligence Management account
- Subscribe to intelligence sources.
Sophisticated threat intelligence operations require integrating data from multiple sources of intelligence. The Splunk Intelligence Management Marketplace provides easy access to a variety of external intelligence sources from Splunk Intelligence Management partners and other cyber-intelligence sources. Reference: TruSTAR Docs: Intel Marketplace - Create Splunk Threat Activity enclave. This is not required since the TruSTAR TAM creates Threat Activity Enclaves.
- Create Prioritized Indicator Intel Workflows before you configure the app. The intelligence workflow's service user API credentials are required to configure the app.
For more information, see
Create and manage an Indicator Prioritization Intelligence Workflow
Download Observables to Splunk
Create Splunk Threat Activity enclave
Enclaves are Splunk Intelligence Management's intelligence data storage facility.
Use the following table to identify the enclaves that interact with the Splunk Intelligence Management App for Enterprise Security, the purpose of the enclave, and how the enclave gets created.
| Enclave name | Enclave purpose | Enclave creation |
|---|---|---|
| Splunk Threat Activity | Submit ARA sends all events and notable events that match the threat intelligence related correlation searches to this enclave for historical archiving. This enables Splunk intelligence Management to enrich the observables in that event. | Splunk intelligence Management Account Manager creates this enclave |
| Workflow Destination Enclaves | Ideally each modinput connects to and downloads from a single workflow destination enclave only. | See Create and manage an Indicator Prioritization Intelligence Workflow. |
| Intelligence Source Enclaves | Prioritized indicator intelligence workflows select subsets of indicators from Intelligence Source Enclaves and deposit them into Workflow Destination Enclaves. | Reference: TruSTAR Docs: Intel Marketplace |
| Sharing Group Enclaves | Share Splunk events, alerts, and notable events with sharing group using Submit ARA. | Splunk Intelligence Management Account Manager provides permissions to access these enclaves. |
Create prioritized indicator intelligence workflows
Splunk Intelligence Management App for Enterprise Security is designed to work together with Splunk Intelligence Management intelligence workflows that specify Splunk or Splunk Enterprise Security as a destination for the workflow.
You must create at least one intelligence workflow before configuring this application because the intelligence workflow creation also creates a set of service user credentials that are required early in the configuration process.
Upgrade from the Splunk Intelligence Management app for Enterprise Security to Splunk Intelligence Management Unified
Upgrade from the Splunk Intelligence Management app for Enterprise Security to Splunk Intelligence Management Unified. Customers who run Splunk Enterprise Security search head clusters can also install and configure the Splunk Intelligence Management Unified app.
To upgrade to the Splunk Intelligence Management Unified app, complete the following steps:
- Remove configurations for the adaptive response actions.
Splunk Intelligence Management Unified has the same adaptive response actions as the Splunk Intelligence Management app for Enterprise Security. All correlation searches configured to use adaptive response actions in the Splunk Intelligence Management Unified app must be re-configured to remove the adaptive response actions.
- Run the following SPL search to identify the correlation searches that have adaptive response actions configured:
| rest splunk_server=local count=0 /servicesNS/-/SplunkEnterpriseSecuritySuite/saved/searches | where match('action.correlationsearch.enabled', "1|[Tt]|[Tt][Rr][Uu][Ee]") | table title actions | where match('actions', "trustar") - Reconfigure the modinput configurations.
- Run the following SPL search to identify the correlation searches that have adaptive response actions configured:
- Delete the Splunk Intelligence Management app for Enterprise Security.
For more information on managing app and add-on objects, see Manage app and add-on knowledge objects. - Follow the instructions provided in section "Installing TruSTAR Unified" to install the Splunk Intelligence Management Unified app and reconfigure the adaptive response actions.
Install Splunk Intelligence Management Unified app
The Splunk Intelligence Management Unified app must be installed on search-heads.
Do not install the App on indexers or heavy-forwarders.
- Select Apps -> Manage Apps from the Splunk Platform main menu.
- Click Browse More Apps button and use the search box to find the Splunk Intelligence Management Unified app.
- Install the Splunk Intelligence Management Unified app.
Configure the Splunk Intelligence Management app for Enterprise Security
Enter the API credentials and set up the proxy server, log, and other details using the configuration options available on the Splunk Intelligence Management app. You can also configure automatic submission of notable events to Splunk Intelligence Management (Splunk Enterprise Security only).
- Choose the Splunk Intelligence Management Unified app from the app pull-down menu on the top-level Splunk menu.
- Click Configuration on the blue submenu.
Map indicators to tables in the KVStore
Use the following table to map indicators to tables in the KV Store:
| Splunk Intelligence Management observable type | Splunk Enterprise Security KV Store collection name | Splunk Intelligence Management KV Store collection name (for non-Splunk Enterprise Security customers) |
|---|---|---|
| IP | ip_intel | trustar_ip_intel |
| URL | http_intel | trustar_http_intel |
| DOMAIN | ip_intel | trustar_ip_intel |
| EMAIL ADDRESS | email_intel | trustar_email_intel |
| MD5, SHA1, SHA256, SOFTWARE | file_intel | trustar_file_intel |
| REGISTRY_KEY | registry_key | trustar_registry_key |
Account Settings
Use the Account Settings tab to set up the API credentials for the integration.
- Add the following three accounts verbatim (all caps):
- DOWNLOAD
- ENRICH
- SUBMIT
- Add the API key and the API Secret.
All three accounts should use the service account API key and the API secret from one of the user's indicator prioritization intelligence workflows.
You must have previously created at least one intelligence workflow whose destination is Splunk or Splunk Enterprise Security. For more information, see Prepare the Splunk Intelligence Management.
Proxy Settings
If your installation uses a proxy between search heads and the Splunk Intelligence Management platform, you must configure the proxy information as shown below.
Logging
Choose one of the following five logging levels:
- Debug
- Info
- Warning
- Error
- Critical
Splunk Intelligence Management recommends leaving the level at the default Info level unless instructed by Splunk Support.
Add-On Settings
The Add-on settings specify the enclaves to use for submissions and for enrichment.
The Add-on settings are as follows:
- Default Submit Enclave: The Enclave ID for Splunk Threat Activity.
- Default Enrich Enclaves: The Enclaves to use when enriching events.
Splunk Intelligence management recommends a value of ALL. Alternatively, enter a comma-separated list of Enclave IDs. You can override the default enclave settings when running individual enrichment or submission actions.
Configure Notable Event Auto-Submission
You can configure the Splunk Intelligence Management app to automatically submit notable events. You can manually submit events, using the procedure described in the User Guide for the app.
This feature is only available with Splunk Enterprise Security
- Choose Enterprise Security from the App pull-down menu on the top-level Splunk menu.
- Click the Configure menu.
- Click the Content menu.
- Click Content Management.
- Search for Threat Activity Detected.
- Click the correlation search called Threat Activity Detected. This opens a configuration window for that search.
- In the configuration window, scroll to the Adaptive Response Actions.
- Click the carat next to Notable.
- In the Next Steps text box, add these lines separated by two newline characters.
- In the Recommended Actions panel, select TruSTAR - Enrichment and TruSTAR - Submit.
- In the Adaptive Response Actions section, choose Add New Response Action
- Select the TruSTAR - Submit action.
- Configure the Submit action by adding a report title and any comments that you want to add to the event.
- Click the green Save button in the lower right corner to complete the configuration.
Configure notable event auto-enrichment (For Enterprise Security only)
- Choose Enterprise Security from the app pull-down menu on the top-level Splunk menu.
- Click Settings.
- Click Searches, reports, and alerts.
- Click New Alert.
- In the Create Alert window, use these settings:
Setting name Setting value Title TruSTAR Enrichment Search `notable` | search rule_title="*Threat Activity Detected*"Permissions Shared in App Alert Type Scheduled (recommend every 4 hours) Trigger Alert When Number of results is greater than zero Trigger For each result - Scroll to the Adaptive Response Actions panel and click Add Actions.
- In the list, select TruSTAR - Enrichment.
- (Optional) Click the Custom radio button and enter a custom Enclave ID to send the results to a different enclave than your default enclave. You can also enable or disable to adjust the urgency for the search.
- Click Save in the bottom right corner to save the correlation search.
Configure Inputs
Inputs download observables from Splunk Intelligence Management to Splunk KV Stores and might be used for detection. Use the following steps to create a single input. For ideas on what inputs to create, see User Guide: Download Observables to Splunk.
Create an Input
- Choose Splunk Intelligence Management Unified from the app pull-down menu on the top-level Splunk menu.
- Click Inputs on the blue submenu.
- Click Create New Input to start defining an input source.
- Use the following table to complete the configuration settings:
Field Value Notes Name Name of the input A unique input name. Valid characters are letters and underscores only. You cannot use spaces or special characters. Destination KV Store Group TruSTAR or Splunk ES Threatintel Indicates the KV Stores in which observables might be copied. Global Account DOWNLOAD The account you created during the installation process. Enclave IDs Workflow Enclaves to download from You must enter the Workflow Enclave ID. Splunk Intelligence Management recommends configuring one modinput for each workflow. To specify multiple Enclave IDs, separate them with commas and no spaces. See Finding Enclave IDs. IOC Types Indicator Types If you used Workflow Enclave ID, this is not needed because this filtering is configured during the creation of the Workflow. The Indicator types you want to download from Splunk Intelligence Management. The default is to include all Indicators supported by Splunk (Email Address, IP, MD5, SHA1, SHA256, Software, Registry Key, URL). Click x on an Indicator to remove it.
Tags List of Indicator tags This list is used to filter Indicators when downloading from Splunk Intelligence Management. Lowercase characters only. The input will only download Indicators that match all other criteria (Enclaves, IOC types, etc.) AND include ALL the tags in the list. Expiration Number of days When an Indicator has not been mentioned in any of the Enclaves this input downloads from in the specified number of days, that Indicator will no longer be detected on. - Click Add to save these settings and create the input.
Download observables to Splunk
Prerequisite
install and configure the Splunk intelligence Management Unified app. For more information, see [the Splunk Intelligence Management Unified app].
Steps
- Plan your modinputs and intelligence workflows prior to creating workflows and inputs.
- Use the modinput configuration examples below for ideas to get started.
- Create Prioritized Indicators Intel Workflows that yield subsets of observables, which you want to use for detection in Splunk.
- Create modinputs following the Install Guide's instructions.
Splunk intelligence Management recommends using one intelligence workflow in each modinput.
Examples of modinput and intelligence workflow ideas
In this example (Input using workflows), Acme user has setup a workflow to prioritize indicators. The workflow usesthe sources, score filtering, IOC filtering, and whitelisting.
| Input Name | Enclave IDs | Indicator Types | Expiration |
|---|---|---|---|
| Prioritized_Indicators | <workflow Enclave ID> | All | Value depends on what type of IOCs the workflow is centered around. For example: 180 for hashes; 7 for IPs |
In this example (Input 1), Acme user wants to watch any Indicators that they have already investigated and determined are malicious. Acme stores these Indicators in a Vetted Indicators Enclave in Splunk Intelligence Management.
| Input Name | Enclave IDs | Indicator Types | Expiration |
|---|---|---|---|
| Vetted_Indicators | <vetted indicators Enclave ID> | All | 360 days |
In this example (Input 2), Acme user is extremely concerned about file hashes reported on by Intelligence-X. They want to constrain this input to file hashes only, and only from that one intelligence source. Acme should make an intel workflow that uses Intelligence X as a source, then create an input similar to this:
| Input Name | Enclave IDs | Indicator Types | Expiration |
|---|---|---|---|
| Intel-X_Source | <workflow enclave ID> | SHA1, SHA256, MD5 | 180 days |
In this example (Input 3), Acme user wants to alert on IP addresses reported on by Intelligence Sources A,B and C, but only if the reporting is timestamped within the last 7 days. Acme should create a Prioritized Indicator Intel Workflow that uses Sources A, B, and C as workflow sources, selects for IP addresses only, then configure this input:
| Input Name | Enclave IDs | Indicator Types | Expiration |
|---|---|---|---|
| Malicious_IPs | <workflow enclave ID> | IP | 7 days |
In this example (Input 4), Acme user is a member of a sharing group named CyberSleuths. Acme wants to download all Indicators from that sharing group Enclave into Splunk and retain them for 90 days.
| Input Name | Enclave IDs | Indicator Types | Expiration |
|---|---|---|---|
| CyberSleuth_Intel | <CyberSleuthEnclave_ID> | All | 90 days |
In this example (Input 4), Acme Corporation runs a script that copies TruSTAR Reports and Indicators that meet certain criteria to an Enclave named ACME_CURATED that then contains very high-signal data. Acme wants to configure an input that copies all Indicator types from that Enclave and retains them for 180 days.
| Input Name | Enclave IDs | Indicator Types | Expiration |
|---|---|---|---|
| Curated_Intel | <AcmeCuratedEnclave_ID> | All | 180 days |
You can reduce false-positive alerts by exercising fine-grained control over the Indicators that the app brings into the detection set. The following table suggests some Indicators that filter inputs:
| Input Name | Enclave | Indicator Types | Tags | Expire |
|---|---|---|---|---|
| investigated_ip | Investigations | IP | malicious, detection | 7 |
| investigated_hash_email | Investigations | Email, MD5, SHA256 | malicious, detection | 180 |
| investigated_phish_urls | Investigations | URL | malicious, phish | 90 |
| investigated_phish_ips | Investigations | IP | malicious, phish | 7 |
| isac_vetted_ip | Sharing Group Vetted Indicators | IP | 7 | |
| isac_vetted_email_hash | Sharing Group Vetted Indicators | Email, MD5, SHA1, SHA256 | 180 | |
| isac_vetted_url | Sharing Group Vetted Indicators | URL | 60 | |
| premium_sources_ipP | Premium IP workflow | IP or all (workflow handles filtering) | 7 |
Auto-submit, enrich, and re-enrich notable events
Splunk Intelligence Management strongly recommends that all Enteprise Security users automatically configure their search heads:
- Submit Threat Activity notable events to a TruSTAR enclave.
- Enrich Threat Activity notable events.
- Re-submit unresolved Threat Activity notable events to the enclave every X hours to trigger TruSTAR to fetch current enrichment from query intel sources about that NE's observable.
- Determine period "X" according to how your query-style intel sources meter their API requests.
- Re-enrich unresolved Threat Activity notable events every hour for the first 96 hours of their existence.
The limit of 96 hours is based on a rather arbitrary assumption that if a user hasn't dealt with an NE in the first 96 hours of its existence, the user likely has no intention of dealing with it and therefore doesn't need to expend intel source API credits keeping its enrichment current.
Splunk Intelligence Management's API call quotas exist to protect the platform from DOS attacks. As long as your daily API quota needs are legitimate traffic from the integration, Splunk Intelligence Management account managers will increase the call quotas.
In accordance with the strength of the recommendation that all Splunk Enterprise Security users configure this functionality, instructions for doing so are included in the installation guide. For more information, see:
Manually submit notable events to enclave
Splunk Intelligence Management recommends that all Enterprise Security users configure their app to automatically submit all Threat Activity notable events to an enclave.
To configure, see the Automatic Submission section of the Installation Guide.
Notable events must be submitted to an enclave before they can be enriched by the Splunk Intelligence Management - Enrich Threat Activity modaction. Maintain a copy of the notable event in an enclave for historical archive. Enrich future notable events with intelligence from previous notable events. Notable events essentially become an intelligence source.
Cases where a user may prefer manual submission to automatic submission
Some users may prefer to not configure the app to automatically share notable events to sharing group enclaves, but may want to manually share select notable events to the sharing group.
Required fields
The notable event, when converted to a Python dictionary, needs to contain a field named "_time".
Steps
- Click the Actions carat at the far right of a notable event to display the Actions menu.
The following screenshot illustrates the Actions menu on the Splunk Intelligence Management Unified app:
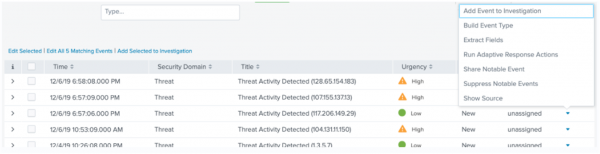
- Click Run Adaptive Response Actions.
The Adaptive Response Actions dialog box appears. - Select the settings in the TruSTAR - Submit action dialog box:
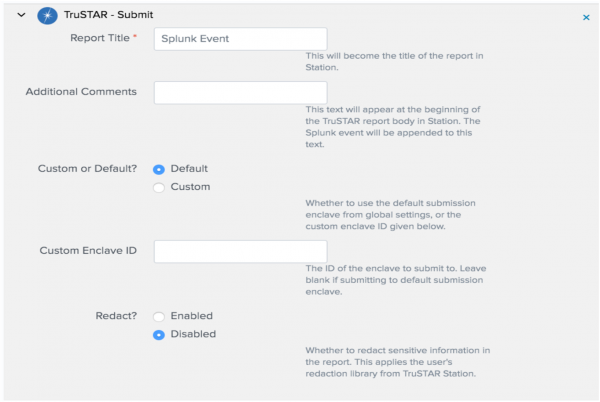
Following is a list of the menu items in the Submit Action dialog box:
- Report Title: Title of the report displayed in Splunk Intelligence Management
- Additional Comments: Notes on the event that you or your team may find useful.
- Custom or Default: Selects whether or not to use the default submission Enclave specified in the TruSTAR App configuration setting.
- Custom Enclave ID: If you choose Custom Enclave, use this field to specify the GUID of the Enclave you want to use for this Intel Report.
- Redact: Select whether or not to redact information specified in your TruSTAR Redaction Library. By default, redaction is disabled.
- Click Run to submit the Intel Report. A popup window provides confirmation that the report has been submitted.

In the Adaptive Response Actions dialog box, select TruSTAR - Submit.
The configuration dialog box for TruSTAR - Submit action appears.


Manually enrich a notable event
Use the Splunk Intelligence Management Unified App with Splunk Enterprise Security to manually enrich a notable event in the following ways:
For more information, see the Overview.
- Create an ad-hoc search by specifying values in Status, Owner or other fields as displayed below.
In the following example:
- Only parameter selected was Last 90 Days in the Time field.
- The Incident Review search returned the list of results that you see at the bottom of the screen.

- Click the Actions carat located at the far right of any event to display the Actions menu.
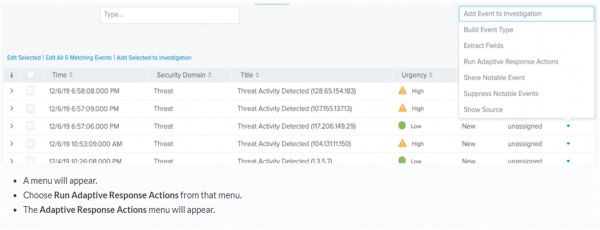
- Choose Run Adaptive Response Actions from the Actions menu.
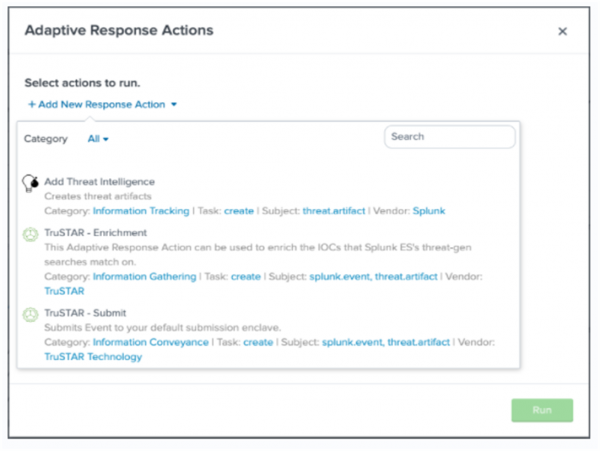
- From the Adaptive Response Actions menu, select Add New Response Action to display a list of adaptive response actions.
- From the list of adaptive response actions, choose TruSTAR - Enrichment to display the TruSTAR - Enrichment Action configuration dialog.
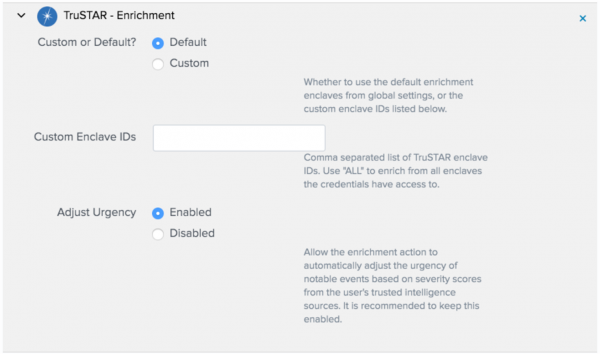
- Select the enclaves to enrich the notables.
- Default: Queries the enclaves that you configured in the Splunk Intelligence Management App as enrichment enclaves.
- Custom: Queries a specified list of one or more Splunk Intelligence Management enclaves, or all enclaves.
To specify a list of enclaves, provide a list of Enclave IDs, separated by commas.
- Select if you want to enable or disable the Urgency adjustment.
You can adjust the urgency of the notable event based on information from the enrichment.Splunk intelligence Management recommends leaving this setting '''Enabled'''.
- Click Run to start the enrichment action.
The Adaptive Response Actions dialog provides confirmation that the enrichment action is run.
- Click X in the upper right corner to close the message and return to the list of notable events.
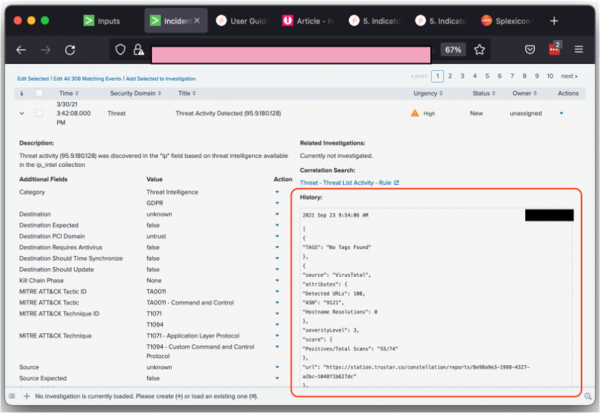
- Refresh the browser page.
- Reopen the notable event.
- View the enrichment in the comment box of the notable event.
This feature is only available with Splunk ES.


You can enrich a notable event using intelligence from the Splunk Intelligence Management enclaves specified in the Splunk intelligence Management app configuration.
Enriching notable events using the Splunk intelligence Management app checks only the enclaves specified in the Configuration panel of the app. The Configuration panel of the app displays the information those enclaves have at the time of the action to receive additional enrichment and rerun this action.
Splunk intelligence Management only raises the severity of an event; it will never lower the severity; For example, if an event has a Critical severity score and Splunk intelligence Management rates it as High, the Urgent rating will remain unchanged.
Research an observable in Splunk intelligence Management
.Use the Splunk intelligence Management app's workflow action to navigate to an observable's graph view in Splunk intelligence Management. For more information on Splunk workflow actions, see Create workflow actions in Splunk Web.
Use the workflow action
- While viewing a log event, click the drop-down Actions carat to the right of the observable that you want to research.
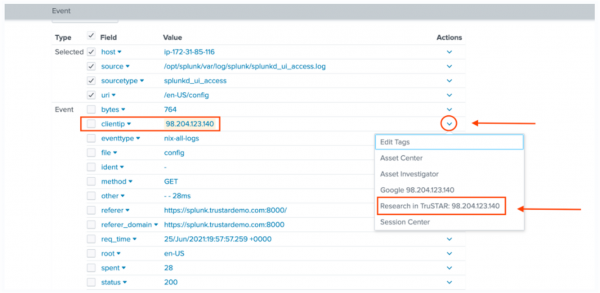
- In the drop-down menu, click the Research in TruSTAR: ____________ option.

Useful SPL searches
| Functionality | SPL search |
|---|---|
| Unique Threat Keys |
|
| Unique TruSTAR Threat Keys |
|
| Modinput logs. |
|
| # Observables |
|
| # Observables for modinput |
|
Troubleshooting
Log messages
| Log Level | Message | Meaning | Impact on Splunk Intelligence Management (Y/N) | Recommended action |
|---|---|---|---|---|
| WARN | Input <your modinput name>, Required collections not found: {'threat_intel_meta'} | Older versions of ES required the TruSTAR Unified app to update this collection every time the app CRUD'ed records in the threat intel kvstores. Newer versions of ES deprecated this kvstore. | No. | ignore. |
| WARN | No checkpoint found for enclave <one of your modinput's enclave IDs>, IOC type <a TruSTAR observable type> and input name <your modinput name>. Initializing new checkpoint. | This message always prints the first time one of your modinputs downloads observables of that type from that enclave, so the modinput has not yet stored a checkpoint for that download operation. | No. | ignore. |
| WARN | Input <your modinput name>, Too many IOCs with same lastSeen time <epoch timestamp milliseconds>, start paging results. This may result in loss of data | The modinput encountered a TruSTAR "lastSeen" timestamp for which the enclave contained >1k observables.
If the enclave contains > 10k observables with same "lastSeen" timestamp, some of them may not end up in the kvstore. This case is very rare, and should only happen if someone performed multiple indicator submissions (to the submit-indicators 1.3 endpoint or the CSV indicator submission UI) and specified the same "lastSeen" timestamp on more than 10k. |
No. But some of the observables from your enclave might not arrive in the Splunk kvstores. | ignore. This edge-case will be handled in future versions of TruSTAR Unified app. |
| WARN | The following enclaves could not be found: [<comma-separated list of TruSTAR enclave IDs>]" | One or more of the enclave IDs specified in the modinput configs are not valid, or the "DOWNLOAD" account does not have read-access to it. It's possible that....
(a) your "DOWNLOAD" account did at one time have read-access to the enclave but someone (with a Station Company Administrator account) modified the "DOWNLOAD" account's permission to that enclave. (b) access to that enclave has been removed from your Station company account altogether. (c) your Station Company Administrator unsubscribed your company account from a particular integration, which removes that enclave from your company's access. (d) The enclave ID was incorrect / invalid. |
No. The Modinput will continue to download observables from other valid enclave IDs that its "DOWNLOAD" creds have access to. | You can ignore, but recommend review / update the modinput's enclave IDs list to contain only valid enclave IDs that the "DOWNLOAD" account has appropriate access to. |
| ERROR | 09-29-2021 15:34:46.421 +0000 ERROR sendmodalert [27651 AlertNotifierWorker-0] - action=trustar_enrich_threat_activity STDERR - ERROR: ts_spl_unified.modalerts. enrich.notable_event_service: REST API call to add indicator summaries endpoint info to notable event 0F7E38BF- AA18-4529-9961- 8E49CB2F0E70@@ notable@@ e9ecb3b 7cee274a1 5bf671b8 66381502 failed. Reason: b' <?xml version="1.0" encoding="UTF-8"?>\n<response>\n <messages>\n <msg type="WARN"> insufficient permission to access this resource</msg>\n </messages> \n</response>\n' | The Splunk user account attempting to run the "enrich" modaction does not have "update_notable_event" permissions. | The Enrich action will not work as expected until user's permissions are updated. | Give the user "ess_admin" role. |
| ERROR | 11-12-2021 14:30:28.227 -0500 ERROR AdminManagerExternal [101463 TcpChannelThread] - Unexpected error "<class 'splunktaucclib.rest_handler.error.RestError'>" from python handler: "REST Error [500]: Internal Server Error -- Traceback (most recent call last):\n File "/opt/splunk/etc/apps/trustar_unified/bin/trustar_unified/aob_py3/splunktaucclib/rest_handler/handler.py", line 117, in wrapper\n for name, data, acl in meth(self, *args, **kwargs):\n File "/opt/splunk/etc/apps/trustar_unified/bin/trustar_unified/aob_py3/splunktaucclib/rest_handler/handler.py", line 338, in _format_all_response\n self._encrypt_raw_credentials(cont["entry"])\n File "/opt/splunk/etc/apps/trustar_unified/bin/trustar_unified/aob_py3/splunktaucclib/rest_handler/handler.py", line 368, in _encrypt_raw_credentials\n change_list = rest_credentials.decrypt_all(data)\n File "/opt/splunk/etc/apps/trustar_unified/bin/trustar_unified/aob_py3/splunktaucclib/rest_handler/credentials.py", line 289, in decrypt_all\n all_passwords = credential_manager._get_all_passwords()\n File "/opt/splunk/etc/apps/trustar_unified/bin/trustar_unified/aob_py3/solnlib/utils.py", line 148, in wrapper\n return func(*args, **kwargs)\n File "/opt/splunk/etc/apps/trustar_unified/bin/trustar_unified/aob_py3/solnlib/credentials.py", line 277, in _get_all_passwords\n clear_password += field_clear[index]\nTypeError: can only concatenate str (not "NoneType") to str\n". See splunkd.log/python.log for more details. | Someone copied a passwords.conf file (for any app - not necessarily TruSTAR Unified) from another Splunk instance to the instance you're working on. | TruSTAR App will not work until you are able to successfully configure the app, which you can't do until you find the offending "passwords.conf" file. | Follow guidance / directions found in this thread:App Fails to Decrypt Encrypted Credential |
Actions to submit or enrich do not work
Splunk User Account Permissions
Splunk ES requires that the Splunk user account have Admin permissions to run Submit or Enrich commands. You can check the error message in Splunk ES to see if your permissions are the issue.
-
To find the error message for an adaptive response action failure, click on the hyperlink labeled View Adaptive Response Invocations. When you click on that hyperlink, you'll be taken to a search results page.
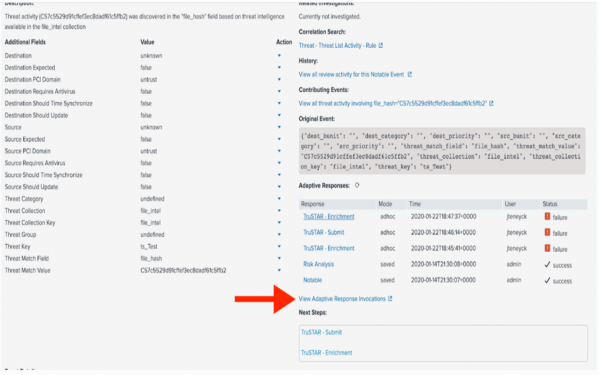
- Read the log entries to find the error message. The text in the red box below shows the error is due to the user's Splunk account having insufficient role permissions.


To verify if your account has the correct permissions, see Requirements to install Splunk Intelligence Management app for Splunk
Map indicators to tables in the KVStore
Use the following table to map indicators to tables in the KV Store:
| Splunk Intelligence Management observable type | Splunk Enterprise Security KV Store collection name | Splunk Intelligence Management KV Store collection name (for non-Splunk Enterprise Security customers) |
|---|---|---|
| IP | ip_intel | trustar_ip_intel |
| URL | http_intel | trustar_http_intel |
| DOMAIN | ip_intel | trustar_ip_intel |
| EMAIL ADDRESS | email_intel | trustar_email_intel |
| MD5, SHA1, SHA256, SOFTWARE | file_intel | trustar_file_intel |
| REGISTRY_KEY | registry_key | trustar_registry_key |
Account Settings
Use the Account Settings tab to set up the API credentials for the integration.
- Add the following three accounts verbatim (all caps):
- DOWNLOAD
- ENRICH
- SUBMIT
- Add the API key and the API Secret.
All three accounts should use the service account API key and the API secret from one of the user's indicator prioritization intelligence workflows.
You must have previously created at least one intelligence workflow whose destination is Splunk or Splunk Enterprise Security. For more information, see Prepare the Splunk Intelligence Management.
Proxy Settings
If your installation uses a proxy between search heads and the Splunk Intelligence Management platform, you must configure the proxy information as shown below.
Logging
Choose one of the following five logging levels:
- Debug
- Info
- Warning
- Error
- Critical
Splunk Intelligence Management recommends leaving the level at the default Info level unless instructed by Splunk Support.
Add-On Settings
The Add-on settings specify the enclaves to use for submissions and for enrichment.
The Add-on settings are as follows:
- Default Submit Enclave: The Enclave ID for Splunk Threat Activity.
- Default Enrich Enclaves: The Enclaves to use when enriching events.
Splunk Intelligence management recommends a value of ALL. Alternatively, enter a comma-separated list of Enclave IDs. You can override the default enclave settings when running individual enrichment or submission actions.
Configure Notable Event Auto-Submission
You can configure the Splunk Intelligence Management app to automatically submit notable events. You can manually submit events, using the procedure described in the User Guide for the app.
This feature is only available with Splunk Enterprise Security
- Choose Enterprise Security from the App pull-down menu on the top-level Splunk menu.
- Click the Configure menu.
- Click the Content menu.
- Click Content Management.
- Search for Threat Activity Detected.
- Click the correlation search called Threat Activity Detected. This opens a configuration window for that search.
- In the configuration window, scroll to the Adaptive Response Actions.
- Click the carat next to Notable.
- In the Next Steps text box, add these lines separated by two newline characters.
- In the Recommended Actions panel, select TruSTAR - Enrichment and TruSTAR - Submit.
- In the Adaptive Response Actions section, choose Add New Response Action
- Select the TruSTAR - Submit action.
- Configure the Submit action by adding a report title and any comments that you want to add to the event.
- Click the green Save button in the lower right corner to complete the configuration.
Configure notable event auto-enrichment (For Enterprise Security only)
- Choose Enterprise Security from the app pull-down menu on the top-level Splunk menu.
- Click Settings.
- Click Searches, reports, and alerts.
- Click New Alert.
- In the Create Alert window, use these settings:
Setting name Setting value Title TruSTAR Enrichment Search `notable` | search rule_title="*Threat Activity Detected*"Permissions Shared in App Alert Type Scheduled (recommend every 4 hours) Trigger Alert When Number of results is greater than zero Trigger For each result - Scroll to the Adaptive Response Actions panel and click Add Actions.
- In the list, select TruSTAR - Enrichment.
- (Optional) Click the Custom radio button and enter a custom Enclave ID to send the results to a different enclave than your default enclave. You can also enable or disable to adjust the urgency for the search.
- Click Save in the bottom right corner to save the correlation search.
Configure Inputs
Inputs download observables from Splunk Intelligence Management to Splunk KV Stores and might be used for detection. Use the following steps to create a single input. For ideas on what inputs to create, see User Guide: Download Observables to Splunk.
Create an Input
- Choose Splunk Intelligence Management Unified from the app pull-down menu on the top-level Splunk menu.
- Click Inputs on the blue submenu.
- Click Create New Input to start defining an input source.
- Use the following table to complete the configuration settings:
Field Value Notes Name Name of the input A unique input name. Valid characters are letters and underscores only. You cannot use spaces or special characters. Destination KV Store Group TruSTAR or Splunk ES Threatintel Indicates the KV Stores in which observables might be copied. Global Account DOWNLOAD The account you created during the installation process. Enclave IDs Workflow Enclaves to download from You must enter the Workflow Enclave ID. Splunk Intelligence Management recommends configuring one modinput for each workflow. To specify multiple Enclave IDs, separate them with commas and no spaces. See Finding Enclave IDs. IOC Types Indicator Types If you used Workflow Enclave ID, this is not needed because this filtering is configured during the creation of the Workflow. The Indicator types you want to download from TruSTAR. The default is to include all Indicators supported by Splunk (Email Address, IP, MD5, SHA1, SHA256, Software, Registry Key, URL). Click x on an Indicator to remove it.
Tags List of Indicator tags This list is used to filter Indicators when downloading from TruSTAR. Lowercase characters only. The input will only download Indicators that match all other criteria (Enclaves, IOC types, etc.) AND include ALL the tags in the list. Expiration Number of days When an Indicator has not been mentioned in any of the Enclaves this input downloads from in the specified number of days, that Indicator will no longer be detected on. - Click Add to save these settings and create the input.
Download observables to Splunk
Prerequisite
install and configure the Splunk intelligence Management Unified app. For more information, see [the Splunk Intelligence Management Unified app].
Steps
- Plan your modinputs and intelligence workflows prior to creating workflows and inputs.
- Use the modinput configuration examples below for ideas to get started.
- Create Prioritized Indicators Intel Workflows that yield subsets of observables, which you want to use for detection in Splunk.
- Create modinputs following the Install Guide's instructions.
Splunk intelligence Management recommends using one intelligence workflow in each modinput.
Examples of modinput and intelligence workflow ideas
In this example (Input using workflows), Acme user has setup a workflow to prioritize indicators. The workflow usesthe sources, score filtering, IOC filtering, and whitelisting.
| Input Name | Enclave IDs | Indicator Types | Expiration |
|---|---|---|---|
| Prioritized_Indicators | <workflow Enclave ID> | All | Value depends on what type of IOCs the workflow is centered around. For example: 180 for hashes; 7 for IPs |
In this example (Input 1), Acme user wants to watch any Indicators that they have already investigated and determined are malicious. Acme stores these Indicators in a Vetted Indicators Enclave in Splunk Intelligence Management.
| Input Name | Enclave IDs | Indicator Types | Expiration |
|---|---|---|---|
| Vetted_Indicators | <vetted indicators Enclave ID> | All | 360 days |
In this example (Input 2), Acme user is extremely concerned about file hashes reported on by Intelligence-X. They want to constrain this input to file hashes only, and only from that one intelligence source. Acme should make an intel workflow that uses Intelligence X as a source, then create an input similar to this:
| Input Name | Enclave IDs | Indicator Types | Expiration |
|---|---|---|---|
| Intel-X_Source | <workflow enclave ID> | SHA1, SHA256, MD5 | 180 days |
In this example (Input 3), Acme user wants to alert on IP addresses reported on by Intelligence Sources A,B and C, but only if the reporting is timestamped within the last 7 days. Acme should create a Prioritized Indicator Intel Workflow that uses Sources A, B, and C as workflow sources, selects for IP addresses only, then configure this input:
| Input Name | Enclave IDs | Indicator Types | Expiration |
|---|---|---|---|
| Malicious_IPs | <workflow enclave ID> | IP | 7 days |
In this example (Input 4), Acme user is a member of a sharing group named CyberSleuths. Acme wants to download all Indicators from that sharing group Enclave into Splunk and retain them for 90 days.
| Input Name | Enclave IDs | Indicator Types | Expiration |
|---|---|---|---|
| CyberSleuth_Intel | <CyberSleuthEnclave_ID> | All | 90 days |
In this example (Input 4), Acme Corporation runs a script that copies TruSTAR Reports and Indicators that meet certain criteria to an Enclave named ACME_CURATED that then contains very high-signal data. Acme wants to configure an input that copies all Indicator types from that Enclave and retains them for 180 days.
| Input Name | Enclave IDs | Indicator Types | Expiration |
|---|---|---|---|
| Curated_Intel | <AcmeCuratedEnclave_ID> | All | 180 days |
You can reduce false-positive alerts by exercising fine-grained control over the Indicators that the app brings into the detection set. The following table suggests some Indicators that filter inputs:
| Input Name | Enclave | Indicator Types | Tags | Expire |
|---|---|---|---|---|
| investigated_ip | Investigations | IP | malicious, detection | 7 |
| investigated_hash_email | Investigations | Email, MD5, SHA256 | malicious, detection | 180 |
| investigated_phish_urls | Investigations | URL | malicious, phish | 90 |
| investigated_phish_ips | Investigations | IP | malicious, phish | 7 |
| isac_vetted_ip | Sharing Group Vetted Indicators | IP | 7 | |
| isac_vetted_email_hash | Sharing Group Vetted Indicators | Email, MD5, SHA1, SHA256 | 180 | |
| isac_vetted_url | Sharing Group Vetted Indicators | URL | 60 | |
| premium_sources_ipP | Premium IP workflow | IP or all (workflow handles filtering) | 7 |
Auto-submit, enrich, and re-enrich notable events
Splunk Intelligence Management strongly recommends that all Enteprise Security users automatically configure their search heads:
- Submit Threat Activity notable events to a TruSTAR enclave.
- Enrich Threat Activity notable events.
- Re-submit unresolved Threat Activity notable events to the enclave every X hours to trigger TruSTAR to fetch current enrichment from query intel sources about that NE's observable.
- Determine period "X" according to how your query-style intel sources meter their API requests.
- Re-enrich unresolved Threat Activity notable events every hour for the first 96 hours of their existence.
The limit of 96 hours is based on a rather arbitrary assumption that if a user hasn't dealt with an NE in the first 96 hours of its existence, the user likely has no intention of dealing with it and therefore doesn't need to expend intel source API credits keeping its enrichment current.
Splunk Intelligence Management's API call quotas exist to protect the platform from DOS attacks. As long as your daily API quota needs are legitimate traffic from the integration, Splunk Intelligence Management account managers will increase the call quotas.
In accordance with the strength of the recommendation that all Splunk Enterprise Security users configure this functionality, instructions for doing so are included in the installation guide. For more information, see:
Manually submit notable events to enclave
Splunk Intelligence Management recommends that all Enterprise Security users configure their app to automatically submit all Threat Activity notable events to an enclave.
To configure, see the Automatic Submission section of the Installation Guide.
Notable events must be submitted to an enclave before they can be enriched by the Splunk Intelligence Management - Enrich Threat Activity modaction. Maintain a copy of the notable event in an enclave for historical archive. Enrich future notable events with intelligence from previous notable events. Notable events essentially become an intelligence source.
Cases where a user may prefer manual submission to automatic submission
Some users may prefer to not configure the app to automatically share notable events to sharing group enclaves, but may want to manually share select notable events to the sharing group.
Required fields
The notable event, when converted to a Python dictionary, needs to contain a field named "_time".
Steps
- Click the Actions carat at the far right of a notable event to display the Actions menu.
The following screenshot illustrates the Actions menu on the Splunk Intelligence Management Unified app:
- Click Run Adaptive Response Actions.
The Adaptive Response Actions dialog box appears. - Select the settings in the TruSTAR - Submit action dialog box:
Following is a list of the menu items in the Submit Action dialog box:
- Report Title: Title of the report displayed in Splunk Intelligence Management
- Additional Comments: Notes on the event that you or your team may find useful.
- Custom or Default: Selects whether or not to use the default submission Enclave specified in the TruSTAR App configuration setting.
- Custom Enclave ID: If you choose Custom Enclave, use this field to specify the GUID of the Enclave you want to use for this Intel Report.
- Redact: Select whether or not to redact information specified in your TruSTAR Redaction Library. By default, redaction is disabled.
- Click Run to submit the Intel Report. A popup window provides confirmation that the report has been submitted.
In the Adaptive Response Actions dialog box, select TruSTAR - Submit.
The configuration dialog box for TruSTAR - Submit action appears.
Manually enrich a notable event
Use the Splunk Intelligence Management Unified App with Splunk Enterprise Security to manually enrich a notable event in the following ways:
For more information, see the Overview.
- Create an ad-hoc search by specifying values in Status, Owner or other fields as displayed below.
In the following example:
- Only parameter selected was Last 90 Days in the Time field.
- The Incident Review search returned the list of results that you see at the bottom of the screen.
- Click the Actions carat located at the far right of any event to display the Actions menu.
- Choose Run Adaptive Response Actions from the Actions menu.
- From the Adaptive Response Actions menu, select Add New Response Action to display a list of adaptive response actions.
- From the list of adaptive response actions, choose TruSTAR - Enrichment to display the TruSTAR - Enrichment Action configuration dialog.
- Select the enclaves to enrich the notables.
- Default: Queries the enclaves that you configured in the Splunk Intelligence Management App as enrichment enclaves.
- Custom: Queries a specified list of one or more Splunk Intelligence Management enclaves, or all enclaves.
To specify a list of enclaves, provide a list of Enclave IDs, separated by commas.
- Select if you want to enable or disable the Urgency adjustment.
You can adjust the urgency of the notable event based on information from the enrichment.Splunk intelligence Management recommends leaving this setting '''Enabled'''.
- Click Run to start the enrichment action.
The Adaptive Response Actions dialog provides confirmation that the enrichment action is run. - Click X in the upper right corner to close the message and return to the list of notable events.
- Refresh the browser page.
- Reopen the notable event.
- View the enrichment in the comment box of the notable event.
This feature is only available with Splunk ES.
You can enrich a notable event using intelligence from the Splunk Intelligence Management enclaves specified in the Splunk intelligence Management app configuration.
Enriching notable events using the Splunk intelligence Management app checks only the enclaves specified in the Configuration panel of the app. The Configuration panel of the app displays the information those enclaves have at the time of the action to receive additional enrichment and rerun this action.
Splunk intelligence Management only raises the severity of an event; it will never lower the severity; For example, if an event has a Critical severity score and Splunk intelligence Management rates it as High, the Urgent rating will remain unchanged.
Research an observable in Splunk intelligence Management
.Use the Splunk intelligence Management app's workflow action to navigate to an observable's graph view in Splunk intelligence Management. For more information on Splunk workflow actions, see Create workflow actions in Splunk Web.
Use the workflow action
- While viewing a log event, click the drop-down Actions carat to the right of the observable that you want to research.
- In the drop-down menu, click the Research in TruSTAR: ____________ option.
Useful SPL searches
| Functionality | SPL search |
|---|---|
| Unique Threat Keys |
|
| Unique TruSTAR Threat Keys |
|
| Modinput logs. |
|
| # Observables |
|
| # Observables for modinput |
|
Troubleshooting
Log messages
| Log Level | Message | Meaning | Impact on Splunk Intelligence Management (Y/N) | Recommended action |
|---|---|---|---|---|
| WARN | Input <your modinput name>, Required collections not found: {'threat_intel_meta'} | Older versions of ES required the TruSTAR Unified app to update this collection every time the app CRUD'ed records in the threat intel kvstores. Newer versions of ES deprecated this kvstore. | No. | ignore. |
| WARN | No checkpoint found for enclave <one of your modinput's enclave IDs>, IOC type <a TruSTAR observable type> and input name <your modinput name>. Initializing new checkpoint. | This message always prints the first time one of your modinputs downloads observables of that type from that enclave, so the modinput has not yet stored a checkpoint for that download operation. | No. | ignore. |
| WARN | Input <your modinput name>, Too many IOCs with same lastSeen time <epoch timestamp milliseconds>, start paging results. This may result in loss of data | The modinput encountered a TruSTAR "lastSeen" timestamp for which the enclave contained >1k observables.
If the enclave contains > 10k observables with same "lastSeen" timestamp, some of them may not end up in the kvstore. This case is very rare, and should only happen if someone performed multiple indicator submissions (to the submit-indicators 1.3 endpoint or the CSV indicator submission UI) and specified the same "lastSeen" timestamp on more than 10k. |
No. But some of the observables from your enclave might not arrive in the Splunk kvstores. | ignore. This edge-case will be handled in future versions of TruSTAR Unified app. |
| WARN | The following enclaves could not be found: [<comma-separated list of TruSTAR enclave IDs>]" | One or more of the enclave IDs specified in the modinput configs are not valid, or the "DOWNLOAD" account does not have read-access to it. It's possible that....
(a) your "DOWNLOAD" account did at one time have read-access to the enclave but someone (with a Station Company Administrator account) modified the "DOWNLOAD" account's permission to that enclave. (b) access to that enclave has been removed from your Station company account altogether. (c) your Station Company Administrator unsubscribed your company account from a particular integration, which removes that enclave from your company's access. (d) The enclave ID was incorrect / invalid. |
No. The Modinput will continue to download observables from other valid enclave IDs that its "DOWNLOAD" creds have access to. | You can ignore, but recommend review / update the modinput's enclave IDs list to contain only valid enclave IDs that the "DOWNLOAD" account has appropriate access to. |
| ERROR | 09-29-2021 15:34:46.421 +0000 ERROR sendmodalert [27651 AlertNotifierWorker-0] - action=trustar_enrich_threat_activity STDERR - ERROR: ts_spl_unified.modalerts. enrich.notable_event_service: REST API call to add indicator summaries endpoint info to notable event 0F7E38BF- AA18-4529-9961- 8E49CB2F0E70@@ notable@@ e9ecb3b 7cee274a1 5bf671b8 66381502 failed. Reason: b' <?xml version="1.0" encoding="UTF-8"?>\n<response>\n <messages>\n <msg type="WARN"> insufficient permission to access this resource</msg>\n </messages> \n</response>\n' | The Splunk user account attempting to run the "enrich" modaction does not have "update_notable_event" permissions. | The Enrich action will not work as expected until user's permissions are updated. | Give the user "ess_admin" role. |
| ERROR | 11-12-2021 14:30:28.227 -0500 ERROR AdminManagerExternal [101463 TcpChannelThread] - Unexpected error "<class 'splunktaucclib.rest_handler.error.RestError'>" from python handler: "REST Error [500]: Internal Server Error -- Traceback (most recent call last):\n File "/opt/splunk/etc/apps/trustar_unified/bin/trustar_unified/aob_py3/splunktaucclib/rest_handler/handler.py", line 117, in wrapper\n for name, data, acl in meth(self, *args, **kwargs):\n File "/opt/splunk/etc/apps/trustar_unified/bin/trustar_unified/aob_py3/splunktaucclib/rest_handler/handler.py", line 338, in _format_all_response\n self._encrypt_raw_credentials(cont["entry"])\n File "/opt/splunk/etc/apps/trustar_unified/bin/trustar_unified/aob_py3/splunktaucclib/rest_handler/handler.py", line 368, in _encrypt_raw_credentials\n change_list = rest_credentials.decrypt_all(data)\n File "/opt/splunk/etc/apps/trustar_unified/bin/trustar_unified/aob_py3/splunktaucclib/rest_handler/credentials.py", line 289, in decrypt_all\n all_passwords = credential_manager._get_all_passwords()\n File "/opt/splunk/etc/apps/trustar_unified/bin/trustar_unified/aob_py3/solnlib/utils.py", line 148, in wrapper\n return func(*args, **kwargs)\n File "/opt/splunk/etc/apps/trustar_unified/bin/trustar_unified/aob_py3/solnlib/credentials.py", line 277, in _get_all_passwords\n clear_password += field_clear[index]\nTypeError: can only concatenate str (not "NoneType") to str\n". See splunkd.log/python.log for more details. | Someone copied a passwords.conf file (for any app - not necessarily TruSTAR Unified) from another Splunk instance to the instance you're working on. | TruSTAR App will not work until you are able to successfully configure the app, which you can't do until you find the offending "passwords.conf" file. | Follow guidance / directions found in this thread:App Fails to Decrypt Encrypted Credential |
Actions to submit or enrich do not work
Splunk User Account Permissions
Splunk ES requires that the Splunk user account have Admin permissions to run Submit or Enrich commands. You can check the error message in Splunk ES to see if your permissions are the issue.
-
To find the error message for an adaptive response action failure, click on the hyperlink labeled View Adaptive Response Invocations. When you click on that hyperlink, you'll be taken to a search results page.
- Read the log entries to find the error message. The text in the red box below shows the error is due to the user's Splunk account having insufficient role permissions.
To verify if your account has the correct permissions, see Requirements to install Splunk Intelligence Management app for Splunk
| Configure Anomali Threatstream client to collect Indicator data from the Splunk Intelligence Management |
This documentation applies to the following versions of Splunk® Intelligence Management (Legacy): current
Feedback submitted, thanks!