For details, see:
Create a new playbook in
You can also use guided automation to create a new playbook. For details, see Use Data Preview to build, test, and edit Splunk SOAR playbooks.
Perform the following tasks to create a new playbook in :
- Select the Home menu, then select Playbooks.
- Select + Playbook to create a new playbook.
- Select the type of playbook you want to create.
Available playbook types depend on whether you have paired {{PONYDOCSPRODUCT}} with your Splunk Enterprise Security instance. The playbook type appears at the bottom of the configuration panel on the playbook editor canvas.
Playbook type Availability Based on Usage Enterprise Security Only when paired with Splunk Enterprise Security. Splunk Enterprise Security data Can be called by analysts within Splunk Enterprise Security, launched as an automation rule, or used as sub-playbooks. SOAR / Automation Named SOAR when paired with Splunk Enterprise Security.
Named Automation when not paired.Splunk SOAR data Can be called by analysts within Splunk SOAR, invoked automatically based on active labels, or used as sub-playbooks. Input Always available. Splunk Enterprise Security data or Splunk SOAR data Can only be called as sub-playbooks. Can only be run directly within the debugger. The playbook canvas displays, including the Start and End blocks. All playbooks must start with the Start block. Regardless if playbooks end with the End block, the end/on_finish function is always called at the end of a playbook's execution.
- Specify a name for the playbook.
- Playbooks in the same repository cannot have the same name. Playbooks in different repositories can have the same name.
- As a best practice, do not use personally identifiable information in the names of playbooks.
- Select Settings. In the Playbook Settings panel, select the Operates on field and specify one or more event labels that this playbook runs on. Operates on is only available for the Automation or SOAR playbook type. Optionally, specify additional settings. For additional details on playbook settings, see Manage settings for a playbook in .
After you have created your playbook, you can use the following tools:
- Select the auto-arrange playbook icon to neatly align the blocks.
- Select the zoom to fit icon, or select the icons with the plus and minus signs to zoom in or zoom out.
- For a list of keyboard shortcuts, see Use keyboard shortcuts in the playbook editor.
Next, see Add a new block to your playbook for instructions on how to add a new block and begin constructing your playbook.
Add outputs to your playbooks
You can add outputs to all types of playbooks. Outputs will be available for use by the parent playbook that calls a sub-playbook with outputs if a playbook is set to Synchronous mode. To add outputs to a playbook, follow these steps:
- Create a new playbook playbook. See "Create a new playbook in " at the beginning of this article.
- Select the End block to access the output configuration panel.
- Enter a name for the output in the Output Variable Name field. The name can only contain A-Z, a-z, 0-9, spaces, or underscores. The name must be a valid Python identifier and cannot start with a zero.
- (Optional) Enter help text or a description in the HelpText/Description field. This appears as help text on the playbook listing page and when selecting a playbook to run as a sub-playbook.
- (Optional) Select the Output field and search for and select an Output datapath from the list. Select Enter to go to the next result or use the
 icons to navigate results. You can also expand or collapse the lists by using the
  icons. You can add multiple output datapaths per output.
 - (Optional) Select a Data Type for the output. If you select a data type, downstream blocks can filter on data type to know whether the output is compatible or not. The Data Type automatically populates based on the first output datapath you selected.
- (Optional) Create a custom datapath if the datapath you need isn't available. When you add a custom datapath, it is only available for the block you add it to. To see an example of a custom datapath, see Example: Add a custom datapath to a playbook block. To create a custom datapath, follow these steps:
- Hover over a datapath field title and click +.
- Enter the datapath name.
- Select either Key or List from the drop-down menu. Use Key to use one value, and use List to use a list of values. Using List adds a .* value to the datapath and it appears as <list_name [] > with datapaths nested below it in the datapath picker. To add more values to your List, click the + icon under the top value of the list.
- Click Save.
- Click Done.
- Click Save.
- (Optional) Click + to add another output. You can add a maximum of 10 outputs per playbook.
- Add a block to your playbook. If you choose to add a playbook block, and the playbook has outputs, the Synchronous switch must be on to access the outputs. For more information, see Add a new block to your playbook.
- Enter a name for the playbook in the Playbook Name field.
- Click Save and enter a comment about the playbook.
After you save the playbook, it appears on the playbook listing page with the type and outputs listed.
Add inputs to an Input playbook
Use Input playbooks to pass data between playbooks and sub-playbooks. Input playbooks accept configured inputs to run, and can provide outputs. Input playbooks can only be used as sub-playbooks, and can't be triggered automatically as an independent playbook. As Input playbooks are only used as sub-playbooks, Input playbooks can be more prescriptive without having to accommodate for all types of data in the notable making playbooks easier to develop and reuse. To add inputs to an Input playbook, follow these steps:
- Create an Input playbook. See "Create a new playbook in " at the beginning of this article.
- Click the Start block to access the input configuration panel.
- Enter a name for the input in the Input Variable Name field. The name can only contain A-Z, a-z, 0-9, spaces, or underscores. Input variable names must be unique.
- (Optional) Enter help text or a description in the HelpText/Description field. This appears as help text on the playbook listing page and when selecting an Input playbook to run as a sub-playbook.
- (Optional) Select a Data Type value from the list. The Data Type value you set is used to filter data when assigning data to a configured input.
- (Optional) Create a custom datapath if the datapath you need isn't available. When you add a custom datapath, it is only available for the block you add it to. To see an example of a custom datapath, see Example: Add a custom datapath to a playbook block. To create a custom datapath, follow these steps:
- Hover over a datapath field title and click +.
- Enter the datapath name.
- Select either Key or List from the drop-down menu. Use Key to use one value, and use List to use a list of values. Using List adds a .* value to the datapath and it appears as <list_name [] > with datapaths nested below it in the datapath picker. To add more values to your List, click the + icon under the top value of the list.
- Click Save.
- (Optional) Click + to add another input. You can add a maximum of 10 inputs to an Input playbook.
- Add a block to your playbook. For more information, see Add a new block to your playbook.
- After you have added a block, select playbook inputs in the datapath picker for the block, usually found in the Select Parameter field, and then select the input you want this block to use.
- Click Save.
- Enter a name for the playbook in the Playbook Name field.
- Click Save and enter a comment about the playbook.
After you save the playbook, it appears on the playbook listing page with the type and inputs listed.
Use an Input playbook as a sub-playbook
After you have created an Input playbook, you can run it as a sub-playbook from an Automation playbook to avoid having to copy and maintain code in different places.
- Create an Automation playbook.
- Drag and drop the half-circle icon attached to any existing block in the editor. Select a Playbook block from the menu that appears.
- Click the Input tab and select the playbook you want to run from the drop-down list.
- Click in the input fields and assign the inputs datapaths from the drop-down list. Search for the datapaths you want to use and click Enter to go to the next result or use the
 icons to navigate results. You can also expand or collapse the lists by using the
  icons. If you assigned a Data Type, such as "ip", when configuring your inputs, you can filter the list by datapaths that have a Data Type of "ip" and toggle the filtering on or off using the "filter on ip" switch.
 - (Optional) Click the Info tab to view information about the playbook including the name, description, inputs, and outputs associated with the playbook.
- (Optional) Toggle the Synchronous switch on to make this playbook wait for the called playbook to complete running before continuing. If this switch is left off, the playbook finishes executing without waiting for the called playbook to complete and you won't be able to access the inputs.
- (Optional) Add any additional blocks to the playbook.
- Click Save.
For more information, see Run other playbooks inside your playbook in .
Sub-playbooks can't be called from Input playbooks.
Example: Use inputs and outputs to block an IP address
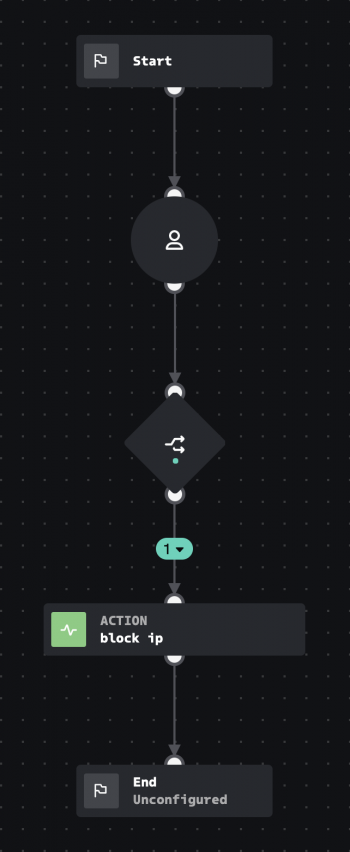
Run an Input playbook as a sub-playbook to avoid having to copy and maintain code in different places. The following Input playbook uses an IP address as an input, and then a prompt block to ask a user whether to block the IP or not. A decision block is used next, where if the decision is to block the IP, then a block IP action block is used to block the IP and the playbook sets the status of the block IP action as an output.
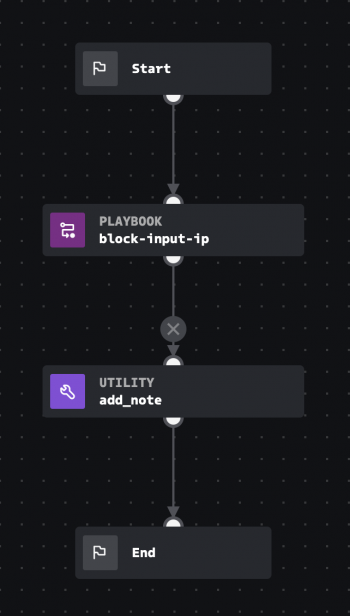
In the following example, the Input playbook is used as a sub-playbook. The parent playbook passes the event src_ip datapath as an input to the sub-playbook, named block-input-ip. The parent playbook then uses a utility block to add a note where the content of the note is the output of the block-input-ip playbook. Alternatively, you can use the Enterprise Security block to add a note to an Investigation.
| Use Data Preview to build, test, and edit playbooks | Add a new block to your playbook |
This documentation applies to the following versions of Splunk® SOAR (Cloud): current


 Download manual
Feedback submitted, thanks!