Synchronize workbooks across multiple Splunk SOAR servers
Keep all of your Splunk SOAR workbooks synchronized in environments where you have multiple Splunk SOAR servers, with multiple workbooks on each server.
What you need to be able to manage workbooks across multiple Splunk SOAR servers
Verify the following before you use Splunk App for SOAR Export to manage your Splunk SOAR workbooks:
- Make sure you have connected your Splunk SOAR servers and have designated one default server. See Steps to connect the Splunk platform with Splunk SOAR.
- Use only one instance of Splunk App for SOAR Export to manage workbooks across multiple Splunk SOAR servers. It's OK if Splunk App for SOAR Export is installed in a search head cluster where the search heads will share a single configuration file for the workbook synchronization.
- Check your workbook names and make sure they contain only the following supported characters:
- Alpha-numeric
a-z,A-Z,0-9 - Dashes
-and underscores_ - Parentheses
( )and curly braces{ } - Pipes
|and backslashes\ - Asterisks
* - Dollar signs
$ - Hashes
# - Percentage signs
% - Ampersands
& - Carats
^ - Colons
:
- Alpha-numeric
- On all Splunk SOAR servers where you have existing workbooks, backup your existing workbooks by using
page_size=0to query the /rest/workbook_template, /rest/workbook_phase_template, and /rest/workbook_task_template REST endpoints. For example, to back up the workbooks on the Splunk SOAR server with the IP address 10.1.2.3:https://10.1.2.3/rest/workbook_template?page_size=0 https://10.1.2.3/rest/workbook_phase_template?page_size=0 https://10.1.2.3/rest/workbook_task_template?page_size=0
See REST Workbook in the REST API Reference for Splunk SOAR (On-premises) manual. - In Connect Splunk App for SOAR Export and the Splunk Platform to a Splunk SOAR, you set up a new automation user to integrate Splunk SOAR servers with the Splunk platform. You must create a new role with delete privileges for Cases and Events and assign this role to that automation user. Without this permission, you will not be able to delete any workbooks.
- In Splunk SOAR, select Administration from the main menu.
- Select User Management > Roles & Permissions.
- Click + Role to create a new role.
- Specify a name and description for the role, then click the Delete checkbox in the Cases and Events fields.
- Click Add Users to add this role to a user.
- In the Users field, click the drop-down list and select the automation user you created earlier.
- Click Add.
- Click Create Role.
- From the main menu, select User Management > Users and verify that your automation user has the new role associated with it.
Synchronize your workbooks for the first time
Perform the following tasks to synchronize your Splunk SOAR workbooks for the first time.
- Navigate to Splunk App for SOAR Export on your Splunk platform.
- Click the Workbooks tab. The first time you access the page, no workbooks are listed.
- Click Sync Workbooks.
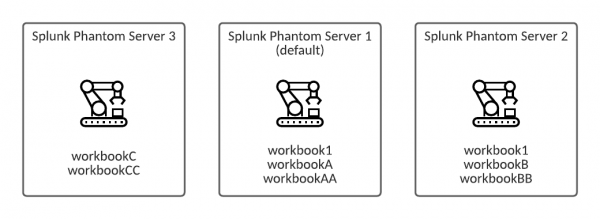
When you click Sync Workbooks for the first time, all workbooks across all connected Splunk SOAR servers are retrieved and listed on the page. For example, suppose you have three Splunk SOAR servers with the workbooks shown in the illustration below. There is a workbook named workbook1 on two of the servers.
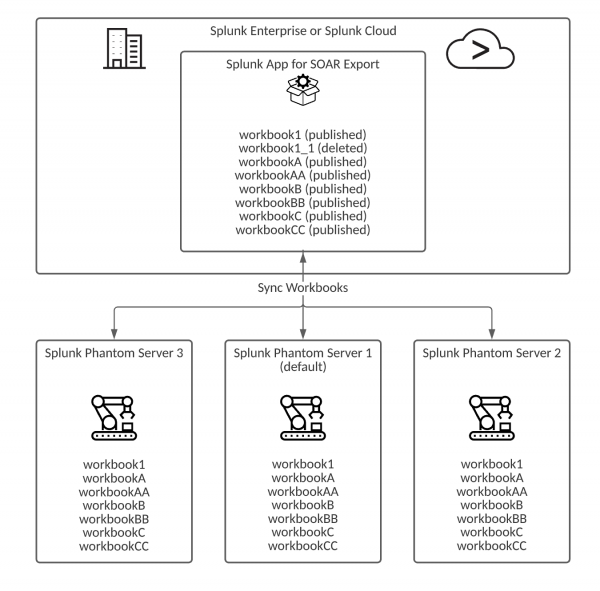
After clicking on Sync Workbooks, all of the workbooks across all servers are retrieved and listed on the Workbooks tab, and all workbooks are made available on all Splunk SOAR servers.
Make changes to your workbooks or add new workbooks from the default Splunk SOAR server
Each time you click Sync Workbooks Splunk App for SOAR Export does the following:
- Retrieve all workbooks from all connected Splunk SOAR servers.
- Push all workbooks to all connected Splunk SOAR servers.
When retrieving the workbooks from the Splunk SOAR servers, the version on the default server is used as the published version. When a workbook name is added for the first time, an underscore and version number are added to any workbooks with name conflicts across multiple Splunk SOAR servers. For example, workbook1 from the default server is propagated to the other Splunk SOAR servers. Since Server 2 also had a workbook with the same name, workbook1 on Server 2 is overwritten by workbook1 from Server 1. The workbook1 from Server 2 is renamed workbook1_1 and appears with a status of deleted in Splunk App for SOAR Export, and does not appear on any Splunk SOAR servers. If you want to preserve the workbook that is now named workbook1_1 you can restore the workbook. After another sync, workbook1_1 will appear on all Splunk SOAR servers.
This is the reason why you should make edits to your workbooks only on the default server, and use Splunk App for SOAR Export to synchronize all workbooks across your Splunk SOAR deployment.
Determine which workbooks are synchronized by deleting, restoring, or purging workbooks
You can delete, restore, or purge workbooks by performing the following tasks:
- (Optional) Enter a search string in the Filter field to limit the workbooks you see in the table. For example, enter _1 to only see workbooks with _1 in their names.
- Select one or more workbooks, or click the checkbox next to the Workbook Name column header to select all workbooks.
- Select the action you want to perform against the selected workbooks in the Edit Selection field. If you select a single workbook, you can also select the desired action in the Actions column.
The following actions are available:
| Option | Description |
|---|---|
| Delete | Delete the selected workbook from all Splunk SOAR servers. The workbook is still visible from the Splunk platform with a status of Deleted. You can restore this workbook by selecting the Restore option.
If you want to delete any connected Splunk SOAR servers and the workbooks on that server, you must delete the workbooks before deleting the server. |
| Restore | Restore a deleted workbook. The workbook is restored on all Splunk SOAR servers.
In some cases, a restored workbook may show a status of Unknown. This will get resolved after you click Sync Workbooks. |
| Purge | Delete the selected workbook from all Splunk SOAR servers and also do not display this workbook in the Splunk platform. Purged workbooks cannot be restored. |
| Configure a Splunk asset in Splunk SOAR to pull data from the Splunk platform | Configure global field mappings |
This documentation applies to the following versions of Splunk® App for SOAR Export: 4.3.13, 4.3.21, 4.3.25


 Download manual
Feedback submitted, thanks!