Simple customizations
To use custom CSS styling
To use custom JavaScript
One of the first things you might want to do is use one of the following mechanisms to change the look or behavior of an app:
- Use custom CSS to change the look of your app.
- Use application.js to add custom JavaScript and change your app behavior.
You might consider simple CSS or JavaScript changes instead of more involved mechanisms, if you need to:
- Make changes to one point in your Splunk view.
- Change the style or behavior of a specific module or modules within a Splunk view.
- Make changes across an entire app. (This is not recommended.)
Note: It might be useful to recall from Getting started that default CSS files are located at $SPLUNK_HOME/share/splunk/search_mrsparkle/exposed/css and $SPLUNK_HOME/share/splunk/search_mrsparkle/exposed/css/skins. For some modules distributed with Splunk, you can find their CSS files in the $SPLUNK_HOME/share/splunk/search_mrsparkle/modules directory for the module.
Because these kinds of customization should already be familiar to you and because minimal Module System knowledge is needed, these are the first examples presented.
Details
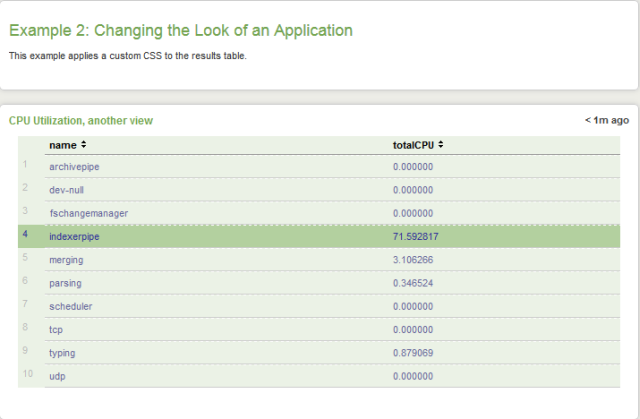
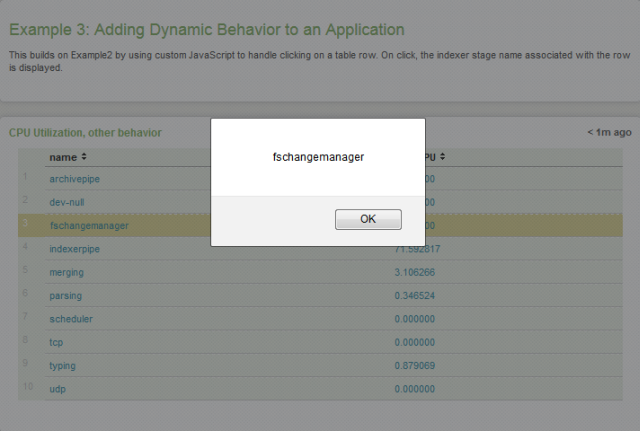
This recipe demonstrates simple customization using two examples. Example2 changes app appearance using CSS customization. Example3 changes app behavior by hooking in custom JavaScript. Both build on our basic CPU utilization app.
Using CSS styling, we enhance the appearance of the results table, applying color to the cell background and highlighting the active row:

CSS styling requires providing a custom CSS file and specifying the filename in the view.
To show some action when a row is clicked, our custom JavaScript displays an alert showing the indexer stage of clicked row:
All resources, including images, custom CSS, and custom JavaScript, are located in the $SPLUNK_HOME/etc/apps/Dev_tutorial/appserver/static directory.
It is useful to understand these simple customization techniques because you'll want to combine these with more advanced customizations you'll learn about to create increasingly sophisticated applications, targeted to your domain.
To use custom CSS styling
- Create your view specification file, Example2.xml, in the $SPLUNK_HOME/etc/apps/Dev_tutorial/default/data/ui/views directory.
- Specify the custom CSS file as a <view> tag parameter. The rest of the view specification is the same as Example1.xml.
<view template="dashboard.html" stylesheet="example2Styles.css">
- Create your custom CSS file, example2Styles.css, in the $SPLUNK_HOME/etc/apps/Dev_tutorial/appserver/static directory. Our example changes the default cell background color and highlights a row on hover.
table.simpleResultsTable tbody{

   background: #ebf2e6;

}
table.simpleResultsTable td{

   color: #669;
   border-top: 1px dashed #fff;

}
table.simpleResultsTable tbody tr:hover td{

   color: #339;
   background: #b3d09f;

}
To use custom JavaScript
The application.js file is used, by convention, to override existing methods for a particular instance. If you want SplunkWeb to do something specific on a user action, such as a click, change, or mouse-over event, use application.js to override the default behavior, replacing the default action with your custom handler.
In Example3, the NullModule is a child of the SimpleResultsTable module. A NullModule, as you might expect, does nothing, but provides a container for custom module code. As such, application.js code can use NullModule as a convenient entry point into the view context.
- Create your view specification file, Example3.xml, in the $SPLUNK_HOME/etc/apps/Dev_tutorial/default/data/ui/views directory.
- Add NullModule as a SimpleResultsTable child module. The rest of the Example3 view specification is the same as Example2.
<module name="SimpleResultsTable">

   <param name="drilldown">row</param>
   <param name="displayMenu">true</param>
   <module name="NullModule"></module>

</module>
The NullModule module executes code attached to it when it is called by the SimpleResultsTable module.
- Create the application.js file in the $SPLUNK_HOME/etc/apps/Dev_tutorial/appserver/static directory and add the following code.
switch (Splunk.util.getCurrentView()) {

   case "Example3":
   if (Splunk.Module.NullModule) {
       Splunk.Module.NullModule =
           $.klass(Splunk.Module.NullModule, {
               getModifiedContext: function() {
               var context = this.getContext(),
               click = context.getAll('click');
               alert (click.value);
               return context;
           }
       });
   }
   break;}
In the code above, we ensure the code is executed only if the current view is Example3 and we are in the NullModule namespace. Use getCurrentView() to ensure you are operating on only the desired view.
We use the JQuery.klass() utility to instantiation a NullModule class to override the getModifiedContext() method. All modules inherit from the AbstractModule base class.
We get the click property from the NullModule context to display in an alert message.
Tip: Alternatively, to the style of specific elements in a Splunk view, use the JQuery ready() method, getCurrentView(), and a selector to scope your changes to the specific elements, usually using the id attribute.
if (Splunk.util.getCurrentView() == 'myview') {

   $(document).ready( function() {
       $('.SimpleResultsTable').parent().css('width', '100%');
   });}
Related recipes
Create a custom module shows the basics of creating a custom app, which you can enhance further by including CSS and application.js customizations.
| Get the tutorial app | Create a custom module |
This documentation applies to the following versions of Splunk® Enterprise: 7.0.0, 7.0.1, 7.0.2, 7.0.3, 7.0.4, 7.0.5, 7.0.6, 7.0.7, 7.0.8, 7.0.9, 7.0.10, 7.0.11, 7.0.13, 7.1.0, 7.1.1, 7.1.2, 7.1.3, 7.1.4, 7.1.5, 7.1.6, 7.1.7, 7.1.8, 7.1.9, 7.1.10, 7.2.0, 7.2.1, 7.2.2, 7.2.3, 7.2.4, 7.2.5, 7.2.6, 7.2.7, 7.2.8, 7.2.9, 7.2.10, 7.3.0, 7.3.1, 7.3.2, 7.3.3, 7.3.4, 7.3.5, 7.3.6, 7.3.7, 7.3.8, 7.3.9

 Download manual
Feedback submitted, thanks!