Anatomy of an app
| Important notice: As part of Advanced XML deprecation, the Module System is officially deprecated beginning with Splunk Enterprise 6.3. For more information, see Advanced XML Deprecation. |
About the example
The Module System borrows many concepts from other application frameworks, like Django and TurboGears. If you're familiar with modern web application frameworks, you'll already have a basic understanding of how the Module System works.
Here, we use the simple custom application example to show the fundamental code and concepts underlying Module System apps. You'll be introduced to some Splunk-specific terminology, the structure and declaration of an application, and client- and server-side programming.
Note: You can view the Source code, used in this example to follow along with the tutorial. You can also download and install the full set of examples as an app to run the examples from the UI and browse the actual implementation.
- Download Dev_tutorial.zip.
- Extract the file to your
$SPLUNK_HOME/etc/appsdirectory. - Restart Splunk.
- Run the Dev_tutorial app.
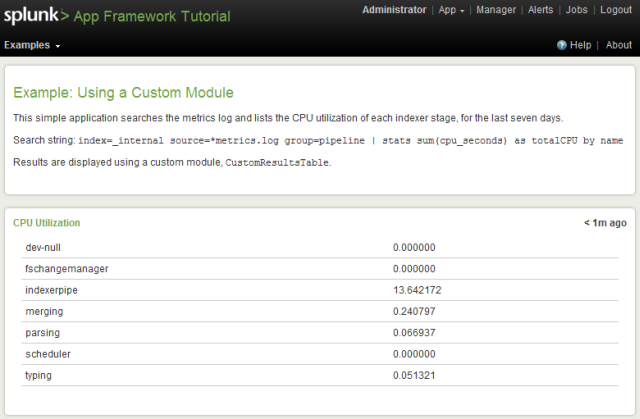
This example app displays CPU utilization using readily available data, the metrics log. You can find a detailed description of the log in Troubleshooting inputs with metrics.log, Some details on metrics.log data, format, utility, and Metrics.log information. But, here, we're going to look at only the CPU utilization of various indexer pipeline stages:
A typical pipeline typing section log entry might look like this:
group=pipeline, name=parsing, processor=utf8, cpu_seconds=2.118462, executes=306, cumulative_hits=112120
So, because we want to extract and sum the CPU seconds for each pipeline stage, the search string we'll use is:
index=_internal source=*metrics.log group=pipeline | stats sum(cpu_seconds) as totalCPU by name
We display the sum of CPU seconds over the specified timerange for each pipeline stage.
To get interesting data for this example, you'll need to run the indexer.
As a point of comparison, you might consider how this same application can be implemented using the SimpleResultsTable module.
Some terminology
Here are some terms you'll encounter meaningful to Splunk application development:
| advanced XML | Advanced XML are XML-formatted files used to define the visual layout and module data flow dependencies. Likely, you're creating a custom application because the simplified XML shipped with Splunk doesn't quite solve the unique problems of your application domain. |
| app | An app is a redistributable software package having presentation and programming logic for visualizing an application domain and responding to domain-specific events. |
| Mako template | Mako is a Python Server Page template library used to define the presentation layer. (See Mako Templates for Python ) |
| module | Modules are components that implement the look-and-feel of a view, primarily client- and server-side code encapsulating the AJAX pattern. |
| view | A view is a collection and layout of modules that work together, hierarchically, to give an enhanced user experience when exploring or visualizing data in Splunk. Views are configured using view XML. |
Structural overview
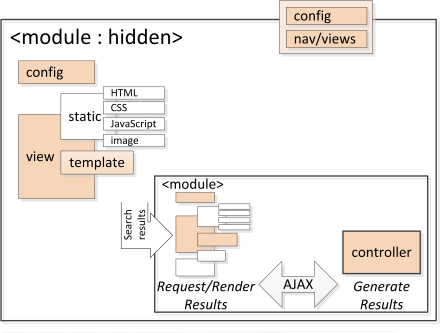
All apps have the same basic layout, which might be familiar to you, if you've developed apps using advanced XML:
XML files define app metadata; view components, including modules, which implement app behavior; and component hierarchical relationships.
In the diagram, the config and nav/views define the modules that compose an app and module parameters and relationships.
Note: The shaded blocks in the diagram are those parts of an app covered in this Getting Started.
A module encapsulates all of the code that implements part of the application logic or view, including client- and server-side code. We discuss module implementation in more detail, later. From a configuration point of view modules can be encapsulated in other modules, and the figure shows a module encapsulated in a hidden module, inheriting properties and context from the hidden module.
Corresponding directory structure
App component relationships are implicit, relying on a directory structure and naming convention, which the framework resolves. All application code is located in a $SPLUNK_HOME/etc/apps subdirectory for the app. In this example, the Dev_tutorial app is located in the $SPLUNK_HOME/etc/apps/Dev_tutorial directory.
A number of subdirectories are located in the application directory. The subdirectories we're interested in this example, minimally, are:
| $SPLUNK_HOME/etc/apps/Dev_tutorial/default | Configuration files that describe the view presentation components and app structure. |
| $SPLUNK_HOME/etc/apps/Dev_tutorial/appserver | Program and resource files that implement the application logic, including modules and MVC components. |
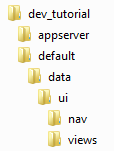
The default directory has the following structure:
- $SPLUNK_HOME/etc/apps/Dev_tutorial/default/app.conf defines your app metadata, such as the app name.
- $SPLUNK_HOME/etc/apps/Dev_tutorial/default/data/ui/nav/default.xml defines your app navigation artifacts, such as the Examples drop-down menu.
- $SPLUNK_HOME/etc/apps/Dev_tutorial/default/data/ui/views/Example.xml defines your app presentation layer hierarchy.
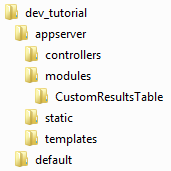
The appserver directory has the following structure:
- $SPLUNK_HOME/etc/apps/Dev_tutorial/appserver/controllers contains your app MVC controllers, which are not used in this example.
- $SPLUNK_HOME/etc/apps/Dev_tutorial/appserver/modules/ contains your custom app modules. For this example, you can see that CustomResultsTable is the only custom module included.
- $SPLUNK_HOME/etc/apps/Dev_tutorial/appserver/static contains any resources, such as images, used in your app.
- $SPLUNK_HOME/etc/apps/Dev_tutorial/appserver/templates contains your app MVC Mako templates, which are not used in this example.
By convention, your custom module subdirectory name and implementation files must have the same base name. The CustomResultsTable module directory contains the following files that implement your application logic:
| CustomResultsTable.conf | (required) Module class, parameters and metadata. |
| CustomResultsTable.css | (optional) Custom CSS required by your module. |
| CustomResultsTable.html | (optional) Module template of your presentation layer. |
| CustomResultsTable.js | (required) Client-side logic. |
| CustomResultsTable.py | (optional) Server-side logic. |
We will now go into more detail about how to implement your custom app.
App definition
The app.conf file defines your app structure at the highest level, which is the relationship between modules.
[ui]
is_visible = true
label = Module System Tutorial
[package]
id = Dev_tutorial
[launcher]
author = Splunk, Inc.
description = Module System Tutorial App
version = 1.0
It is important that the id value in the package stanza is unique for your Splunk instance.
Note: By convention, the id property is the same as the name of your app directory, /apps/Dev_tutorial.
The default.xml file defines your view navigation, which is your view entry point:
<nav>
   <collection label="Examples">
   <view name="Example" />
   </collection>
</nav>
This example provides the Examples drop-down menu, in the upper left, with one Example menu item. You might add variations of this example by adding to the menu, which is what we show in the Cookbook.
Presentation layer
The declarations in your /views directory is where you define the look and behavior of your app. Our Example.xml file has the following sections implemented, which includes existing and custom module declarations.
The top section shows a typical application header layout:
<module name="AccountBar" layoutPanel="appHeader"/>
<module name="AppBar" layoutPanel="navigationHeader"/>
<module name="Message" layoutPanel="messaging">
   <param name="filter">*</param>
   <param name="clearOnJobDispatch">False</param>
   <param name="maxSize">1</param>
</module>
We've provided some text explaining the example in the middle section:
<module name="StaticContentSample" layoutPanel="panel_row1_col1">
   <param name="text"><![CDATA[
       <h1>Example: Using a Custom Module</h1>
       <p>This simple application searches ...</p>
       <p>Search string:  index=_internal ...</p>
       <p>Results are displayed using ...</p>
   ]]></param>
</module>
Finally, we've specified the CustomResultsTable module to render the search results:
<module name="HiddenSearch" layoutPanel="panel_row2_col1" group="CPU Utilization" autoRun="True">
   <param name="search">index=_internal source=*metrics.log group=pipeline | stats sum(cpu_seconds) as totalCPU by name</param>
   <param name="earliest">-7d</param>
   <module name="CustomResultsTable"></module>
</module>
Notice that the CustomResultsTable module is encapsulated in the HiddenSearch module, which initiates the search job. On context change or job status change, the CustomResultsTable module inherits and displays the results from the HiddenSearch module.
Also, for this example the search command is statically defined.
AJAX call
The AJAX call, shown in the diagram as the interface between Request/Render Results and Generate Results, is abstracted because your app client ultimately inherits from Splunk.Module (see $SPLUNK_HOME/share/splunk/search_mrsparkle/modules/AbstractModule.js).
All you need to do is provide server-side results and client-side response handlers to render the results. The Module System automatically makes the AJAX request on your behalf.
Custom module definition
This example demonstrates the fundamental way you can leverage the Module System to create new applications. In addition to using configuration files, which you have already seen, the primary way of extending framework functionality is by subclassing and overriding module base class methods. In your methods you have access to Module API utilities with their getter and setter functions for accessing Module System properties.
The module subsystem abstracts the MVC pattern through high-level interfaces. In subsequent examples, you will use the MVC pattern more directly to setup and monitor your application. But you might find it useful to gain some understanding of how the Module System works by looking at the following source code:
| ModuleController and ModuleHandler classes. | $SPLUNK_HOME/lib/Python2.x/site-packages/splunk/appserver/mrsparkle/lib/module.py |
| ViewController class. View states are of special interest. | $SPLUNK_HOME/lib/Python2.x/site-packages/splunk/appserver/mrsparkle/controllers/view.py |
We'll complete the discussion by looking at the client- and server-side logic, but first let's see how to define and configure your app. All of these files are located in the following directory:
$SPLUNK_HOME/etc/apps/Dev_tutorial/appserver/modules/CustomResultsTable
CustomResultsTable.conf
Use the CustomResultsTable.conf file to define your module signature.
Module class name and base class from which your module inherits:
[module]
className = Splunk.Module.CustomResultsTable
superClass = Splunk.Module.DispatchingModule
Note: Parameters are not used in this example but you will learn how to use parameters in subsequent examples.
Client-side code walkthrough
The client-side code includes:
- HTML module template
- Style sheet (optional)
- JavaScript
If the example used other static resources, such as images and other HTML pages, they would be stored in the $SPLUNK_HOME/etc/apps/Dev_tutorial/appserver/static directory.
CustomResultsTable.html
The main module HTML page is a Mako template. Here, we have defined a <div> tag where we will render the results of the search request.
<%page args="module"/>
<div class="CustomResultsTableResults"></div>
The template has a specifically defined argument signature, indicating this is a module template. See <%page>.
CustomResultsTable.css
In this example, we use CustomResultsTable.css for custom styling. You have the option of whether or not to use custom styling. You could use the default style sheet:
$SPLUNK_HOME/share/splunk/search_mrsparkle/exposed/css/skins/default/default.css
CustomResultsTable.js
Client-side logic hooks into the framework by subclassing Splunk.Module.DispatchingModule for attaching handlers to job progress events, overriding methods to primarily handle context change, job progress events, and results rendering.
Define the CustomResultsTable class using the klass construct.
Splunk.Module.CustomResultsTable = $.klass(Splunk.Module.DispatchingModule, {})
Next, initialize the class by calling the base class, and define a local container variable for rendering the results.
initialize: function($super, container) {
       $super(container);
       this.myParam = this.getParam("myParam");
       this.resultsContainer = this.container;
   },
Note: Module initialization always requires calling the base class constructor using $super.
onJobDone method
Your app can perform actions based on various job state functions, such as onJobProgress(). In this example, we only want to render the results after the job completes, so we use a callback function to handle the job done state change.
onJobDone: function(event) {
       this.getResults();
   },
The Splunk.Module base class, in AbstractModule.js, implements the getResults() function, which handles the response to the AJAX request and calls the renderResults() method.
Calling getResults() causes the getResultParams() and renderResults() functions to be called, in turn, to retrieve and render the response data.
getResultParams method
Implement the getResultParams() method to get the results returned as a parameter, using the search ID for the active context.
getResultParams: function($super) {
       var params = $super();
       var context = this.getContext();
       var search  = context.get("search");
       var sid         = search.job.getSearchId();
       if (!sid) this.logger.error(this.moduleType, "...");
       params.sid = sid;
       return params;
   },
renderResults method
This method renders an HTML fragment formatted on the server, in the browser.
renderResults: function($super, htmlFragment) {
   if (!htmlFragment) {
       this.resultsContainer.html('No content available.');
       return;
   }
   this.resultsContainer.html(htmlFragment);
}
The table of CPU utilization is rendered in the <div> defined in CustomResultsTable.html.
We could have sent raw results data to the client and had the client do the HTML formatting, but we will save that for another example where we transfer JSON data.
Server-side code walkthrough
The server-side code implements the generateResults() method of the ModuleHandler class. It formats the HTML code that will be transferred to and rendered in the client browser.
CustomResultsTable.py
Almost all modules require the following imports:
import controllers.module as module
import splunk
import splunk.search
import splunk.util
import splunk.entity
import lib.util as util
import lib.i18n as i18n
import logging
logger = logging.getLogger('splunk.module.CustomResultsTable')
For debugging server code, we advise using built-in logging feature:
We allocated a logger for the CustomResultsTable class.
Define the CustomResultsTable class, passing the ModuleHandler base class as a parameter:
class CustomResultsTable(module.ModuleHandler):
The generateResults() method is the only method we need to override to build the HTML results page.
def generateResults(self, host_app, client_app, sid, count=1000,
offset=0, entity_name='results'):
This method is called by ModuleController.renderModule() when the search completes, with the following possible arguments:
| host_app | Where this module resides. (not used in this example) | |
| client_app | Namespace of app context which made the request. (not used in this example) | |
| sid | Search ID, used to get information about the job. | |
| count | 1000 | Together with offset, gives an index of the returned data. |
| offset | 0 | Together with count, gives an index of the returned data. |
| entity_name | results | Reference to the actual returned data. |
Validate the parameters, which should always be valid for this example.
count = max(int(count), 0)
offset = max(int(offset), 0)
if not sid:
raise Exception('CustomResultsTable.generateResults - sid not passed!')
Get the job property for this search ID. The job information is used to extract the field names, results data, and job progress status for the search.
try:
job = splunk.search.getJob(sid)
except splunk.ResourceNotFound, e:
   logger.error('CustomResultsTable could not find job %s.' % sid)
   return _('<p class="resultStatusMessage">Could not retrieve data.</p>')
At last, we are ready to do the work we set out to do, which is to build the results page to be sent to the client.
output = []
output.append('<div class="CustomResultsTableWrapper">')
output.append('<table class="CustomResultsTable splTable">')
Inside the CustomResultsTableResults <div> tag in our HTML template we're adding a table of CPU utilization results wrapped in a CustomResultsTableWrapper <div>.
Let's build the table by extracting the field names of interest and, for each field, associate the field value.
fieldNames =
[x for x in getattr(job, entity_name).fieldOrder if (not x.startswith('_')]
offset_start = offset
if offset < 0 and count < abs(offset):
offset_start = -count
dataset = getattr(job, entity_name)[offset_start: offset+count]
for i, result in enumerate(dataset):
   output.append('<tr>')
   for field in fieldNames:
       output.append('<td')
       fieldValues = result.get(field, None)
       if fieldValues:
           output.append('>%s</td>' % fieldValues)
       else:
           output.append('></td>')
   output.append('</tr>')
output.append('</table></div>')
The results in the search dataset include all the pipeline name fields because the search selected by name. From these data, we construct the table, populating each row with the pipeline name and summary value from fieldValues.
The completed HTML-formatted table is returned and will subsequently be sent to the client.
if (entity_name == 'results' and job.resultCount == 0):
   if job.isDone:
       output = self.generateStatusMessage(entity_name, 'nodata', job.id)
   else:
       output = self.generateStatusMessage(entity_name, 'waiting', job.id)
else:
output = .join(output)
return output
| Environment setup | Testing your app |
This documentation applies to the following versions of Splunk® Enterprise: 7.0.0, 7.0.1, 7.0.2, 7.0.3, 7.0.4, 7.0.5, 7.0.6, 7.0.7, 7.0.8, 7.0.9, 7.0.10, 7.0.11, 7.0.13, 7.1.0, 7.1.1, 7.1.2, 7.1.3, 7.1.4, 7.1.5, 7.1.6, 7.1.7, 7.1.8, 7.1.9, 7.1.10, 7.2.0, 7.2.1, 7.2.2, 7.2.3, 7.2.4, 7.2.5, 7.2.6, 7.2.7, 7.2.8, 7.2.9, 7.2.10, 7.3.0, 7.3.1, 7.3.2, 7.3.3, 7.3.4, 7.3.5, 7.3.6, 7.3.7, 7.3.8, 7.3.9


 Download manual
Feedback submitted, thanks!