The Set Sourcetype page
The Set Sourcetype page lets you improve event processing by previewing how your data will be indexed. Use this page to confirm that indexes your data as you want it to appear.
Preview data prior to indexing
The Set Sourcetype page appears after you use the Upload or Monitor pages to specify a single file as a source of data.
On the Set Sourcetype page, you can make adjustments to how the software indexes your data. You can adjust and improve the indexing process interactively so that when Splunk software indexes and stores the incoming data, the event data ends up in the format that you want.
Assign the correct source type to your data
The Set Sourcetype page helps you apply the correct source type to your incoming data. The source type is one of the default fields that is assigned to all incoming data, and determines how Splunk software formats the data during indexing. By assigning the correct source type to your data, the indexed version of the data (the event data) will look the way you want it to, with correct timestamps and event breaks.
comes with many predefined source types, and attempts to assign the correct source type to your data based on its format. In some cases, you might need to manually select a different predefined source type to the data. In other cases, you might need to create a new source type with customized event processing settings.
The page displays how will index the data based on the application of a predefined source type. You can modify the settings interactively and save those modifications as a new source type.
Use the Set Sourcetype page to:
- See what your data will look like without any changes, using the default event-processing configuration.
- Apply a different source type to see whether it offers results more to your liking.
- Modify settings for timestamps and event breaks to improve the quality of the indexed data and save the modifications as a new source type.
- Create a new source type from scratch.
The page saves any new source types to a props.conf file that you can later distribute across the indexers in your deployment, so that the source types are available globally. See "Distribute source type configurations".
For information on source types, see "Why source types matter" in this manual.
Use the Set Sourcetype page
When the Set Sourcetype page loads, chooses a source type based on the data you specified. You can accept that recommendation or change it.
Here is an example of the Set Sourcetype page.

- Look at the preview pane on the right side of the page to see how will index the data. Review event breaks and time stamps.
- (Optional) View the event summary by clicking on the View event summary link on the right. Splunk Web displays the event summary in a new window. See "View event summary".
- If the data appears the way that you want, then proceed to Step 5. Otherwise, choose from one of the following options:
- Choose an existing source type to change the data formatting. See "Choose an existing source type."
- Adjust time stamps, delimiters, and line breaking manually, then save the changes as a new source type. See Adjust time stamps and event line breaks."
- After making the changes, return to Step 1 to preview the data again.
- After you are satisfied with the results, click "Next" to proceed to the Input Settings page.
Choose an existing source type
If the data does not appear the way that you want, see whether or not an existing source type fixes the problem.
Note: If can detect a source type, the source type is displayed in the "Sourcetype <sourcetype>" button. If a source type cannot be determined, "Sourcetype: System Defaults" is displayed. Input Settings

- Click the Sourcetype: <sourcetype> button to see a list of source type categories. Under each category is a list of source types within that category.
- Hover over the category that best represents your data. As you do, the source types under that category appear in a pop-up menu to the right.
- Select the source type that best represents your data. Splunk Web updates the data preview pane to show how the data looks under the new source type. You might need to scroll to see all source types in a category.
- Review your data again.
View event summary

You can see a summary of the events within the data sample by clicking the "View Event Summary" link on the right side of the page. This summary shows the following information:
- The size of the sample data, in bytes.
- The number of events that were present in the sample.
- The chart that represents the distribution of the events over time. Splunk software uses date stamps within the file to determine how to display this chart.
- A breakdown of the number of lines each event in the sample took up.
Adjust time stamps and event breaks
If you choose an existing source type without success, then you can manually adjust how processes timestamps and event line breaks for the incoming data.
To manually adjust time stamp and event line breaking parameters, use the Event Breaks, Timestamp, Delimited Settings, and Advanced drop-down tabs on the left pane of the "Set Sourcetypes" page. The preview pane updates as you make changes to the settings.
Note: Some tabs appear only if detects that a file is a certain type, or if you select a specific source type for a file.
- The Event breaks tab appears when cannot determine how to line-break the file, or if you select a source type that does not have line breaking defined.
- The Delimited settings tab appears only when detects that you want to import a structured data file, or you select a source type for structured data (such as
csv).
For more information about how to adjust time stamps and event breaks, see Modify event processing.
- Click the Event breaks tab. The tab displays the Break type buttons, which control how Splunk software line-breaks the file into events.
- Auto: Detect event breaks based on the location of the time stamp.
- By Line: Breaks every line into a single event.
- Regex…: Uses the specified regular expression to determine line breaking.
- Click the Timestamps tab. The tab expands to show options for extraction. Select from one of the following options.
- Auto: Extract timestamps automatically by looking in the file for timestamp events.
- Current time: Apply the current time to all events detected.
- Advanced: Specify the time zone, timestamp format (in a specific format known as strptime()), and any fields that comprise the timestamp.
- Click the Delimited settings tab to display delimiting options.
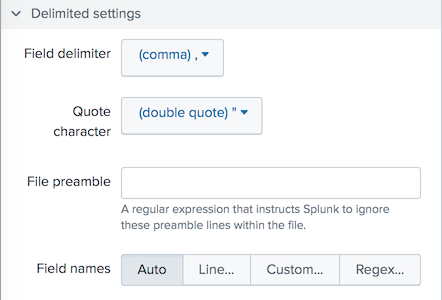
- Field delimiter: The delimiting character for structured data files, such as comma-separated value (CSV) files.
- Quote character: The character that uses to determine when something is in quotes.
- File preamble: A regular expression that tells to ignore one or more preamble lines (lines that don't contain any actual data) in the structured data file.
- Field Names: How to determine field names: Automatically, based on line number, based on a comma-separated list, or through a regular expression.
- Click the Advanced tab to display fields that let you enter attribute/value pairs that get committed directly to the
props.confconfiguration file.
Caution: The "Advanced" tab requires advanced knowledge of Splunk features, and changes made here might negatively affect the indexing of your data. Consider consulting a member of Splunk Professional Services for help in configuring these options.

Make configuration changes in the Advanced tab
- Click a field to edit props.conf entries that generates based on your previous choices.
- Click on the X to the right of an attribute/value field pair to delete that pair.
- Click New setting to create a new attribute/value field pair and specify a valid attribute and value for
props.conf. - Click Apply settings to commit the changes to the
props.conffile.
Next step
| Forward data | Prepare your data for preview |
This documentation applies to the following versions of Splunk® Enterprise: 7.1.0, 7.1.1, 7.1.2, 7.1.3, 7.1.4, 7.1.5, 7.1.6, 7.1.7, 7.1.8, 7.1.9, 7.1.10
Feedback submitted, thanks!