Create a custom module
| Important notice: As part of Advanced XML deprecation, the Module System is officially deprecated beginning with Splunk Enterprise 6.3. For more information, see Advanced XML Deprecation. |
To add your module code
To define your custom module
To implement the server-side search request handler
To implement the client-side results renderer
To integrate the module into the app view
Typically, applications are constructed from prebuilt modules distributed with Splunk. You can list modules available in your Splunk distribution by logging in to Splunkweb and entering http://<host>:<port>/en-US/modules. For example, http://localhost:8000/en-US/modules. This also provides basic documentation about how to use a module.
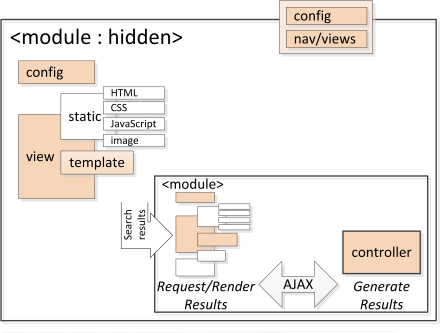
For your application domain, you may need to create a custom module to present your data in a more meaningful way. Modules are at the core of Splunk apps, where the UI view is constructed from a hierarchy of modules. Data returned from your search is passed between modules and handled, or rendered, according to module functionality. The following figure introduces you to the module components:
Modules are nested and search results are typically passed from parent to child modules for processing. The figure depicts a HiddenModule, because it has no UI, which initiates the search request in our recipes. Using the AJAX pattern, modules pend on search results generated by the module controller on the host. The module client templating mechanism renders the results.
Details
This recipe demonstrates the basic steps needed to create a module:
- Create the example source files in the correct directory.
- Define the module so it is recognized by the Module System.
- On the server, handle the search request and return the requested data.
- On the client, render the response data.
- Integrate the module into the app view.
These steps are common to all modules, and demonstrated in this recipe using the CustomResultsTable module.
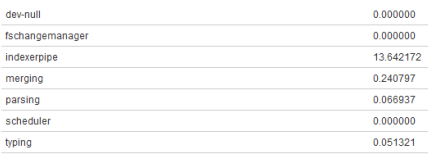
The CustomResultsTable module extracts CPU utilization data from the indexed metrics.log file using the following search string:
index=_internal source=*metrics.log group=pipeline |
stats sum(cpu_seconds) as totalCPU by name
and displays results in tabular format:
Creating custom modules is the foundation of most of the recipes in this cookbook.
To add your module code
Create the $SPLUNK_HOME/etc/apps/Dev_tutorial/appserver/modules/CustomResultsTable directory and add the following files:
- CustomResultsTable.conf
- CustomResultsTable.js
- CustomResultsTable.py
You can copy and paste the file contents from the sample code. Experiment with modifying the code to better understand how Module System works.
Note: Remember that modules minimally require a .conf and a .js file.
To define your custom module
- In the CustomResultsTable.conf file, give the module a class name and specify the base class from which it inherits.
[module]
className = Splunk.Module.CustomResultsTable
superClass = Splunk.Module.DispatchingModule
description = This is my first custom module.
- In the same file, define module parameters to customize your view. For simplicity, this module does not have parameters so none are specified.
[param:myParam]required = False
default = none
The configuration file hooks your module into the Module System. The Splunk.Module.DispatchingModule abstract base class, itself a subclass of the root Splunk.Module abstract class, handles the attachment of jobProgress and jobDone events, such that the onJobProgress() and onJobDone() methods are only called when the job context actually changes.
Note: The description and parameter fields are used to auto-document your module, which you can view when you enter http://<host>:<port>/en-US/modules in Splunkweb.
To implement the server-side search request handler
Server-side code is implemented in the CustomResultsTable.py file.
Note: The root filename is the same as the unique className defined in CustomResultsTable.conf.
- Import the libraries needed by most modules.
import controllers.module as module
import splunk
import splunk.search
import splunk.util
import splunk.entity
import lib.util as util
import lib.i18n as i18n
import logging
Tip : It is the recommended practice to have each import statement on a separate line.
(See: PEP 8 -- Style Guide for Python Code ) - Create a logger for your module to log error and debug messages.
logger = logging.getLogger('splunk.module.CustomResultsTable')
Messages are logged by calling logger. logLevel ( logMessage ), which appends logMessage to the $SPLUNK_HOME/var/log/splunk/web_service.log file.
Loggers are arranged in a namespace hierarchy so create your logger passing the module namespace, splunk.module.CustomResultsTable as a parameter.
- Define the module class, specifying the base class as a parameter.
class CustomResultsTable(module.ModuleHandler)
The ModuleHandler base class defines Module System server-side extension points for handling module requests. Your module hooks into Module System by implementing the methods for your particular application.
- The only method that needs to be implemented for this simple module is the generateResults() method. Define the method and parameters used.
def generateResults(self, host_app, client_app, sid, count=1000,

                   offset=0, entity_name='results'):
Validate the parameters and set local variables.
count = max(int(count), 0) offset = max(int(offset), 0) if not sid:
raise Exception('CustomResultsTable.generateResults - sid not passed!')try:
job = splunk.search.getJob(sid)
except splunk.ResourceNotFound, e:
logger.error('CustomResultsTable could not find job %s.' % sid)return _('<p class="resultStatusMessage">Could not retrieve search data.</p>')
If the job ID parameter, sid, is not associated with your search request job, valid data are not available. In more advanced examples, you will learn how to work with job states.
Tip: Use standard Python logging to log errors.
The rest of this method builds the HTML displayed by this module, inserting the CPU Utilization search results in a table.
output = [] output.append('<div class="CustomResultsTableWrapper">') output.append('<table class="CustomResultsTable splTable">') fieldNames = [x for x in getattr(job, entity_name).fieldOrder if (not x.startswith('_'))] dataset = getattr(job, entity_name)[offset: offset+count] for i, result in enumerate(dataset):
output.append('<tr>') for field in fieldNames: output.append('<td') fieldValues = result.get(cgi.escape(field), None) if fieldValues: output.append('>%s</td>' % fieldValues) else: output.append('></td>') output.append('</tr>') output.append('</table></div>') output = .join(output)return output
The fieldNames variable contains the names of the fields specified in the search request (the pipeline indexer stage name and cpu_seconds utilization), which are used to index the field value.
The method returns an HTML-formatted data table populated with CPU utilization data.
Tip: To avoid security vulnerabilities, make sure to use HTML escaping of your data, either on the client or server, as applicable. Escaping is conveniently specified on the server using the Mako template but, because this example does not have a template, manually escape the HTML by calling cgi.escape(<field>).
To implement the client-side results renderer
Client-side code is implemented in the CustomResultsTable.js file.
Note: The root filename is the same as the unique className defined in CustomResultsTable.conf.
- Instantiate an instance of the CustomResultsTable class as a subclass of Splunk.Module.DispatchingModule, using the jQuery klass construct.
Splunk.Module.CustomResultsTable = $.klass(Splunk.Module.DispatchingModule, {...}
The DispatchingModule base class, subclassing Splunk.Module, defines Module System extension points for implementing client-side response data handling and rendering particular to your application.
Tip: Splunk provides a number of modules with predefined functionality. Choose the module from which to inherit most appropriate for your module functionality. Splunk modules are located at $SPLUNK_HOME/share/splunk/search_mrsparkle/modules. All modules have Splunk.Module as the base class.
- Implement the constructor, which is called automatically when the class is instantiated, passing the containing DOM element as a parameter.
initialize: function($super, container) {

   $super(container);
   this.resultsContainer = this.container;

},
All modules must have an initialize() method.
Call $super(), first, to guarantee that the base class constructor is called before the module initialize() method executes. Save the container where results are rendered with this object.
- Override the onJobDone() event handler.
onJobDone: function(event) {

   this.getResults();

},
This method is called when the search command is completed for the job associated with this instance. The only action needed for this simple example is to request the search results. For more complex applications, you might consider using other job progress event handlers.
- Override the getResultParams() method, which is called when results are available following the getResults() call.
getResultParams: function($super) {
var params = $super(); var context = this.getContext(); var search = context.get("search"); var sid = search.job.getSearchId(); if (!sid) this.logger.error(this.moduleType, "Assertion Failed."); params.sid = sid; return params;},
- Override the renderResults() method to render the results in the container for this module.
renderResults: function($super, htmlFragment) {
if (!htmlFragment) { this.resultsContainer.html('No content available.'); return; } this.resultsContainer.html(htmlFragment);}
For this example, the HTML fragment constructed on the server can be rendered directly by calling resultsContainer.html(), passing the results as a parameter.
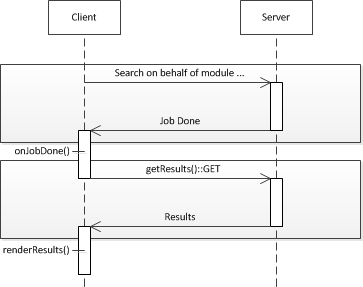
The following simplified sequence diagram shows the basic client-server interaction:
A search job is dispatched by the module with DispatchingModule binding job progress events to the module. The getResults() and response sequence is implemented as an AJAX pattern. Other apps may interact differently, responding to different job progress events or doing something other than render the data.
To integrate the module into the app view
In the $SPLUNK_HOME/etc/apps/Dev_tutorial/default/data/ui/views/Example4.xml file, add the following line in the view hierarchy where you want your module data rendered:
<module name="CustomResultsTable"></module>
In other examples, you will learn Parameterize your module.
Related recipes
Render JSON data shows you how to transfer your data as JSON and format the display on the on the client.
Include 3rd-party libraries shows you how to import third-party graphics library for more advanced rendering.
Parameterize your module shows you how to statically parameterize your module.
Setup your app shows you how to configure your app at runtime.
| Simple customizations | Render JSON data |
This documentation applies to the following versions of Splunk® Enterprise: 7.0.0, 7.0.1, 7.0.2, 7.0.3, 7.0.4, 7.0.5, 7.0.6, 7.0.7, 7.0.8, 7.0.9, 7.0.10, 7.0.11, 7.0.13, 7.1.0, 7.1.1, 7.1.2, 7.1.3, 7.1.4, 7.1.5, 7.1.6, 7.1.7, 7.1.8, 7.1.9, 7.1.10, 7.2.0, 7.2.1, 7.2.2, 7.2.3, 7.2.4, 7.2.5, 7.2.6, 7.2.7, 7.2.8, 7.2.9, 7.2.10, 7.3.0, 7.3.1, 7.3.2, 7.3.3, 7.3.4, 7.3.5, 7.3.6, 7.3.7, 7.3.8, 7.3.9


 Download manual
Feedback submitted, thanks!