Link to a dashboard
Set up a drilldown to link users to a target dashboard or form. This drilldown action lets you show users dashboard content related to the values that they click.
How linking to a dashboard works
A table shows customer activity, such as purchases or views, on a retail website. The table aggregates events to show which products and product categories have recent activity.

You can use a drilldown to link users to a dashboard showing more data about the product category that they click.
For example, the target dashboard might have single value visualizations showing purchase and removal counts for this category. It might also include a Choropleth map showing relative purchase counts by state. The following drilldown <link> opens this target dashboard in a new browser window.
<link target="_blank">/app/search/customer_purchase_removal_map</link>
Use parameters to customize target content
Show custom content in the target by passing values to it from the source. You can configure a drilldown to capture a clicked or other value in the source dashboard and pass it as a parameter to the target.
As an example, you might have drilldown enabled on a table visualization. The $click.value2$ predefined token gives you access to the value in a clicked table cell. You can configure the drilldown to set a token in the target to the captured $click.value2$. On a user click, drilldown opens the target with a parameter set to the clicked value.
Setting tokens in target forms
Prefix form token names with form. if you are setting token values in a target form. For example, use the following configuration to set the host token in the target form to the clicked table cell value from the source.
form.host = $click.value2$
Dashboard token names do not need a prefix. To set the host token in a target dashboard to the clicked table cell value, use host = $click.value2$.
Configure the drilldown in the drilldown editor
You can use the drilldown editor to configure linking to an external dashboard or URL. The drilldown editor also lets you pass parameters between the source and target.
To create conditional or other advanced behaviors in a drilldown, use Simple XML. An error message appears if you access the drilldown editor in panels with existing advanced configurations.
Prerequisites
Some default drilldown settings are new in software version 6.6.0. Review drilldown defaults and customization in Use drilldown for dashboard interactivity.
Steps
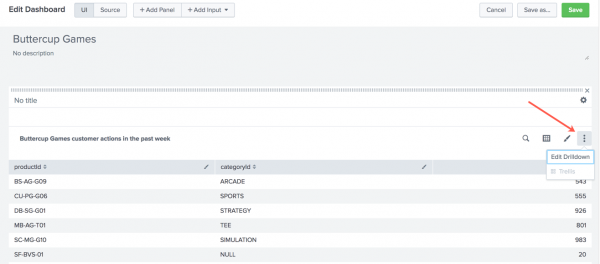
- From the dashboard where you want to configure drilldown, click Edit to open the dashboard editor.
- Find the panel where you are configuring drilldown. Click the additional options button and select Edit drilldown.
- Select Link to dashboard.
- Select the target app and dashboard.
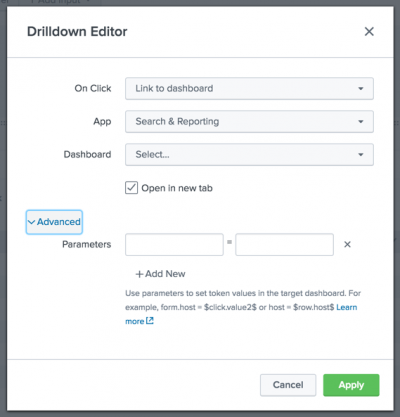
- (Optional) Click Advanced to input parameter names and values to set in the target dashboard. You can use values captured from the source, such as
$click.value$to configure parameters in the target. - Click Apply to apply the drilldown settings.
- Click Save to save your dashboard changes.


Configure the drilldown in Simple XML
Start building a dynamic drilldown by putting a <drilldown> element in a table or chart.
Specify a drilldown target
Inside the <drilldown> element, use a <link> element to indicate the drilldown target and to customize content in a target dashboard or form.
<drilldown>
   <link>...</link>
</drilldown>
The <link> element contains a path to the target and any token values that you are passing from the source to the target. These examples show you the syntax for specifying the target path and passing values.
| Target and behavior | Syntax |
|---|---|
| Link to a dashboard in your Splunk deployment. | Use a relative path that includes the dashboard or form id.
<link> [relative path]/[dashboard or form id] </link> |
| Link to a form in your Splunk deployment. Show customized content in the form by passing a token value captured from the source. Use the token value to populate a form input. | Add a ? symbol after the relative path. Set tokens in the target to values passed from the source. This example sets a token in a target form to a value from the source.Prefix tokens in the target form with form., as shown here.
<link> [relative path]/[dashboard or form id]?form.[target_token_name]=[$source_value$] </link> |
Pass the <earliest> and <latest> time range modifiers from the source search to a search in the target.
|
Add &earliest=$earliest$&latest=$latest$ to the target path and token values. Use the <![CDATA[ ... ]]> wrapper to make sure that the & symbol is interpreted correctly.<link> <![CDATA[ [relative path]/[dashboard or form id]?form.[target_token_name]=[$source_value$]&earliest=$earliest$&latest=$latest$ ]]> </link> |
Additional information
- For more details on the
<link>and<drilldown>elements, see the Simple XML Reference. - See Token usage in dashboards for information on using and customizing tokens.
Conditional linking
You might want to configure conditional linking to different targets depending on the specific elements that users click in the source dashboard or form. To do this, add a <condition> element to the <drilldown>. The <condition> element contains the conditional <link> target and values to use.
A table field or chart series attribute in the <condition> indicates the field or series value to evaluate for conditional linking.
Example
A dashboard includes a table with columns A, B, and C.
If a user clicks a value in column A, open a form with a token set to the captured value.
<drilldown>
 <condition field="A">
   <link> [relative_path]/[target_form_id]?form.[target_token]=$[value_from_source]$ </link>
 </condition>
 [...]
</drilldown>
Capture values from multivalue fields
Multivalue fields can appear multiple times in an event. Each time that the field appears in an event, it can have a different value. You can configure a drilldown to link to specific targets depending on the value that users click.
When setting up a drilldown from a table, you typically use $click.name$ or $click.name2$ to capture the value that users click in a column or row. However, when working with multivalue fields, use $click.value2$ to capture the selected value for the drilldown. Use a <condition> element with a field attribute to limit the column selection to the multivalue field.
See Configure multivalue fields in the Knowledge Manager Manual for more information on working with multivalue fields in your data.
Open the target in another browser tab
By default in Simple XML, drilldown targets open in the same browser tab as the source dashboard or form. You can add a target="blank" attribute to the drilldown element to make the target open in a new browser tab.
Example source code
<dashboard>
  <label>Example linking drilldown</label>

  <row>
    <panel>
      <table>

      <title>Sourcetypes by source (Drilldown to a form)</title>
      <search>
        <query>
        index="_internal" | stats dc(sourcetype) by sourcetype, source
        </query>
      <earliest>-60m</earliest>
      <latest>now</latest>
      </search>
      <option name="count">15</option>
      <option name="showPager">true</option>

      <drilldown target="blank">
       <!-- Access the input on the target form, which is in the same app  -->
       <!-- sourcetype.tok is the token for an input to the target form    -->
       <link>
          form_for_drilldown?form.sourcetype_tok=$click.value$
        </link>
      </drilldown>

      </table>
    </panel>
  </row>
</dashboard>
Simple XML Examples
Dashboard linking to a form
Target form path
The form_for_drilldown form is the target for the following example. The relative path for this form is
/app/search/form_for_drilldown
Target token configurations
Before linking to a target dashboard or form, review the tokens that it has available. Make sure that the target and its tokens are configured to work with the values that you are passing to it in the drilldown action.
This target form has a dropdown input that lets users select a sourcetype value. The input uses the sourcetype token to represent the selected value. This token is used in a search that generates a chart showing results for this sourcetype.
Target form source code
<form>
  <label>Target form for drilldown</label>
  <fieldset autoRun="true" submitButton="false">
    <input type="dropdown" token="sourcetype">
      <label>Select a source type</label>
      <default>splunkd</default>
      <search>
        <query>
          index = _internal | stats count by sourcetype
        </query>
      </search>
      <fieldForLabel>sourcetype</fieldForLabel>
      <fieldForValue>sourcetype</fieldForValue>
    </input>
  </fieldset>
  <row>
    <panel>
      <chart>
        <search>
          <query>index = _internal sourcetype=$sourcetype$
            | timechart count by sourcetype</query>
          <earliest>-7d</earliest>
          <latest>-0d</latest>
        </search>
      </chart>
    </panel>
  </row>
</form>
Source dashboard
Set up a drilldown that links from a source dashboard to the target form. Use tokens to capture values from the source and set values in the target. When users click on a table row in the dashboard, the form opens to show customized content.
Drilldown configuration
This drilldown uses the <link> element to indicate the form to open and to set the sourcetype token value in the form.
<drilldown>
<link>
<![CDATA[
  /app/search/form_for_drilldown?form.sourcetype=$row.sourcetype$&earliest=$earliest$&latest=$latest$
]]>
</link>
</drilldown>
In the <link> element, the following drilldown components configure linking and token setting when users click on a table row in the dashboard.
| Component | Drilldown behavior that this component configures | Details |
|---|---|---|
| Target form path | Indicates the form to open when the user clicks on a table row | /app/search/form_for_drilldown
|
| Token names and values | Tokens customize form content based on the table row that users click in the dashboard. | To pass token values from the source dashboard to the target form, query string parameters are included in the path after the ? symbol.
|
Complete dashboard source code
<dashboard>
 <label>Dashboard linking to a form</label>
  <row>

    <table>
      <search>
        <query>
           index="_internal" group="per_sourcetype_thruput" |
           chart sum(kbps) over series
        </query>
        <earliest>-60m</earliest>
        <latest>now</latest>
      </search>
      <title>Top sourcetypes (drilldown example)</title>
      <option name="count">15</option>
      <option name="showPager">true</option>

     <drilldown>
       <link>
        <![CDATA[
          /app/search/form_for_drilldown?form.sourcetype=$row.sourcetype$&earliest=$earliest$&latest=$latest$
         ]]>
       </link>
     </drilldown>
    </table>

  </row>
</dashboard>
| Link to a search | Link to a URL |
This documentation applies to the following versions of Splunk® Enterprise: 7.1.0, 7.1.1, 7.1.2, 7.1.3, 7.1.4, 7.1.5, 7.1.6, 7.1.7, 7.1.8, 7.1.9, 7.1.10, 7.2.0, 7.2.1, 7.2.2, 7.2.3, 7.2.4, 7.2.5, 7.2.6, 7.2.7, 7.2.8, 7.2.9, 7.2.10, 7.3.0, 7.3.1, 7.3.2, 7.3.3, 7.3.4, 7.3.5, 7.3.6, 7.3.7, 7.3.8, 7.3.9, 8.0.0, 8.0.1, 8.0.2, 8.0.3, 8.0.4, 8.0.5, 8.0.6, 8.0.7, 8.0.8, 8.0.9, 8.0.10, 8.1.0, 8.1.1, 8.1.2, 8.1.3, 8.1.4, 8.1.5, 8.1.6, 8.1.7, 8.1.8, 8.1.9, 8.1.10, 8.1.11, 8.1.12, 8.1.13, 8.1.14, 8.2.0, 8.2.1, 8.2.2, 8.2.3, 8.2.4, 8.2.5, 8.2.6, 8.2.7, 8.2.8, 8.2.9, 8.2.10, 8.2.11, 8.2.12
Feedback submitted, thanks!