Set up your app
| Important notice: As part of Advanced XML deprecation, the Module System is officially deprecated beginning with Splunk Enterprise 6.3. For more information, see Advanced XML Deprecation. |
To bootstrap the controller
To specify the setup view, preserving app chrome
To render the setup form
To update the model
To display update status and continue
App setup involves setting properties to configure your app appearance or behavior. Typically, you modify properties, or configuration objects, using HTML forms. Module controllers, the parts that compose your view, are designed to facilitate asynchronous interaction with Splunk context, search, and job facilities but not to support HTML forms. By design, module controllers only support the GET method and not POST.
To support both GET and POST methods on configuration objects, Module System provides a Model-View-Controller (MVC) architecture pattern implementation. Briefly,
- Model is the code that accesses the data, or REST endpoints.
- View is the code that renders and handles UI interaction.
- Controller is the code that mediates between the model and view, providing separation of concerns.
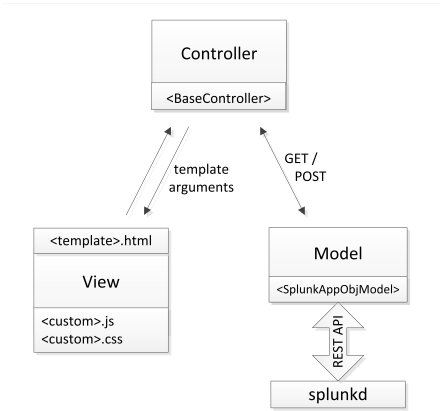
The following figure shows the Splunk MVC implementation.

In the Module System MVC implementation:
- All models inherit from the SplunkAppObjModel class. The model uses the REST API to access data endpoints.
Tip: See the $SPLUNK_HOME/lib/Python2.x/site-packages/splunk/models directory for the models that ship with Splunk.
- Mako templates implement the view, which can be forms, pop-ups, and status notifications. These can include custom JavaScript and CSS, although they are not included in this tutorial.
- All controllers inherit from the BaseController class.
Details
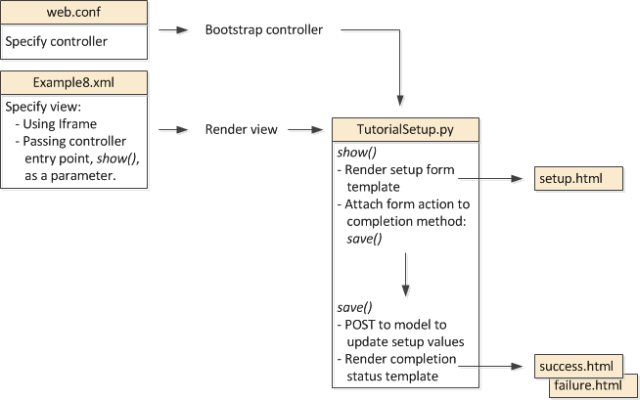
Example8 uses the TutorialSetup controller to demonstrate how to set up an app. The following figure shows the dependencies between TutorialSetup MVC components:

The web.conf file hooks your controller into the Module System.
The Example8.xml file is mostly the same as module view definitions you've seen in previous recipes. The difference here is that, to preserve our app chrome, we specify an iframe as the module where the form is rendered. The required module parameter is a pathname to the controller method that renders the form.
The example TutorialSetup.py controller has two methods:
- show() Render the setup form.
- save() Commit the form values to the model, and announce update status upon completion.
These methods render the setup.html, success.html, and failure.html templates.
You typically follow a logical sequence to implement app setup:
- Define your model, which correlates with your UI form elements.
- Design your app UI (view) for setting configurable items and navigation upon update complete (or error handling).
- Create your controller method to render the setup form.
- Create your controller method to update your model data objects and values.
Note: This example simplifies the code as much as possible to highlight the essential setup logic. In a real-world application, you would augment the logic with facilities that make for a more robust implementation. But, to cover the various alternative and enhanced mechanisms here would obscure our main purpose, which is to introduce you to app setup using MVC. Where practical, we will suggest some implementation options to consider for your own learning.
To bootstrap the controller
Create a web.conf file in the $SPLUNK_HOME/etc/apps/Dev_tutorial/default directory that has the following line:
[endpoint:TutorialSetup]
When SplunkWeb starts, this instantiates your controller and permits URI targets to be routed to specific controller methods.
Note: CherryPy controllers are instantiated at startup, not on a per-request basis. Any change to controller code requires a Splunk restart to reload the controller instance. For this same reason, custom controllers should be resilient in handling exceptions on instantiation.
Controllers are exposed at:
/<locale>/custom/<hostApp>/<controllerName>
For example,
/en-US/custom/Dev_tutorial/TutorialSetup
To make sure that your controller has started, check the /paths endpoint. If you do not see your controller listed after a Splunk restart, it has failed to load. Check the logs to verify controller loading success or failure.
Tip: Use the @route decorator in your controller code, if needed, to expose additional endpoints. (See h ttps://<yourServer>/en-US/paths for a list of exposed endpoints.)
To specify the setup view, preserving app chrome
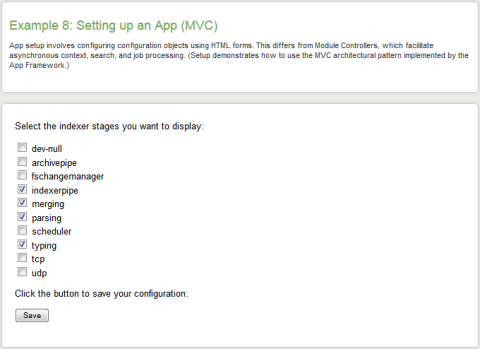
We continue to work with the CPU utilization example because you are already familiar with how the app works. Now, we modify the app behavior by specifying configurable properties. Instead of displaying the CPU utilization of all indexer stages, you can select which stages you want to include in the display.

If an indexer stage is not checked, it is not included in the results.
When you have checked the stages you want displayed, click Save to save the setup.
For most applications, the form needs to be embedded in a splunk view that preserves the app chrome. This is done using an iframe, as shown in the new module added to Example8.xml:
<module name="IFrameInclude" layoutPanel="panel_row2_col1">
   <param name="src">/custom/Dev_tutorial/TutorialSetup/show</param>
</module>
The controller entry point that renders the form, show(), is passed as a parameter.
To render the setup form
A first step is to create the templates, which define the parameters passed to the controller and the template arguments the controller needs to provide to the templates.
The setup.html template implements the checklist UI. As a point of reference, here is a basic HTML fragment that renders a form:
<div id="setup">
<p class="pageDesc">Select the indexer stages you want to display:</p>
<form>
   <input type="checkbox" name="dev-null" value="Yes" /> dev-null<br />
   <input type="checkbox" name="archivepipe" value="Yes" /> archivepipe<br />
   <input type="checkbox" name="fschangemanager" value="Yes" /> fschangemanager<br />
   <input type="checkbox" name="indexerpipe" value="Yes" checked/> indexerpipe<br />
   <input type="checkbox" name="merging" value="Yes" checked/> merging<br />
   <input type="checkbox" name="parsing" value="Yes" checked/> parsing<br />
   <input type="checkbox" name="scheduler" value="Yes" /> scheduler<br />
   <input type="checkbox" name="typing" value="Yes" checked/> typing<br />
   <input type="checkbox" name="tcp" value="Yes" /> tcp<br />
   <input type="checkbox" name="udp" value="Yes" /> udp<br />
   <p>Click the button to save your configuration:</p>
   <input class="splButton-primary" type="submit" value="Save"></input>
</form>
</div>
Notice the differences between this code and the setup.html Mako template used in this tutorial.
Create a setup.html file, adding the following templating facilities.
- Specify the base template and namespaces, as described in Include 3rd-party libraries, adding support for logging, if needed.
<%page expression_filter="h"/>
<%inherit file="//layout/base.html" />
<%namespace name="lib" file="//lib.html" import="*"/>
<%namespace name="helpers" file="//view/_helpers.html" import="*"/>
<%!import logging
logger = logging.getLogger('splunk.module.setup')%>
- Define a gen_form() function to POST the form data.
<%def name="gen_form(method='POST', action=None)">
<form  method="${method}"  action="${action if action else }">
</%def>
Mako def s are equivalent to Python functions, but modified for use in templates. A def must contain a name value that defines the namespace. As with Python functions, a def can optionally define positional and keyword arguments with default values.
- Call the gen_form() function in the <form> tag line.
${gen_form(method="POST", action=make_url(['custom', 'Dev_tutorial', 'TutorialSetup', 'save']))}
${csrf_hidden_input()}
Tip: Make sure to use make_url(), defined in lib.html to define a path relative to the current app server location, handling locale.
Tip: Make sure to use csrf_hidden_input() to add CSRF protection and pass the correct value on a POST.
</form>
To update the model
Each controller method to be exposed through a URI uses the @expose_page() decorator.
- Create the TutorialSetup.py controller file and import the libraries commonly used by controllers.
import logging
import os
import sys
import cherrypy
import splunk
import splunk.bundle as bundle
import splunk.appserver.mrsparkle.controllers as controllers
import splunk.appserver.mrsparkle.lib.util as util
from splunk.appserver.mrsparkle.lib.decorators
import expose_page
Tip: Standard library imports should be listed first, followed by third-party imports, followed by local imports. Following this convention makes imports easier for others to understand.
- Particularly, import event_type, which subclasses SplunkAppObjModel, for working with configuration objects.
from splunk.models.event_type import EventType
Note: Because SplunkAppObjModel is an abstract class, remember to instantiate and derive classes by subclassing
- Define the example TutorialSetup controller class, inheriting from the BaseController class.
class TutorialSetup(controllers.BaseController):
- Implement the show() method to render the setup.html form.
@expose_page(must_login=True, methods=['GET'])

   def show(self, **kwargs):
The only thing we need to do in this example is render the form, passing the template to be rendered as a parameter.
return self.render_template('/Dev_tutorial:/templates/setup.html')
In practice, you are likely to want to populate form fields with current field values. To do that, get the field values and pass them as a dictionary in a render_template() argument. To get all the values for your app and render them, do something similar to the following:
etype = EventType.all().filter_by_app('Dev_tutorial')
return self.render_template('/Dev_tutorial:/templates/setup.html', dict(etype=etype))
Tip: Use EventType.get() to get specific event values.
- Implement the save() method to handle form submission and to save the configuration objects to the model, passing form data as a parameter.
@expose_page(must_login=True, trim_spaces=True, methods=['POST'])

   def save(self, **params):
Declare a dictionary to hold our configuration objects of name-value pairs.
form_content = {}
Get the session CherryPy session associated with the authenticated user.
user = cherrypy.session['user']['name']
Iterate through the form data, passed in the parameter, and add the parameter name and value to the dictionary.
for key, val in params.iteritems():

   try:
       if (key != 'splunk_form_key'):
           form_content[key] = EventType.get(EventType.build_id(key, 'Dev_tutorial', user))
           form_content[key].search = val
           except Exception, ex:
               form_content[key] = EventType('Dev_tutorial', user, key)
For this tutorial, the model is not a defined endpoint so we need to create the configuration objects. We use an exception on the get() method to determine the object doesn't exist. If it doesn't exist, we create the object instantiating a new configuration object by calling the EventType constructor.
Tip: The build_id() method provides a convenient alternative to specifying a get() path parameter such as:
'/servicesNS/%s/%s/saved/eventtypes/%s' % (user, 'Dev_tutorial', key)
After getting the form data, save each configuration object to the model.
for key in form_content.keys():

   try:
       form_content[key].passive_save()
Tip: The passive_save() method is recommended over save() because it handles errors for you. Exception messages are added to the instance member so you can display errors from the list in the best way for your application.
If the configuration object value is Yes, the associated indexer stage results are included in the display.
It is recommended that you handle save exceptions, particularly, authorization exceptions.
except splunk.AuthorizationFailed:

   logger.info('User %s is unauthorized to perform setup on %s' % (user,
                                               'Dev_tutorial'))
   except Exception, ex:
       logger.info(ex)
       logger.info('Failed to save eventtype %s' % key)
Provide notification on the success or failure of the operation to update configuration data by rendering a status template. For simplicity, this example only provides a notification of successful completion.
return self.render_template('/Dev_tutorial:/templates/success.html')
To display update status and continue
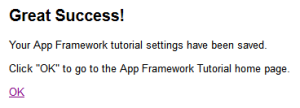
You might want to provide a status template to be rendered when show() completes successfully. The success.html template is a simple implementation.
- Specify the standard template base and namespace entities.
<%inherit file="//layout/base.html" />
<%namespace name="lib" file="//lib.html" import="*"/>
- Provide an exit prompt with the notification, specifying a destination URL.
<a target="_parent" href="${make_url('/app/Dev_tutorial')}" class="splButton-primary">

   <span  class="cancel">OK</span>

</a>
Because we are in an iframe, specify target-"_parent" to alter the parent document instead of the iframe.
Use make_url() to define a path relative to the current app server location.
Related recipes
Create a custom module describes the basics of the environment in which your app runs.
Include 3rd-party libraries introduces you to templates.
| Parameterize your module | Getting started example |
This documentation applies to the following versions of Splunk® Enterprise: 7.0.0, 7.0.1, 7.0.2, 7.0.3, 7.0.4, 7.0.5, 7.0.6, 7.0.7, 7.0.8, 7.0.9, 7.0.10, 7.0.11, 7.0.13, 7.1.0, 7.1.1, 7.1.2, 7.1.3, 7.1.4, 7.1.5, 7.1.6, 7.1.7, 7.1.8, 7.1.9, 7.1.10, 7.2.0, 7.2.1, 7.2.2, 7.2.3, 7.2.4, 7.2.5, 7.2.6, 7.2.7, 7.2.8, 7.2.9, 7.2.10, 7.3.0, 7.3.1, 7.3.2, 7.3.3, 7.3.4, 7.3.5, 7.3.6, 7.3.7, 7.3.8, 7.3.9

 Download manual
Feedback submitted, thanks!