Field Extractor: Select Fields step
The Select Fields step of the field extractor is for regular-expression-based field extractions only.
In the Select Fields step of the field extractor, highlight values in the sample event that you want the field extractor to extract as fields.
To improve the accuracy of your field extraction, you can optionally:
- Preview the results returned by the regular expression.
- Identify additional sample events to expand the range of the regular expression.
- Identify a string of required text to focus the field extraction on events that contain this text.
- Manually edit the regular expression.
Identify one or more field values
Define at least one field extraction for your chosen source or source type.
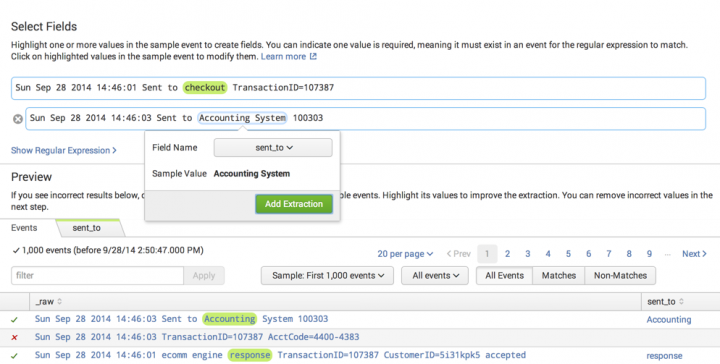
- In the sample event, highlight a value that you want to extract as a field.
- A dialog box with fields appears underneath the highlighted value.
- Note: The field extractor identifies existing field extractions in the sample event with colored outlines. If the text that you want to select overlaps with an existing field extraction, you must turn off its highlighting before you can select the overlapping text. You can turn off highlighting for a previously-extracted field using the Existing Fields sidebar. See "Use the Fields sidebar to control existing field extraction highlighting" in the Select Sample step.
- Enter a name for the Field Name field.
- Field names must start with a letter and contain only letters, numbers, and underscores.
- Click Add Extraction to save the extraction.
- When you add your first field extraction, the field extractor generates a regular expression that matches events like the event that you have selected and attempts to extract the field that you have defined from those events.
- The field extractor also displays a Preview section under the sample event. This section displays the list of events that match your chosen source or source type, and indicates which of those events match the regular expression that the field extractor has generated. The field extractor identifies the extracted field with colored highlighting. Previously extracted fields for the selected source or source type are indicated by a colored outline.
- (Optional) Preview the results of the field extraction to see whether or not the field is being extracted correctly.
- This can help you determine whether you need to take steps to improve your field extraction by adding sample events or identifying required text.
- (Optional) Repeat steps 1 through 4 until you identify all the values that you want to extract.
- The field extractor gives each extracted value a different highlight color.
- As you select more fields in an event for extraction there is a greater chance that the field extractor will be unable to generate a regular expression that can reliably extract all of the fields. You can improve the reliability of multifield extractions by adding sample events and identifying required text. You can also improve the regular expression by editing it manually.
- (Optional) Remove or rename field extractions in the sample event by clicking on them and selecting an action of Remove or Rename.
- Click Next to go to the Validate Fields step.
Preview the results of the field extraction
This action is optional for the Select Fields and Validate Fields steps.
The Preview section appears after you add your first field extraction. It displays a list of the events that match your chosen source or source type. It also displays tabs for each field that you are trying to extract from the sample event.
The event list has features that you can use to inspect the accuracy of the field extraction. The list displays all of the events in the sample for the source type, by default.
- Use the left-most column to identify which events match the regular expression and which events do not.
- If the regular expression matches a small percentage of the sample events, toggle the view to Matches to remove the nonmatching events from the list. You can also select Non-Matches to see only the events that fail to match the regular expression.
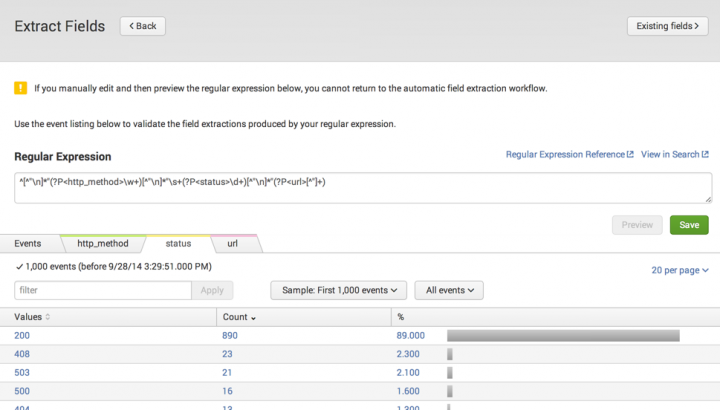
- Click a field tab to value distribution statistics for a field. Each field tab displays a bar chart showing the count of each value found for the field in the event sample, organized from highest to lowest.

- Click a value in the chart to filter the field listing table on that value. For example, in the
statuschart, a click on the503value causes the field extractor to return to the main Preview field list view, with the filter set tostatus=503. It only lists events with thatstatusvalue.
You may find that the generated field extraction is not correctly matching events. Or you may discover that it is extracting the wrong field values. When this happens, there are steps that you can take to improve the field extraction.
You can:
- Add sample events to extend the range of the regular expression. This can help it to match more events.
- Identify required text to create extractions that match specific event patterns. This reduces the set of events that are matched by the regular expression.
- Submit incorrectly extracted field values as counterexamples in the Validate Fields step.
- Remove fields from an extraction that involves multiple fields, when the extraction fails. You can create additional field extractions for those removed fields.
Add sample events to expand the range of the regular expression
This action is optional for the Select Fields step.
When you select a set of fields in your sample event you may find that events with those fields are not matched. This happens when the regular expression generated by the field extractor matches events with patterns similar to your sample event, but misses others that have slightly different patterns.
Try to expand the range of the regular expression by adding one of the missed events as an additional sample event. After you highlight the missed fields, the field extractor attempts to generate a new field extraction that encompasses both event patterns.
- In the field listing table, click an event that is not matched by the regular expression but which has values for all of the fields that you are extracting from your first sample event.
- Additional sample events have the greatest chance of improving the accuracy of the field extraction when their format or pattern closely matches that of the original sample event.
- The sample event you select appears under the original sample event.
- In the additional sample event, highlight the value for a field that you are extracting from the first sample event.
- Select the correct Field Name.
- You see names only for fields that you identified in the first sample event.
- Click Add Extraction.
- The field extractor attempts to expand the range of the regular expression so that it can find the field value in both event patterns. It matches the new regular expression against the event sample and displays the results in the event table.
- (Optional) If you are extracting multiple fields, repeat steps 2 through 4 for each field.
- You do not need to highlight all of the fields that are highlighted in the first sample event. For example, you may find that a more reliable field extraction results when the additional sample event only highlights one of the two fields highlighted in the original sample event.
- (Optional) Add additional sample events.
- (Optional) Remove sample events by clicking the gray "X" next to the event.

The field extractor sometimes cannot build a regular expression that matches the sample events as well as the original sample event. You can address the situation by using one of these methods.
- Remove some of the fields you are trying to extract, if you are extracting multiple fields. This action can result in a field extraction that works across all of your selected events. The first field values you should remove are those that are embedded within longer text strings. You can set up separate field extractions for the fields that you remove.
- Define a separate field extraction for each event pattern that contains the field values that you want to extract, using required text to set the extractions apart. For information about required text, see the next topic.
Identify required text to create extractions that match specific event patterns
This action is optional for the Select Fields step.
Sometimes a source type contains different kinds of events that contain the same field or fields that you want to extract. It can be difficult to design a single field extraction that matches multiple event patterns. One way to deal with this is to define a different field extraction for each event pattern.
You can focus the extraction to specific event patterns with required text. Required text behaves like a search filter. It is a string of text that must be present in the event for Splunk software to match it with the extraction.
For example, you might have event patterns for the access_combined source type that are differentiated by the strings action=addtocart, action=changequantity, action=purchase, and action=remove. You can create four extractions, one for each string, that each extract the same fields, but which have a different string for required text.
You can also use required text to make sure that a value is extracted only from specific events.
There are two limits to required text definition:
- You can define only one string of required text for a single field extraction.
- You cannot apply a required text string to a string of text that you highlighted as an extracted field value, nor can you do the reverse.
Procedure
- In the sample event, highlight the text you want to require.
- Select Require.
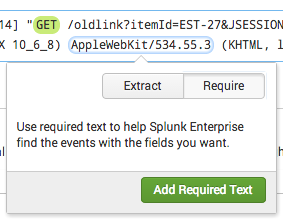
- Click Add Required Text to add the required text to the field extraction.
- (Optional) Remove required text in the sample event by clicking it and selecting Remove Required Text.


This example shows a field extraction that extracts fields named http_method (green) and status (yellow) and which has action=purchase defined as required text. In the field listing table, the first two events do not match the extraction, because they do not have the required text. The third event matches the regular expression and has the required text. It has highlighting that shows the extracted fields.
The filter feature is a useful tool for setting up and testing required text.
Manually edit the regular expression
This action is optional for the Select Fields and Validate steps.
You can manually edit the regular expression. However, doing this takes you out of the field extractor workflow. When you save your changes to the field extraction, the field extractor takes you to the final Save step.
- Click Show Regular Expression.
- Click Edit the Regular Expression.
- Click the Back button at the top left of the page if you want to abandon manual regular expression editing and return to the field extractor workflow. You can only go back if you have not yet tried to preview a regular expression change.
- Edit the regular expression. See the links at More about regular expressions if you need help with regular expressions.
- Click Preview to match your edited extraction against the sample events.
- The Back button disappears. The Preview button is grayed out until you make more edits to the field extraction.
- Use the Filter, Sample, and Matches, and Non-Matches controls to help you assess the quality of your regular expression.
- Repeat steps 3 and 4 until the regular expression is matching events and extracting fields appropriately.
- Click Save to save your new field extraction.
- The field extractor sends you to the Save step.
- When you enter the Save step, click Back to continue editing the regular expression. The Back button disappears after you enter a name for the extraction or make permissions choices.

More about regular expressions
For more information:
- See About Splunk regular expressions.
- See SPL and regular expressions in the Search Reference for a detailed discussion about using backslash ( \ ) characters to escape special characters such as periods ( . ), double quotation marks ( " ), and backslash characters.
| Field Extractor: Select Method step | Field Extractor: Rename Fields step |
This documentation applies to the following versions of Splunk® Enterprise: 7.0.0, 7.0.1, 7.0.2, 7.0.3, 7.0.4, 7.0.5, 7.0.6, 7.0.7, 7.0.8, 7.0.9, 7.0.10, 7.0.11, 7.0.13, 7.1.0, 7.1.1, 7.1.2, 7.1.3, 7.1.4, 7.1.5, 7.1.6, 7.1.7, 7.1.8, 7.1.9, 7.1.10, 7.2.0, 7.2.1, 7.2.2, 7.2.3, 7.2.4, 7.2.5, 7.2.6, 7.2.7, 7.2.8, 7.2.9, 7.2.10, 7.3.0, 7.3.1, 7.3.2, 7.3.3, 7.3.4, 7.3.5, 7.3.6, 7.3.7, 7.3.8, 7.3.9, 8.0.0, 8.0.1, 8.0.2, 8.0.3, 8.0.4, 8.0.5, 8.0.6, 8.0.7, 8.0.8, 8.0.9, 8.0.10, 8.1.0, 8.1.1, 8.1.2, 8.1.3, 8.1.4, 8.1.5, 8.1.6, 8.1.7, 8.1.8, 8.1.9, 8.1.10, 8.1.11, 8.1.12, 8.1.13, 8.1.14, 8.2.0, 8.2.1, 8.2.2, 8.2.3, 8.2.4, 8.2.5, 8.2.6, 8.2.7, 8.2.8, 8.2.9, 8.2.10, 8.2.11, 8.2.12, 9.0.0, 9.0.1, 9.0.2, 9.0.3, 9.0.4, 9.0.5, 9.0.6, 9.0.7, 9.0.8, 9.0.9, 9.0.10, 9.1.0, 9.1.1, 9.1.2, 9.1.3, 9.1.4, 9.1.5, 9.1.6, 9.1.7, 9.1.8, 9.1.9, 9.2.0, 9.2.1, 9.2.2, 9.2.3, 9.2.4, 9.2.5, 9.2.6, 9.3.0, 9.3.1, 9.3.2, 9.3.3, 9.3.4, 9.4.0, 9.4.1, 9.4.2
Feedback submitted, thanks!