Display global banner
Splunk Enterprise lets you display a global banner that remains visible to all users on all UI pages across the product. The global banner feature gives organizations with strict security concerns the ability to display a site classification message that is required to run Splunk software in some environments. For example, you can display a global banner that tells users they are using a secure or classified site.
While the primary use case for the global banner is the persistent display of a site classification message, you can use it to display any type of notification that requires a persistent, highly visible message. For example, you can use the global banner to notify users about:
- New features
- Software version upgrades
- Scheduled maintenance or downtime
- Data outages
Splunk Web bulletin messages are suitable for most in-product notifications that do not require a persistent global message. For more information on bulletin messages, see Customize Splunk Web messages.
Splunk Enterprise supports the display of a single global banner only. The global banner does not appear on the Splunk Enterprise login page and users cannot dismiss the banner inside the product.
Customize the global banner
You can enable and customize the global banner using Splunk Web, REST, or configuration files.
To customize the global banner a role must have the edit_global_banner capability. This capability is provided to admin and sc_admin roles by default.
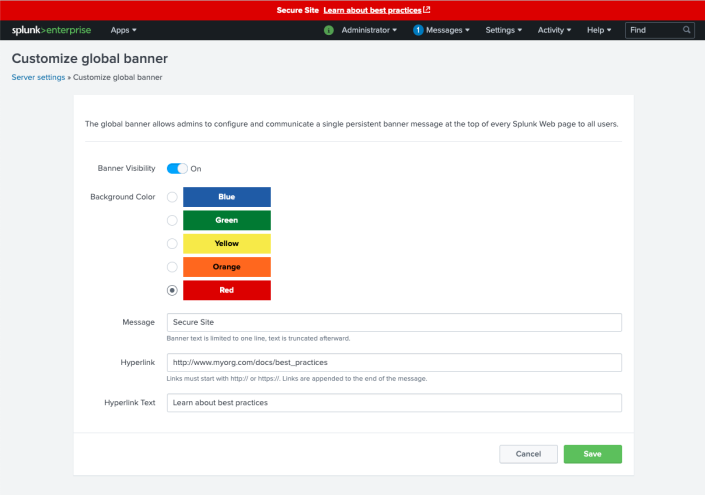
Customize global banner using Splunk Web
- In Splunk Web, click Settings > Server Settings > Global Banner.
- Toggle the Banner Visibility switch to On.
- Select a background color for your global banner.
- Enter your message text.
- (optional) Specify a URL to generate a hyperlink to additional information, such as relevant best practices documentation.
- Enter text for the hyperlink. For example, "Learn about best practices".
Your customized global banner now appears on all UI pages in Splunk Enterprise.

Deploy global banner in a search head cluster
In a search head cluster environment, some sections of the Settings menu in Splunk Web are hidden by default. To deploy the global banner using Splunk Web in a search head cluster, you must first show the full Settings menu, as follows:
- On any cluster member, in Splunk Web, click Settings > Show All Settings > Show.
The full Settings menu now appears in Splunk Web. - Click Server settings > Global banner.
- Customize the global banner as shown in the preceding section Customize global banner using Splunk Web.
- Click Save.
The search head cluster automatically replicates the global banner configuration to each cluster member and the global banner now appears in Splunk Web on each search head.
Customize global banner using REST
To customize the global banner using REST, send a POST request to the following endpoint:
data/ui/global-banner
For endpoint details, see data/ui/global-banner in the REST API Reference Manual.
Customize global banner using configuration files
You can customize the global banner by specifying settings in $SPLUNK_HOME/etc/system/local/global-banner.conf.
For detailed information on global-banner.conf settings, see global-banner.conf.
| Customize Splunk Web messages | About configuration files |
This documentation applies to the following versions of Splunk® Enterprise: 8.1.0, 8.1.1, 8.1.2, 8.1.3, 8.1.4, 8.1.5, 8.1.6, 8.1.7, 8.1.8, 8.1.9, 8.1.10, 8.1.11, 8.1.12, 8.1.13, 8.1.14, 8.2.0, 8.2.1, 8.2.2, 8.2.3, 8.2.4, 8.2.5, 8.2.6, 8.2.7, 8.2.8, 8.2.9, 8.2.10, 8.2.11, 8.2.12, 9.0.0, 9.0.1, 9.0.2, 9.0.3, 9.0.4, 9.0.5, 9.0.6, 9.0.7, 9.0.8, 9.0.9, 9.0.10, 9.1.0, 9.1.1, 9.1.2, 9.1.3, 9.1.4, 9.1.5, 9.1.6, 9.1.7, 9.1.8, 9.1.9, 9.2.0, 9.2.1, 9.2.2, 9.2.3, 9.2.4, 9.2.5, 9.2.6, 9.3.0, 9.3.1, 9.3.2, 9.3.3, 9.3.4, 9.4.0, 9.4.1, 9.4.2
Feedback submitted, thanks!