Install on Windows
You can install Splunk Enterprise on Windows with the Graphical User Interface (GUI)-based installer or from the command line. More options, such as silent installation, are available if you install from the command line. See Install on Windows from the command line for the command line installation procedure.
You cannot install or run the 32-bit version of Splunk Enterprise for Windows on a 64-bit Windows machine. You also cannot install Splunk Enterprise on a machine that runs an unsupported OS. For example, you cannot install Splunk Enterprise on a machine that runs Windows Server 2003. See System requirements. If you attempt to run the installer in such a way, it warns you and prevents the installation.
Note: If, rather than installing Splunk Enterprise, you want to install the Splunk universal forwarder, see Install a Windows universal forwarder from an installer in the Universal Forwarder manual. The universal forwarder is a separate executable from Splunk Enterprise and uses a different installer.
Upgrading?
If you plan to upgrade Splunk Enterprise, see How to upgrade Splunk Enterprise for instructions and migration considerations before proceeding.
Before you install
Choose the Windows user Splunk should run as
Before installing, see Choose the Windows user Splunk should run as to determine which user account Splunk should run as to address your specific needs. The user you choose has ramifications on what you must do prior to installing the software, and more details can be found there.
Disable or limit antivirus software if able
The Splunk Enterprise indexing subsystem requires high disk throughput. Any software with a device driver that intermediates between Splunk Enterprise and the operating system can restrict processing power available to Splunk Enterprise, causing slowness and even an unresponsive system. This includes anti-virus software.
You must configure such software to avoid on-access scanning of Splunk Enterprise installation directories and processes before you start a Splunk installation.
Consider installing Splunk software into a directory with a short path name
By default, the Splunk MSI file installs the software to \Program Files\Splunk on the system drive (the drive that booted your Windows machine.) While this directory is fine for many Splunk software installations, it might be problematic for installations that run in distributed deployments or that employ advanced Splunk features such as search-head or indexer clustering.
The Windows API has a path limitation of MAX_PATH which Microsoft defines as 260 characters including the drive letter, colon, backslash, 256-characters for the path, and a null terminating character. Windows cannot address a file path that is longer than this, and if Splunk software creates a file with a path length that is longer than MAX_PATH, it cannot retrieve the file later. There is no way to change this configuration.
To work around this problem, if you know that the instance will be a member of a search head or indexer cluster, consider installing the software into a directory with a short path length, for example C:\Splunk or D:\SPL.
Install Splunk Enterprise via the GUI installer
The Windows installer is an MSI file.
Begin the installation
- Download the Splunk installer from the Splunk download page.
- To start the installer, double-click the
splunk.msifile. The installer runs and displays the Splunk Enterprise Installer panel.

- To continue the installation, check the "Check this box to accept the License Agreement" checkbox. This activates the "Customize Installation" and "Next" buttons.
- (Optional) If you want to view the license agreement, click View License Agreement.

Installation Options
The Windows installer gives you two choices: Install with the default installation settings, or configure all settings prior to installing.
When you choose to install with the default settings, the installer does the following:
- Installs Splunk Enterprise in
\Program Files\Splunkon the drive that booted your Windows machine. - Installs Splunk Enterprise with the default management and Web network ports.
- Configures Splunk Enterprise to run as the Local System user.
- Prompts you to create a Splunk administrator password. You must do this before installation can continue.
- Creates a Start Menu shortcut for the software.
If you want to change any of these default installation settings, click Customize Options and proceed with the instructions in "Customize Options" in this topic.
Otherwise, click Next. You will be prompted for a password for the Splunk admin user. After you supply a password, installation begins and you can continue with the "Complete the install" instructions later in this topic.
Customize options during the installation
You can customize several options during the installation. When you choose to customize options, the installer displays the "Install Splunk Enterprise to" panel.

By default, the installer puts Splunk Enterprise into \Program Files\Splunk on the system drive. This documentation set refers to the Splunk Enterprise installation directory as $SPLUNK_HOME or %SPLUNK_HOME%.
Splunk Enterprise installs and runs two Windows services, splunkd and splunkweb. The splunkd service handles all Splunk Enterprise operations, and the splunkweb service installs to run only in legacy mode.
These services install and run as the user you specify on the "Choose the user Splunk Enterprise should run as" panel. You can choose to run Splunk Enterprise as the Local System user, or another user.
When the installer asks you the user that you want to install Splunk Enterprise as, you must specify the user name in domain\username format. The user must be a valid user in your security context, and must be an active member of an Active Directory domain. Splunk Enterprise must run under either the Local System account or a valid user account with a valid password and local administrator privileges. Failure to include the domain name with the user will cause the installation to fail.
- Click Change… to specify a different location to install Splunk Enterprise, or click Next to accept the default value. The installer displays the "Choose the user Splunk Enterprise should run as" panel.
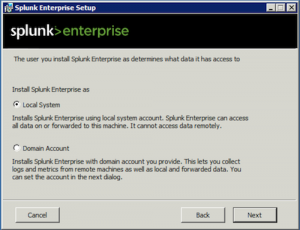
- Select a user type and click Next.
- If you selected the Local System user, proceed to Step 5. Otherwise, the installer displays the Logon Information: specify a username and password panel.
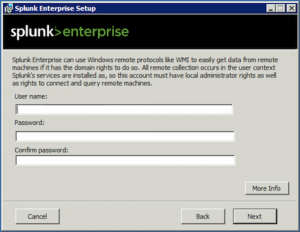
- Enter the Windows credentials that Splunk Enterprise uses to run on the machine and click Next.
These credentials are different from the Splunk administrator credentials that you create in the next step.
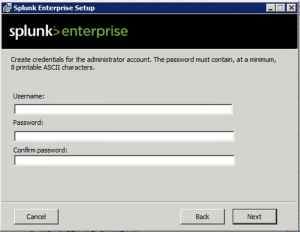
- Create credentials for the Splunk administrator user by entering a username and password that meets the minimum eligibility requirements as shown in the panel and click Next.
You must perform this action as the installation cannot proceed without your completing it. If you do not enter a username, the installer creates the
adminuser during the installation process. - The installer displays the installation summary panel.
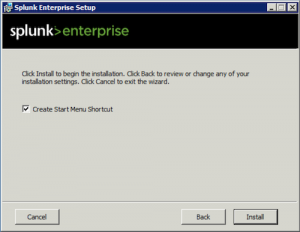
- Click "Install" to proceed with the installation.


Complete the installation
The installer runs, installs the software, and displays the Installation Complete panel.

If you specified the wrong user during the installation procedure, you will see two pop-up error windows explaining this. If this occurs, Splunk Enterprise installs itself as the Local System user by default. Splunk Enterprise does not start automatically in this situation. You can proceed through the final panel of the installation, but uncheck the "Launch browser with Splunk" checkbox to prevent your browser from launching. Then, use these instructions to switch to the correct user before starting Splunk.
- (Optional) Check the boxes to Launch browser with Splunk and Create Start Menu Shortcut.
- Click Finish. The installation completes, Splunk Enterprise starts and launches in a supported browser if you checked the appropriate box.
Avoid Internet Explorer Enhanced Security pop-ups in Splunk Web
If you use Internet Explorer to access Splunk Web, add the following URLs to the allowed Intranet group or fully trusted group to avoid getting "Enhanced Security" pop-ups:
quickdraw.splunk.com- the URL of your Splunk Enterprise instance
Install or upgrade license
If this is a new installation of Splunk Enterprise or switching from one license type to another, you must install or update your license. See Install a license.
Next steps
Now that you have installed Splunk Enterprise, you can find out how to start using Splunk Enterprise. See What happens next?
Alternatively, you can see the following topics in Getting Data In for help on adding Windows data:
| Prepare your Windows network to run Splunk Enterprise as a network or domain user | Install on Windows using the command line |
This documentation applies to the following versions of Splunk® Enterprise: 7.2.2, 7.2.3, 7.2.4, 7.2.5, 7.2.6, 7.2.7, 7.2.8, 7.2.9, 7.2.10, 7.3.0, 7.3.1, 7.3.2, 7.3.3, 7.3.4, 7.3.5, 7.3.6, 7.3.7, 7.3.8, 7.3.9, 8.0.0, 8.0.1, 8.0.2, 8.0.3, 8.0.4, 8.0.5, 8.0.6, 8.0.7, 8.0.8, 8.0.9, 8.0.10, 8.1.0, 8.1.1, 8.1.2, 8.1.3, 8.1.4, 8.1.5, 8.1.6, 8.1.7, 8.1.8, 8.1.9, 8.1.10, 8.1.11, 8.1.12, 8.1.13, 8.1.14
Feedback submitted, thanks!