Create or edit a license pool
This topic describes how to create or edit a license pool. Before you proceed, read Allocate license volume for general information about allocating license volume across Splunk Enterprise instances.
Note: You can also perform these tasks through the CLI. See Manage licenses from the CLI.
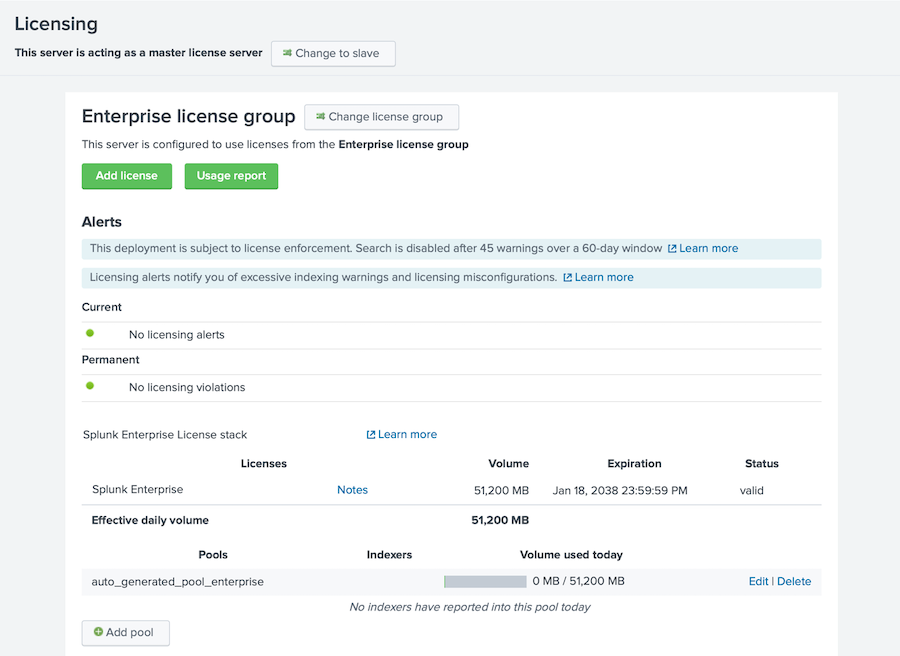
The default license pool
When you first install an Enterprise license on a Splunk Enterprise instance, the instance becomes the license master for that license. Several default configurations result:
- The license resides in a license stack called Splunk Enterprise Stack
- The stack has a default license pool called
auto_generated_pool_enterprise. - Any license slave that connects to this license master has accesss to the default pool.
You can change the set of pools. You can also configure access of license slaves to stacks.
The following example shows the Settings > Licensing screen for an Enterprise license.
Edit an existing license pool
You can edit a license pool to change the pool's allocation or to change the set of indexers that have access to the pool.
- Next to the license pool that you want to edit, click Edit. The Edit license pool page is displayed.
- (Optional) Change the allocation for the pool. The allocation is how much of the stack's overall licensing volume is available for use by the indexers that access this pool. The allocation can be a specific value, or it can be the entire amount of indexing volume available in the stack, as long as it is not already allocated to any other pool.
- (Optional) Change the indexers that have access to the pool. The options are:
- Any indexer configured as a license slave can access the pool and use the license allocation within it.
- Only specific indexers can access the pool and use the license allocation within it. To allow a specific indexer to draw from the pool, click the plus sign next to the name of the indexer in the list of available indexers to move it into the list of associated indexers.
- Click Submit.
Once a license pool is created, there's no option to rename the pool using License Management in Splunk Web. To modify the license pool name, you can delete the old pool and create a new pool with the chosen name. Or you can edit the server.conf file, change the pool name in the [lmpool:] stanza, and restart Splunk Enterprise services.
Create a new license pool
Before you can create a new license pool from the default Enterprise stack, you must make some indexing volume available by either editing an existing pool and reducing its allocation, or by deleting an existing pool entirely. Click Delete next to the pool's name to delete it.
To create a new license pool:
- Click Add pool toward the bottom of the page. The Create new license pool page is displayed.
- Specify a name for the pool, and optionally add a description for the pool.
- Set the allocation for the pool. The allocation is how much of the stack's overall licensing volume is available for use by the indexers that access this pool. The allocation can be a specific value, or it can be the entire amount of indexing volume available in the stack, as long as it is not already allocated to any other pool.
- Specify the indexers that have access to the pool. The options are:
- Any indexer configured as a license slave can access the pool and use the license allocation within it.
- Only specific indexers can access the pool and use the license allocation within it. To allow a specific indexer to draw from the pool, click the plus sign next to the name of the indexer in the list of available indexers to move it into the list of associated indexers.
| Configure a license slave | About Splunk Free |
This documentation applies to the following versions of Splunk® Enterprise: 8.2.0, 8.2.1, 8.2.2, 8.2.3, 8.2.4, 8.2.5, 8.2.6, 8.2.7, 8.2.8, 8.2.9, 8.2.10, 8.2.11, 8.2.12

 Download manual
Feedback submitted, thanks!