Use fields to search
To take advantage of the advanced search features in the Splunk software, you must understand what fields are and how to use them.
What are fields?
Fields exist in machine data in many forms. Often, a field is a value with a fixed, delimited position on a line, or a name and value pair, where there is a single value to each field name. A field can be multivalued, that is, a field in a single event can have multiple values in a field.
- Some examples of fields are
clientipfor IP addresses accessing your Web server,_timefor the timestamp of an event, andhostfor domain name of a server. - One of the more common examples of multivalue fields is email address fields. While the
Fromfield will contain only a single email address, theToandCcfields have one or more email addresses associated with them.
Fields are searchable name and value pairings that distinguish one event from another. Not all events have the same fields and field values. Use fields to write more tailored searches to retrieve the specific events that you want.
Extracted fields
The Splunk software extracts fields from event data at index time and at search time.
- Index time
- The time span from when the Splunk software receives new data to when the data is written to an index. During index time, the data is parsed into segments and events. Default fields and timestamps are extracted, and transforms are applied.
- Search time
- The period of time beginning when a search is launched and ending when the search finishes. During search time, certain types of event processing take place, such as search time field extraction, field aliasing, source type renaming, event type matching, and so on.
The default fields and other indexed fields are extracted for each event when your data is indexed.
Search with fields
When you search for fields, you use the syntax field_name=field_value.
- Field names are case sensitive, but field values are not.
- You can use wildcards in field values.
- Quotation marks are required when the field values include spaces.
Let's try a search.
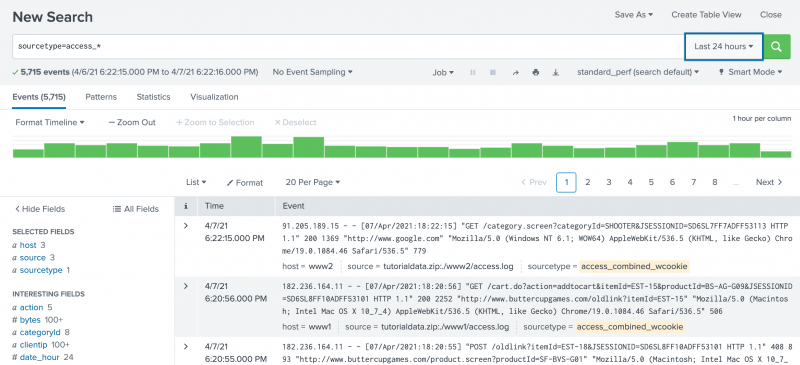
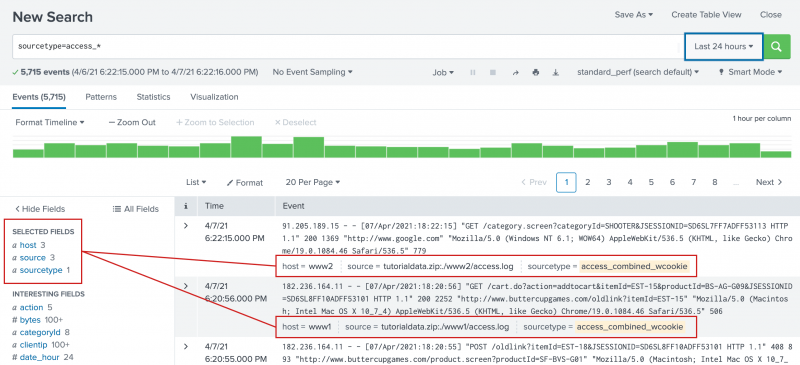
- Click Search in the App bar to start a new search. Notice that the time range is set back to the default Last 24 hours.
- To search the sourcetype field for any values that begin with access_, run the following search.
sourcetype=access_*This search indicates that you want to retrieve only events from your web access logs and nothing else.
This search uses a wildcard character ( * ) in the field value,access_*, to match any Apache web access source type. The source types can beaccess_common,access_combined, oraccess_combined_wcookie. - Scroll through the list of events in your search results.
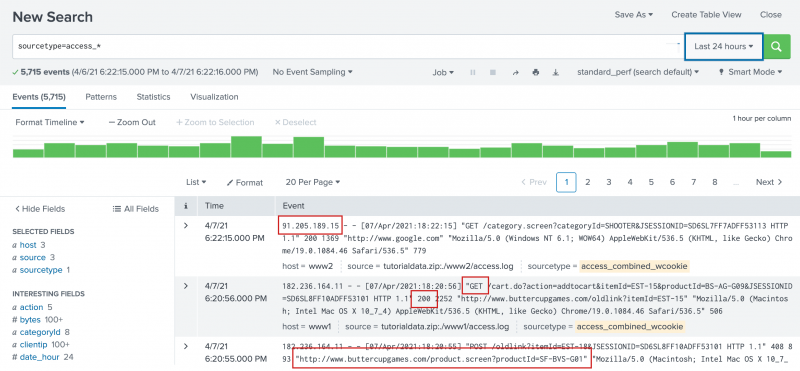
If you are familiar with the access_combined format of Apache logs, you might recognize some of the information in each event, such as:
- IP addresses for the users accessing the website.
- URIs and URLs for the pages requested and referring pages.
- HTTP status codes for each page request.
- GET or POST page request methods.
These are events for the Buttercup Games online store, so you might recognize other information and keywords in the search results, such as Arcade, Simulation, productId, categoryId, purchase, addtocart, and so on.
To the left of the events list is the Fields sidebar. As events are retrieved that match your search, the Fields sidebar updates the Selected Fields and Interesting Fields lists. These are the fields that the Splunk software extracts from your data.
When you first run a search the Selected Fields list contains the default fields host, source, and sourcetype. These default fields appear in every event.
Interesting Fields are fields that appear in at least 20% of the events.
Specify additional selected fields
You can designate other fields to appear in the Selected Fields list. When you add a field to the Selected Fields list, the field name and field value are included in the search results.
- To add fields to the Selected Fields list, click All Fields at the top of the Fields sidebar.
The Select Fields dialog box shows a list of fields in your events. The # of Values column shows the number of unique values for each field in the events. Because your search criteria specifies the source type, the sourcetype field has just 1 value.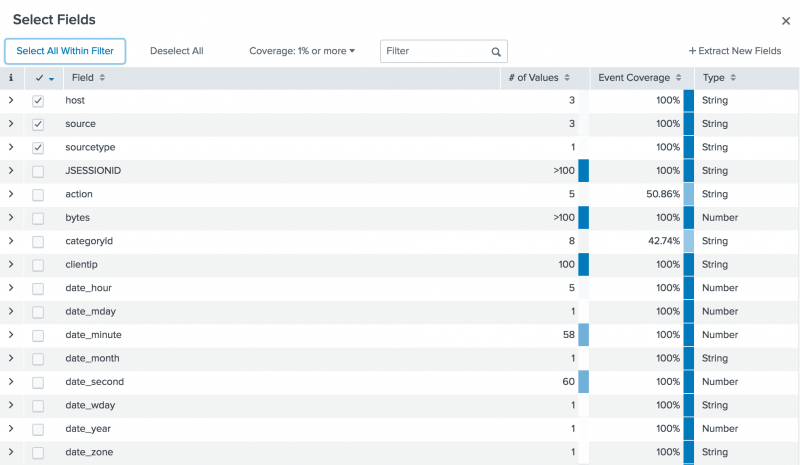
The list contains additional default fields, fields that are unique to the source type, and fields that are related to the Buttercup Games online store.- In addition to the three default fields that appear automatically in the list of Selected Fields, there are other default fields that are created when your data is indexed. For example, fields that are based on the event
timestampbegin withdate_*). The field that identifies data that contains punctuation is thepunctfield. The field that specifies the location of the data in your Splunk deployment is theindexfield. - Other field names apply to the web access logs that you are searching. For example, the
clientip,method, andstatusfields. These are not default fields. They are extracted at search time. - Other extracted fields are related to the Buttercup Games online store. For example, the
actionandcategoryIdfields.
- In addition to the three default fields that appear automatically in the list of Selected Fields, there are other default fields that are created when your data is indexed. For example, fields that are based on the event
- Select the
action,categoryId, andproductIdfields. - Close the Select Fields dialog box.
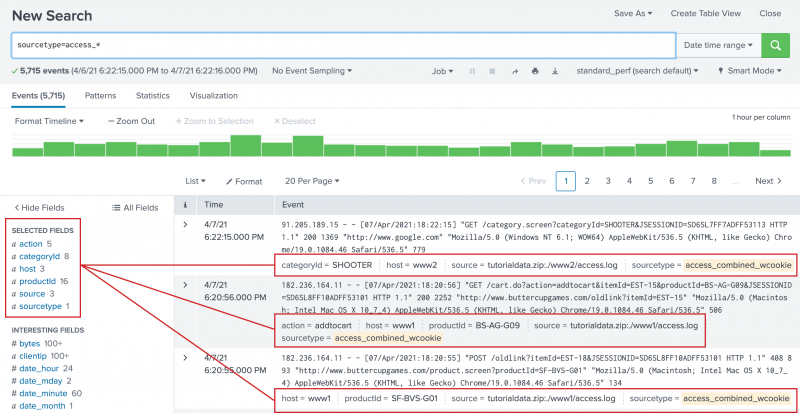
The three fields that you selected appear under Selected Fields in the Fields sidebar. The selected fields also appear in the events in your search results, if those fields exist in that particular event. Every event might not have all of the selected fields, as shown in the following image.
Identifying field values
The Fields sidebar displays the number of unique values for each field in the events. These are the same numbers that appear in the Select Fields dialog box.
- Under Selected Fields, notice the number 5 next to the
actionfield. - Click the
actionfield.
The field summary for the action field opens.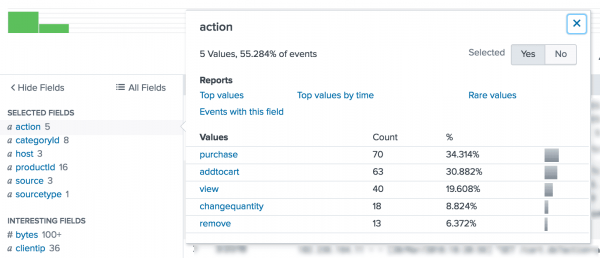
In this set of search results there are five values foraction. Theactionfield appears in over 50% of your search results. - Close the action field summary window.
- Review the other two fields you added to the Selected fields. The
categoryIdfield identifies the types of games or other products that are sold by the Buttercup Games online store. TheproductIdfield contains the catalog numbers for each product. - Scroll through the events list.
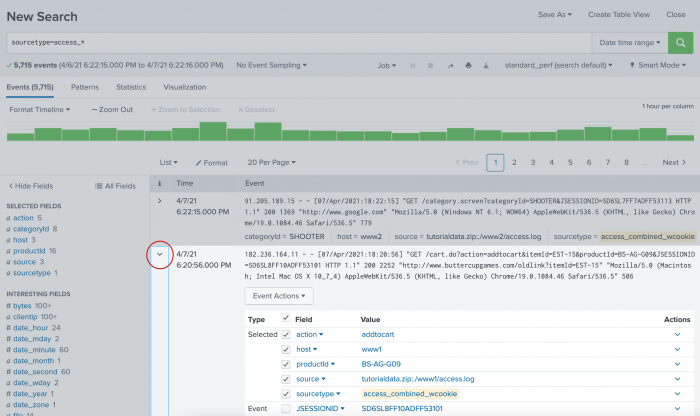
- The i column contains event information. In the i column, click the arrow ( > ) next to an event to expand the event information.
You can use this expanded panel to view all the fields in a particular event, and select or deselect individual fields for an individual event.
Run targeted searches
The following examples are searches that use fields.
Search for purchases
Search for successful purchases from the Buttercup Games store.
- Start a new search.
- In the time range picker, select Yesterday from the Presets list.
- Run the following search.
sourcetype=access_* status=200 action=purchaseThis search uses the
statusfield, which contains HTTP status codes, to find successful eventsstatus=200and narrows down those events using theactionfield to search for onlypurchaseactions.You can also search for failed purchases in a similar manner using
status!=200, which looks for all events where the HTTP status code is not equal to 200. - Change the
statusportion of the search tostatus!=200and run the search again.sourcetype=access_* status!=200 action=purchase
Search for errors
The way that errors are designed in events varies from source to source. To search for errors, your search must specify these different designations.
Use Boolean operators to specify different error criteria. Use parentheses to group parts of your search string.
- Start a new search.
- Change the time range to All time.
- Run the following search.
(error OR fail* OR severe) OR (status=404 OR status=500 OR status=503) - Click on source in the Selected Fields list.
This search does not specify a source type. The search retrieves events from both the secure log files and the web access log files.
Search for sales of a specific product
Search for how many simulation style games were bought yesterday.
- Change the time range to Yesterday.
If you downloaded the
tutorialdata.zipfile more than one day ago, there are no events that have a timestamp for yesterday. Instead, change the time range picker to All time and run the previous search. In the search results, look at the dates. Use the Date Range option in the time range picker to specify one of the dates in your results. - Run the following search.
sourcetype=access_* status=200 action=purchase categoryId=simulationAs you type the search, the Search Assistant shows you a list of your previous searches that start with "sourcetype". You can select the search that you ran earlier to search for successful purchases. Then add
categoryId=simulationto the end of that search.The count of events returned are the number of simulation games purchased.
- Find the number of purchases for each type of product sold on the Buttercup Games online store.
- Remove
categoryId=simulationfrom your search criteria and run the search again. - Locate the unique categoryId values by clicking on the categoryId field in the Selected Fields list.
- Click on a categoryId name, such as ACCESSORIES. The categoryId is added to your search and the search is automatically run again. The results show the number of purchases for that product.
- For the number of purchases made each day of the previous week, run the search again for each time range.
Next step
You can use your knowledge about fields to take advantage of the Splunk search processing language to generate statistics and build charts.
Let's learn how to use the search language.
See also
In the Knowledge Manager Manual
| Basic searches and search results | Use the search language |
This documentation applies to the following versions of Splunk® Enterprise: 8.2.0, 8.2.1, 8.2.2, 8.2.3, 8.2.4, 8.2.5, 8.2.6, 8.2.7, 8.2.8, 8.2.9, 8.2.10, 8.2.11, 8.2.12, 9.0.0, 9.0.1, 9.0.2, 9.0.3, 9.0.4, 9.0.5, 9.0.6, 9.0.7, 9.0.8, 9.0.9, 9.0.10, 9.1.0, 9.1.1, 9.1.2, 9.1.3, 9.1.4, 9.1.5, 9.1.6, 9.1.7, 9.1.8, 9.1.9, 9.2.0, 9.2.1, 9.2.2, 9.2.3, 9.2.4, 9.2.5, 9.2.6, 9.3.0, 9.3.1, 9.3.2, 9.3.3, 9.3.4, 9.4.0, 9.4.1, 9.4.2
 Download manual
Feedback submitted, thanks!