Configure Linux systems not running systemd
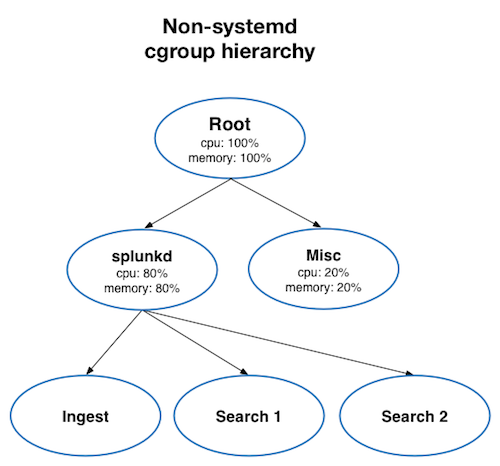
Before you can configure workload management on Linux systems not running systemd, you must create a cgroup hierarchy in which splunkd and other system processes run in their own cgroups.
The following diagram illustrates the cgroup hierarchy on Linux systems not running systemd:
For more information, see cgroups.
Workload management supports Linux cgroups v1 only. If your Linux system has been upgraded to a version running cgroups v2, you must revert your system to cgroups v1 to use Workload Management in Splunk Enterprise. For additional guidance and resources, see Workload Management operation during the transition to cgroups v2.
Configure cgroups on non-systemd distributions
There are two ways to configure cgroups for workload management on Linux systems not running systemd:
You must configure cpu and memory cgroups for workload management on all search heads and indexers.
Configure cgroups using cgconfig
You can use the cgconfig service installed with libcgroup to create cgroups on Linux systems not running systemd.
libcgroup is deprecated in RHEL 7.0 and other Linux distributions that support systemd.
To configure cgroups for workload management using cgconfig:
- Check that
/sys/fsis mounted. If it is not mounted, mount thetmpfsin-memory filesystem under/sys/fs/cgroupas follows:sudo mount -t tmpfs -o size=10M tmpfs /sys/fs
Splunk Enterprise examines the
/proc/mountsfile to determine whether your Linux machine can support workload management. - Create the
cgconfig.conffile under/etcand add the following contents:# Copyright IBM Corporation. 2007 # # Authors: Balbir Singh <balbir@linux.vnet.ibm.com> # This program is free software; you can redistribute it and/or modify it # under the terms of version 2.1 of the GNU Lesser General Public License # as published by the Free Software Foundation. # # This program is distributed in the hope that it would be useful, but # WITHOUT ANY WARRANTY; without even the implied warranty of # MERCHANTABILITY or FITNESS FOR A PARTICULAR PURPOSE. # # See man cgconfig.conf for further details. # # By default, mount all controllers to /cgroup/<controller> mount { cpuset = /sys/fs/cgroup/cpuset; cpu = /sys/fs/cgroup/cpu; cpuacct = /sys/fs/cgroup/cpuacct; memory = /sys/fs/cgroup/memory; devices = /sys/fs/cgroup/devices; freezer = /sys/fs/cgroup/freezer; net_cls = /sys/fs/cgroup/net_cls; blkio = /sys/fs/cgroup/blkio; } group splunk { perm { admin { uid = "splunk"; gid = "splunk"; } task { uid = "splunk"; gid = "splunk"; } } cpu { cpu.shares = "2048"; } memory { memory.limit_in_bytes = "3G"; } } - Restart the
cgconfigservice.# service cgconfig restart Stopping cgconfig service: [ OK ] Starting cgconfig service: [ OK ]
This creates the
splunkcgroup.The cgroup name must match the value of
workload_pool_base_dir_namedefined inworkload_pools.confThe default value issplunk.
Configure cgroups using filesystem operations
To configure cgroups, the Linux admin, logged in as root user, must create the cgroups and assign the splunk user permissions to manage the cgroups, as follows:
- In the
workload_pools.conf.file, setworkload_pool_base_dir_nameto the root cgroup to be used by splunk. For example:[general] workload_pool_base_dir_name = splunk
Or, send a POST request:
workloads/config/set-base-dirname -workload_pool_base_dir_name <base_dir_name>
For endpoint details, see workloads/config/set-base-dirname in the Splunk Enterprise REST API Reference Manual.
- Create cpu and memory cgroups:
sudo mkdir /sys/fs/cgroup/cpu/<workload_pool_base_dir_name>
sudo mkdir /sys/fs/cgroup/memory/<workload_pool_base_dir_name>
- Assign the splunk user permissions to manage the respective cgroups:
sudo chown -R ${USER} /sys/fs/cgroup/cpu/<workload_pool_base_dir_name>
sudo chown -R ${USER} /sys/fs/cgroup/memory/<workload_pool_base_dir_name>
If you have specified a user as
SPLUNK_OS_USERinsplunk-launch.conf, you must specify the same user as {USER} in the command. For more information see splunk-launch.conf in the Splunk Enterprise ''Admin Manual''. - Assign CPU shares for
splunkcgroup:cd /sys/fs/cgroup/cpu/splunk echo 2048 > cpu.shares
- Assign physical memory for the
splunkcgroup:cd /sys/fs/cgroup/memory/splunk/ echo 14G > memory.limit_in_bytes
Next step
After you set up cgroups on your Linux operating system, you can configure workload management in Splunk Enterprise. See Configure workload management.
| Configure Linux systems running systemd | Configure workload pools |
This documentation applies to the following versions of Splunk® Enterprise: 7.2.0, 7.2.1, 7.2.2, 7.2.3, 7.2.4, 7.2.5, 7.2.6, 7.2.7, 7.2.8, 7.2.9, 7.2.10, 7.3.0, 7.3.1, 7.3.2, 7.3.3, 7.3.4, 7.3.5, 7.3.6, 7.3.7, 7.3.8, 7.3.9, 8.0.0, 8.0.1, 8.0.2, 8.0.3, 8.0.4, 8.0.5, 8.0.6, 8.0.7, 8.0.8, 8.0.9, 8.0.10, 8.1.0, 8.1.1, 8.1.2, 8.1.3, 8.1.4, 8.1.5, 8.1.6, 8.1.7, 8.1.8, 8.1.9, 8.1.10, 8.1.11, 8.1.12, 8.1.13, 8.1.14, 8.2.0, 8.2.1, 8.2.2, 8.2.3, 8.2.4, 8.2.5, 8.2.6, 8.2.7, 8.2.8, 8.2.9, 8.2.10, 8.2.11, 8.2.12, 9.0.0, 9.0.1, 9.0.2, 9.0.3, 9.0.4, 9.0.5, 9.0.6, 9.0.7, 9.0.8, 9.0.9, 9.0.10, 9.1.0, 9.1.1, 9.1.2, 9.1.3, 9.1.4, 9.1.5, 9.1.6, 9.1.7, 9.1.8, 9.1.9, 9.2.0, 9.2.1, 9.2.2, 9.2.3, 9.2.4, 9.2.5, 9.2.6

 Download manual
Feedback submitted, thanks!