Add an auto-extracted field
You can add an auto-extracted field to any root dataset in your data model.
- In the Data Model Editor, open the root dataset you'd like to add an auto-extracted field to.
- Click Add Field and select Auto-extracted to define an auto-extracted field.
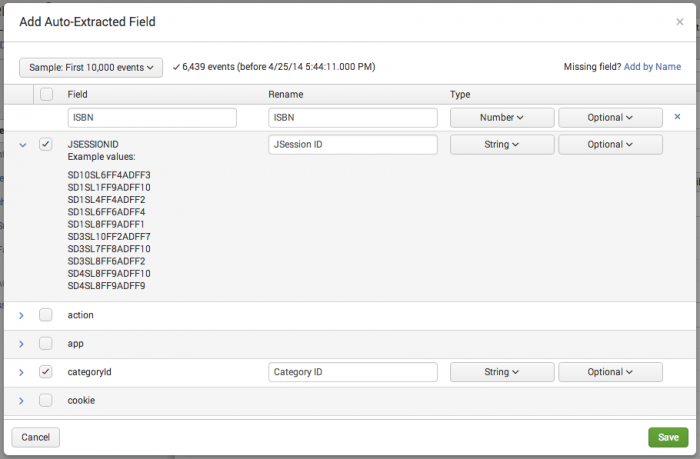
- The Add Auto-Extracted Field dialog appears. It includes a list of fields that can be added to your data model datasets.
- Select the fields you would like to add to your data model by marking their checkboxes.
- You can select the checkbox in the header to select all fields in the list.
- If you look at the list and don't find the fields you are expecting, try changing the event sample size, which is set to the First 1000 events by default. A larger event sample may contain rare fields that didn't turn up in the first thousand events. For example, you could choose a sample size like the First 10,000 events or the Last 7 days.
- (Optional) Rename the auto-extracted field.
- If you use Rename, do not include asterisk characters in the new field name.
- (Optional) Correct the auto-extracted field Type.
- (Optional) Update the auto-extracted field's status (Optional, Required, Hidden, or Hidden and Required) as necessary.
- Click Save to add the selected fields to your root dataset.
Note: You cannot add auto-extracted fields to child datasets. Child datasets inherit auto-extracted fields from the root dataset at the top of their dataset hierarchy.
The list of fields displayed by the Add Auto-Extracted Field dialog includes:
- Fields that are extracted automatically, like
uriorversion. This includes fields indexed through structured data inputs, such as fields extracted from the headers of indexed CSV files. - Field extractions, lookups, or calculated fields that you have defined in Settings or configured in
props.conf.
Expand a field row for a field to see its top ten sample values.
Manually add a field to the set of auto-extracted fields
While building a data model you may find that you are missing certain auto-extracted fields. They could be missing for a variety of reasons. For example:
- You may be building your data model prior to indexing the data that will make up its dataset.
- You are indexing data, but certain rare fields that you expect to see eventually haven't been indexed yet.
- You are utilizing a generating search command like
inputcsvthat adds fields that don't display in this list.
You can manually add auto-extracted fields to a root dataset.
Note: Before adding fields manually, try increasing the event sample size as described in the procedure above to pull in rare fields that aren't found in the first thousand events.
- Click Add by name in the top right-hand corner of the Add Auto-Extracted Field dialog.
- This adds a row to the field table. Note that in the example at the top of this topic a row has been added for a manually added ISBN field.
- In that row, manually identify the Field name, Type, and status for an auto-extracted field.
- Click Add by name again to add additional field rows.
- Click the X in the top right-hand corner of an added row to remove it.
- Click Save to save your changes.
- Fields that you've added to the table are added to your root dataset as Extracted in the Extracted category, along with any selected auto-extracted fields.
| Define dataset fields | Add an eval expression field |
This documentation applies to the following versions of Splunk® Enterprise: 7.0.0, 7.0.1, 7.0.2, 7.0.3, 7.0.4, 7.0.5, 7.0.6, 7.0.7, 7.0.8, 7.0.9, 7.0.10, 7.0.11, 7.0.13, 7.1.0, 7.1.1, 7.1.2, 7.1.3, 7.1.4, 7.1.5, 7.1.6, 7.1.7, 7.1.8, 7.1.9, 7.1.10, 7.2.0, 7.2.1, 7.2.2, 7.2.3, 7.2.4, 7.2.5, 7.2.6, 7.2.7, 7.2.8, 7.2.9, 7.2.10, 7.3.0, 7.3.1, 7.3.2, 7.3.3, 7.3.4, 7.3.5, 7.3.6, 7.3.7, 7.3.8, 7.3.9, 8.0.0, 8.0.1, 8.0.2, 8.0.3, 8.0.4, 8.0.5, 8.0.6, 8.0.7, 8.0.8, 8.0.9, 8.0.10, 8.1.0, 8.1.1, 8.1.2, 8.1.3, 8.1.4, 8.1.5, 8.1.6, 8.1.7, 8.1.8, 8.1.9, 8.1.10, 8.1.11, 8.1.12, 8.1.13, 8.1.14, 8.2.0, 8.2.1, 8.2.2, 8.2.3, 8.2.4, 8.2.5, 8.2.6, 8.2.7, 8.2.8, 8.2.9, 8.2.10, 8.2.11, 8.2.12, 9.0.0, 9.0.1, 9.0.2, 9.0.3, 9.0.4, 9.0.5, 9.0.6, 9.0.7, 9.0.8, 9.0.9, 9.0.10, 9.1.0, 9.1.1, 9.1.2, 9.1.3, 9.1.4, 9.1.5, 9.1.6, 9.1.7, 9.1.8, 9.1.9, 9.2.0, 9.2.1, 9.2.2, 9.2.3, 9.2.4, 9.2.5, 9.2.6, 9.3.0, 9.3.1, 9.3.2, 9.3.3, 9.3.4, 9.4.0, 9.4.1, 9.4.2

 Download manual
Feedback submitted, thanks!