Manage SPL2-based apps
Beta features are provided by Splunk to you "as is" without any warranties, maintenance and support, or service level commitments. Splunk makes this Beta feature available in its sole discretion and may discontinue it at any time. Use of Beta features is subject to the Splunk General Terms.
For this Beta you must use a pre-release version of Splunk Enterprise. These Beta features are not included in version 9.2.1, or any other released version of Splunk Enterprise.
This documentation is designed for Splunk administrators who are participating in the Beta of SPL2-based application development. Refer to SPL2 Public Beta overview in the Splunk Developer Guide on dev.splunk.com for more information about using the pre-release version of the Beta, which can be found on the Splunk Voice of the Customer portal.
Modify an SPL2-based application
To made changes to an SPL2-based application beyond just updating permissions, as a best practice, update and reinstall the app. Modifying the app contents in the local directory alone is not sufficient to cause the app to update. If you just modify the local directory, completely reinstalling the app is necessary for changes to take effect.
When you reinstall an app, modules with the exact same name are overwritten.
Complete the following steps to change an SPL2-based app:
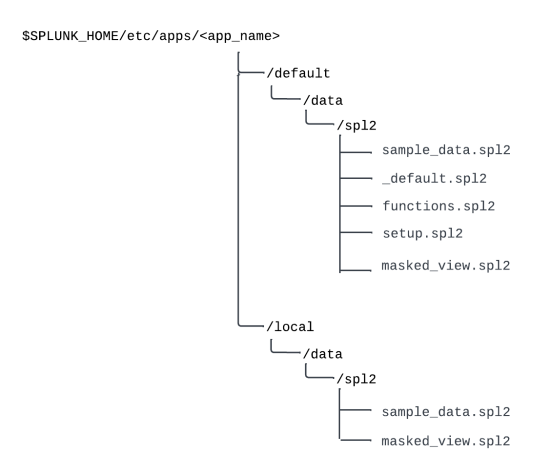
- Copy the modules that you want to change into a local directory under the
<app_name>directory. The local directory structure must be/local/data/spl2. The following image shows only thesample_dataandmasked_viewmodules copied into the local directory path:
- Modify the files in the local directory. The local directory takes precedence over the default directory. Note that the default module must be named
_defaultto provide implicit SPL2 imports to the app's search interface. - Reinstall the app.

As an alternative, to avoid reinstalling the app, use the modules endpoints to modify a module. For examples of how to use these endpoints to modify a module, see Endpoints for SPL2-based application in the REST API Reference Manual.
To fully customize an SPL2-based app by downloading your modules, re-packaging them, and re-editing them, use the same steps as the application developer. See Package your SPL2-based application in the Splunk Developer Guide on the Splunk Developer Portal.
Modify permissions for modules
Permissions for SPL2-based apps are set by role and module. Module-level permissions are set by using the Splunk Enterprise API. Module-level permission are distinct from app-level permissions, which are set in Splunk Web.
By default, the admin and power roles have read, write, and execute permissions on all modules, while individuals with the user role have no permissions on any modules. As a result, during this Beta, users can create modules that, by default, they cannot see, modify, or run.
- The
executepermission enables the role to run a search. - The
readpermission enables the role both to run a search and to see a module definition. The read permission supersedes the execute permission. - The
writepermission enables the role to perform create, update, and delete operations.
You can modify role-based permissions for SPL2-based apps at the module level by using the permissions API endpoints. For details on the permissions endpoints, see Search endpoint descriptions in the REST API Reference Manual.
Calls to the permissions endpoints must specify all of the operations, even if you are only changing one of the operations.
Example of setting role based permissions
Suppose an SPL2-based app contains a module called "masked_data" that takes events from an index and uses a search to return the same set of events with the email addresses masked out. The search that masks the events is exported as a view which can be used in other modules in the app. While you can't set permissions on the masked view itself, you can set permissions on the "masked_data" module.
Here's an example of the permissions endpoint that you use to add the user role to the execute operation for the masked_data module. The other permissions remain unchanged from the default permissions:
curl -k -u admin:pass https://localhost:8089/services/spl2/permissions \
--data '{
  "resourceType": "modules",
  "resourceName": "masked_data",
  "permissions": [
     {
      "operation": "execute",
      "roles": [
        "admin",
        "power",
        "user"
      ]
    },
    {
      "operation": "read",
      "roles": [
        "admin",
        "power"
      ]
    },
    {
      "operation": "write",
      "roles": [
        "admin",
        "power"
      ]
    }
  ]
}'
Run a module as if you are its owner
To enable an SPL2 module to be run by someone other than the module's owner, the module must be marked with @run_as_owner; as the first line of the module
For this Beta, anyone with write permission on a module can add the @run_as_owner; line to it, not only the module's owner. Before users can run a module as if they were the module's owner, however, a Splunk administrator must set run_as_owner_enabled to true in the [spl2] stanza of the server.conf file. The option to use @run_as_owner; is disabled by default.
Complete the following steps to add @run_as_owner; to a module:
- In the
server.conffile, locate the[spl2]stanza and set therun_as_owner_enabledoption to 'true'. A Splunk administrator must complete this step. - Ensure you have write permission for the module that you want to modify.
- In the
localdirectory of the <app_name>, add the line@run_as_owner;as the first line of the module. - Re-install the app.
- Grant
executepermission to the users you want to be able to run the module.
A Splunk administrator still needs to grant users execute permission for the module before they can run it. Users can run a module without read permission, but they need read permission to see its definition.
The following requirements and limitations apply to modules marked with @run_as_owner;.
- If you add the
@run_as_owner;line to a module, and then another user runs the module, any indexes or other datasets that the module references are accessed on the owner's behalf. If a user imports a module with this line and runs a search, then search quotas are also calculated on the owner's behalf. - Only private apps can be marked
@run_as_owner;. For this Beta, any user with write permission on a module can add the@run_as_owner;line, but as a best practice, only the owner of a module should modify it. - Modules marked with
@run_as_owner;can only import other modules marked with@run_as_owner;if they have the same owner. Imported modules can have a different owner as long as they are not also marked@run_as_owner;. - Only exported views are run as the owner of the module. Exported functions still run as the user importing the function.
The @run_as_owner; option can pose security risks or cause data loss if a module uses any risky commands from SPL1, or uses the into command in SPL2. If the module owner does not have safeguards enabled, safeguards for risky commands are not applied when a user runs a module as owner.
For more information about risky commands, see SPL safeguards for risky commands in the Securing Splunk Cloud Platform manual.
See also
- To learn how to install an SPL2-based app, see Install SPL2-based apps.
- To learn how to create an SPL2-based app, see Create a SPL2-based app in the Developer Guide for Splunk Cloud Platform and Splunk Enterprise on the Splunk Developer Portal.
| Install SPL2-based apps | About users and roles |
This documentation applies to the following versions of Splunk® Enterprise: 9.2.1, 9.2.2, 9.2.3, 9.2.4, 9.2.5, 9.3.0, 9.3.1, 9.3.2, 9.3.3
Feedback submitted, thanks!