Forwarder management overview
The forwarder management interface is an interactive, visual tool for creating server classes, which map deployment clients to deployment apps. You can also use forwarder management to manage and monitor your deployment.
The interface saves server class configurations to a serverclass.conf file, located under $SPLUNK_HOME/etc/system/local on the deployment server.
Capabilities of the interface
The main purpose of the forwarder management interface is to create and edit server classes. You can also use it for a number of other purposes:
- To track the status of the system
- To monitor deployment activity
- To view the associations between apps, clients, and server classes
- To configure app behavior
- To uninstall apps from clients
Access the forwarder management interface
You access the forwarder management interface through Splunk Web on the deployment server. To open the interface:
1. Click the Settings link at the top of Splunk Web. A window pops up with links to the set of system interfaces.
2. Select "Forwarder Management" in the Distributed Environment section. This takes you to the main page of the interface.
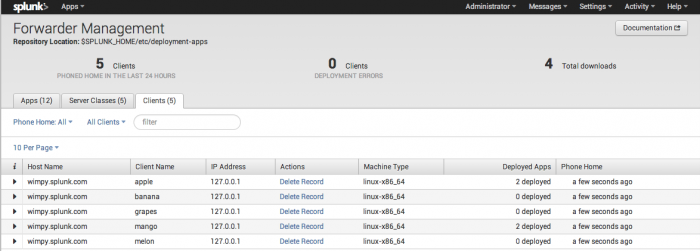
The following example shows the forwarder management home page as it might appear when you already have some apps, clients, and server classes:
The page contains these features (going from top to bottom):
- The Repository Location. The repository location is where deployment apps reside on the deployment server.
- A status section, with information on deployment clients and recent downloads.
- Three tabs:
- Apps. This tab lists the set of deployment apps in the repository location, along with their status. You can edit some app properties from here.
- Server Classes. This tab lists the set of server classes, along with their status. From here, you can create new server classes and edit existing ones. You can also drill down on existing server classes for information on their associated apps and clients. For a new, unconfigured deployment server, the list will be empty.
- Clients. This tab lists all of the deployment server's clients, along with status information. You can filter this list in various ways to limit the current view.
For more information on this page, read "Use forwarder management to define server classes".
Limitations of the interface
The forwarder management interface supports the vast majority of deployment server use cases. For some complex configuration requirements, however, you might need to edit serverclass.conf directly.
Important: If you switch from forwarder management to direct editing of serverclass.conf, you might not be able to use forwarder management for any subsequent configuration. This is because the forwarder management interface can handle only a subset of the configurations possible through serverclass.conf.
Here are some limitations of the interface, compared to direct editing of the configuration file:
- Deployment behavior of any app must be the same across server classes. For example, you cannot specify that an app initiate a restart on a client when it's downloaded via one server class but not when it's downloaded via another server class.
- You cannot modify the default
repositoryLocationon the deployment server. - The
filterType, which governs the combined behavior of allow lists and deny lists, must use the default value ofwhitelist. - Client filters are only supported at the server class level.
For details on forwarder management limitations and compatibility between forwarder management and serverclass.conf, see the topic "Compatibility and forwarder management".
| How deployment updates happen | Plan a deployment |
This documentation applies to the following versions of Splunk® Enterprise: 7.0.0, 7.0.1, 7.0.2, 7.0.3, 7.0.4, 7.0.5, 7.0.6, 7.0.7, 7.0.8, 7.0.9, 7.0.10, 7.0.11, 7.0.13, 7.1.0, 7.1.1, 7.1.2, 7.1.3, 7.1.4, 7.1.5, 7.1.6, 7.1.7, 7.1.8, 7.1.9, 7.1.10, 7.2.0, 7.2.1, 7.2.2, 7.2.3, 7.2.4, 7.2.5, 7.2.6, 7.2.7, 7.2.8, 7.2.9, 7.2.10, 7.3.0, 7.3.1, 7.3.2, 7.3.3, 7.3.4, 7.3.5, 7.3.6, 7.3.7, 7.3.8, 7.3.9, 8.0.0, 8.0.1, 8.0.2, 8.0.3, 8.0.4, 8.0.5, 8.0.6, 8.0.7, 8.0.8, 8.0.9, 8.0.10, 8.1.0, 8.1.1, 8.1.2, 8.1.3, 8.1.4, 8.1.5, 8.1.6, 8.1.7, 8.1.8, 8.1.9, 8.1.10, 8.1.11, 8.1.12, 8.1.13, 8.1.14, 8.2.0, 8.2.1, 8.2.2, 8.2.3, 8.2.4, 8.2.5, 8.2.6, 8.2.7, 8.2.8, 8.2.9, 8.2.10, 8.2.11, 8.2.12, 9.0.0, 9.0.1, 9.0.2, 9.0.3, 9.0.4, 9.0.5, 9.0.6, 9.0.7, 9.0.8, 9.0.9, 9.0.10, 9.1.0, 9.1.1, 9.1.2, 9.1.3, 9.1.4, 9.1.5, 9.1.6, 9.1.7, 9.1.8, 9.1.9, 9.2.0, 9.2.1, 9.2.2, 9.2.3, 9.2.4, 9.2.5, 9.2.6, 9.3.0, 9.3.1, 9.3.2, 9.3.3, 9.3.4

 Download manual
Feedback submitted, thanks!