Field Extractor: Select Sample step
In the Select Sample field extractor step, you do two things:
- First you identify a data type for your field extraction. Your data type selection brings up a list of events that have the selected source or source type value.
- Then you select an event from the list that has the field or fields that you want to extract.
The field extractor bypasses the Select Sample step when you enter the field extractor from a specific event in your search results. When you do this, the field extractor starts you off at the Select Method step.
Select a data type and a sample event
Note: The field extractor bypasses the first step of this procedure (select a data type) if you choose your source type before you enter the field extractor.
The Splunk field extractor is limited to twenty lines on a sample event.
This happens when you enter the field extractor:
- After you run a search where a specific source type is identified in the search string and then click the Extract New Fields link in the fields sidebar or the All Fields dialog box.
- After you run a search that returns a set of events that all have the same source type, and then click the Extract New Fields link in the fields sidebar or All Fields dialog box.
- After you add a data input with a fixed source type.
Steps
- Select a Data Type for your field extraction.
- Each field extraction is associated with a specific source type or source value. If you have entered the field extractor after running a search, the sets of sources and source types that you can choose from are limited to those discovered in the results returned by that search. To see all of the source and source type sets in your Splunk deployment, go to the Field Extractions page in Settings.
- If you select sourcetype the Source Type list appears. Choose a source type there. If you do not see the source type that you would like to use, try specifying the source type that you want to use in that search and rerunning it.
- If you select source the Source Name field appears. Enter a
sourcevalue there.
- If you select source the Source Name field appears. Enter a
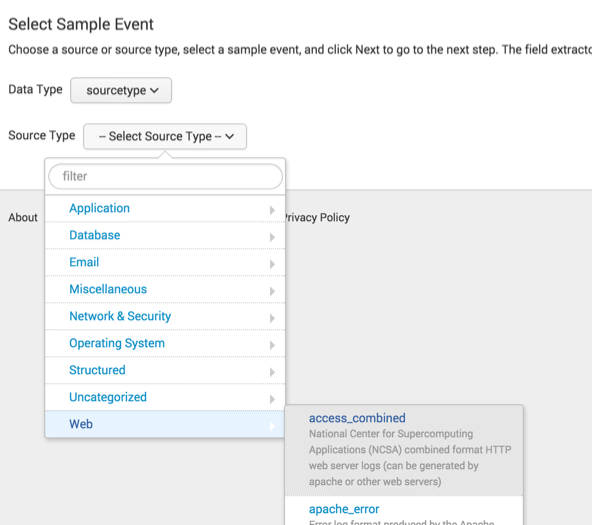
- This screenshot is an example of the source type listing you see when you enter the field extractor from the Field Extractions page in Settings.

- If you run a search and then enter the field extractor by clicking Extract New Fields at the bottom of the fields sidebar, your Source Type list options may be reduced. This is because the list only shows source types that appear in the data returned by the search.
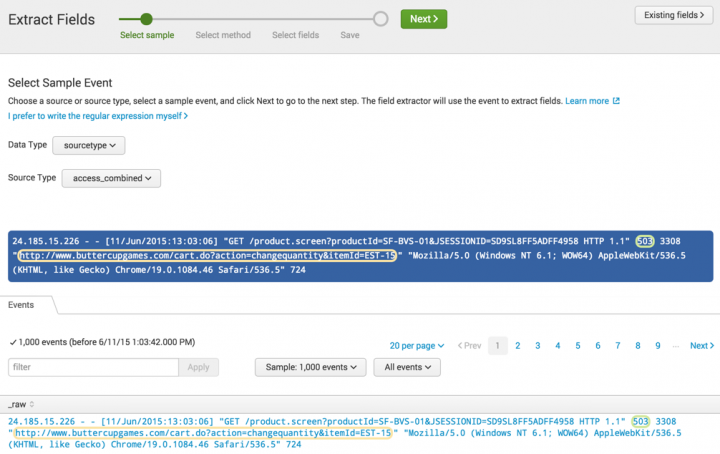
- After you provide a source type or source, the Events tab appears. If events exist that have the source or source type that you provided, they are listed in this tab.
- In the event list, select a sample event that has one or more values that you want to extract as fields. Sample events are limited to twenty lines.
- The selected event appears just above the Events tab.

- When field extractions already exist for the source type or source that you have chosen, they are surrounded by colored outlines in the selected event and the events in the event list. Mouse over a circled value to see the name of the field.
- Note: When two or more field extractions overlap in the event that you select, only one of them is highlighted. A red triangle warning icon appears next to the Existing fields button when the field extractor detects overlapping fields. See "Use the Fields sidebar to control existing field extraction highlighting"
- Click Next to go to the Select Method step.
Use the Fields sidebar to control existing field extraction highlighting
This is an optional action that you can perform on every field extractor step except Save.
The source or source type that you select may already be associated with search-time field extractions. When this is the case, the field extractor highlights the extracted field values in the sample events with colored outlines.
The field extractor highlighting functionality cannot display highlighting for overlapping field values. When two or more extracted fields share event text, it can only display highlighting for one of those fields at a time.
For example, if the field extractor extracts a phone_number value of (555) 789-1234 and an area_code value of 555 from the same bit of text in an event, it can display highlighting for the phone_number value or the area_code value, but not both at once.
When two or more existing field extractions overlap, the field extractor automatically disables highlighting for all of the fields. If you select a sample event with overlapping field extractions, the field extractor displays a red triangle warning indicator next to the Existing fields button.
Note: This warning does not appear when you use the Field sidebar to manually turn off highlighting for extracted fields that do not overlap with other fields.
The Existing fields button opens the Fields sidebar. Use the Fields sidebar to:
- Determine which existing field extractions are highlighted in the sample events.
- Turn off highlighting for an existing field extraction, if you want to define a new field extraction that overlaps with it.
- Determine whether an existing field extraction is accurately extracting field values.
Steps
- Click Existing fields in the upper right of the screen.
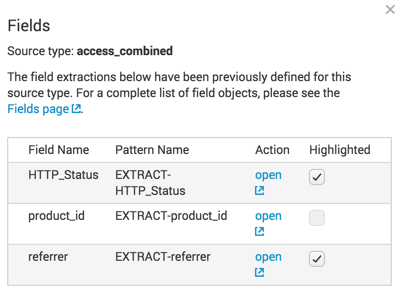
- The Fields sidebar opens. Existing field extractions for your selected source or source type appear in a table.

- It is possible for a field to appear multiple times with different Pattern Name values.
- If there are no existing field extractions, the table does not appear.
- (Optional) Click open for an extraction to see detail information about it.
- A page opens in a new tab. This page displays the regular expression that extracts the field. It also provides examples of events that the field extraction matches and values that the regular expression extracts.
- If the field extraction matches a different event pattern than the one you want to extract the field from, you can create a new extraction with the same name as long as it has a unique Pattern Name. You define the pattern name for your field extraction at the Save step.
- (Optional) Use the Highlighted checkboxes to manage highlighting of extracted fields in sample events.
- Uncheck a Highlighted checkbox to turn off highlighting for a field and vice versa.
- When two or more field extractions overlap with each other, only one of the field extractions can have highlighting enabled at any given time. To make an unavailable field extraction available again, deselect the field extraction that overlaps with it. If you then select the other extraction, the extraction that you just deselected becomes unavailable.
- If you want to create a new field extraction that overlaps with an existing field extraction, you must first deselect the existing extraction. See the documentation of the Select Fields step for more information.
- Close the sidebar by clicking the X in the corner or by clicking outside of the sidebar.
| Build field extractions with the field extractor | Field Extractor: Select Method step |
This documentation applies to the following versions of Splunk® Enterprise: 7.0.0, 7.0.1, 7.0.2, 7.0.3, 7.0.4, 7.0.5, 7.0.6, 7.0.7, 7.0.8, 7.0.9, 7.0.10, 7.0.11, 7.0.13, 7.1.0, 7.1.1, 7.1.2, 7.1.3, 7.1.4, 7.1.5, 7.1.6, 7.1.7, 7.1.8, 7.1.9, 7.1.10, 7.2.0, 7.2.1, 7.2.2, 7.2.3, 7.2.4, 7.2.5, 7.2.6, 7.2.7, 7.2.8, 7.2.9, 7.2.10, 7.3.0, 7.3.1, 7.3.2, 7.3.3, 7.3.4, 7.3.5, 7.3.6, 7.3.7, 7.3.8, 7.3.9, 8.0.0, 8.0.1, 8.0.2, 8.0.3, 8.0.4, 8.0.5, 8.0.6, 8.0.7, 8.0.8, 8.0.9, 8.0.10, 8.1.0, 8.1.1, 8.1.2, 8.1.3, 8.1.4, 8.1.5, 8.1.6, 8.1.7, 8.1.8, 8.1.9, 8.1.10, 8.1.11, 8.1.12, 8.1.13, 8.1.14, 8.2.0, 8.2.1, 8.2.2, 8.2.3, 8.2.4, 8.2.5, 8.2.6, 8.2.7, 8.2.8, 8.2.9, 8.2.10, 8.2.11, 8.2.12, 9.0.0, 9.0.1, 9.0.2, 9.0.3, 9.0.4, 9.0.5, 9.0.6, 9.0.7, 9.0.8, 9.0.9, 9.0.10, 9.1.0, 9.1.1, 9.1.2, 9.1.3, 9.1.4, 9.1.5, 9.1.6, 9.1.7, 9.1.8, 9.1.9, 9.2.0, 9.2.1, 9.2.2, 9.2.3, 9.2.4, 9.2.5, 9.2.6, 9.3.0, 9.3.1, 9.3.2, 9.3.3, 9.3.4, 9.4.0, 9.4.1, 9.4.2

 Download manual
Feedback submitted, thanks!