Manage private apps on your Splunk Cloud Platform deployment
Private apps are custom apps that you create for your Splunk Cloud Platform deployment. Private apps are not publicly available on Splunkbase.
You can install private apps on your Splunk Cloud Platform deployment in a self-service manner using the app management page in Splunk Web.
When you upload an app, Splunk Cloud Platform automatically runs the app through Splunk AppInspect validation to confirm that it meets Splunk Cloud Platform requirements. For more information, see Install private apps on Splunk Cloud Platform.
You can also install private apps programmatically using the Admin Config Service (ACS) API. For more information, see Manage private apps in Splunk Cloud Platform in the Admin Config Service Manual.
You must have the sc_admin (Splunk Cloud Platform Administrator) role to install apps in Splunk Cloud Platform.
Create a private app
This section provides an overview of the steps involved in creating a private app for your Splunk Cloud Platform deployment. For detailed information on how to create a private app, see Develop Splunk Apps for Splunk Cloud Platform in the Splunk Developer Guide.
Prerequisites
- See the Building Splunk Apps documentation on Splunkbase.
- For information about dependencies, see the Splunk Packaging Toolkit in the Splunk Developer Guide.
- For information on how to validate your app using Splunk AppInspect, see Validate the quality of Splunk apps using AppInspect in the Splunk Developer Guide.
- If your private app uses Python, make sure to use a supported Python version. For more details, see the Splunk Cloud section of the Python 3 Migration guide.
Steps
- Create an app that conforms to Splunk app standards and requirements.
- Make sure the app package does not have any static dependencies. Splunk Cloud Platform supports dynamic dependencies only.
- Package the app using .spl, .tar, .tar.gz or .tgz file format. Limit the package size to 128MB.
- Run the app through AppInspect and make sure it passes all app validation checks. The AppInspect validation report must show 0 Failures, 0 Errors, and 0 Manual Checks before you can install the app using self-service app installation in Splunk Web.
- You can now install the app on your deployment using Splunk Web. See Install private apps on Splunk Cloud Platform.
If the AppInspect report shows greater than 0 Manual Checks, you must contact Splunk Support to install your app.
Install private apps on Splunk Cloud Platform
Splunk Cloud Platform supports self-service installation of private apps on search heads and indexers.
In Splunk Cloud Platform version 8.2.2106 and higher, there are two slightly different private app installation workflows that can appear in Splunk Web. Both workflows automatically run your app through AppInspect validation checks and let you view a report that shows the results of the app validation process.
The app installation workflow available to you in Splunk Web depends on your Splunk Cloud Platform Experience: Victoria or Classic. To find your Splunk Cloud Platform Experience, in Splunk Web, click Support & Services > About.
After you determine your Splunk Cloud Platform Experience, follow the app installation instructions that apply to your deployment:
For more information on Splunk Cloud Platform Experience, see Determine your Splunk Cloud Platform Experience.
Install a private app on Victoria Experience
If your Splunk Cloud Platform deployment is on Victoria Experience, you can upload and install your private app using the Install app from file workflow on the Apps page in Splunk Web.
Splunk Cloud Platform deployments on Victoria Experience do not require IDM. If your deployment is on Victoria Experience you can run apps and add-ons that contain scripted or modular inputs directly on the search head.
To install a private app on a Victoria Experience deployment:
- In Splunk Web, click the Apps gear icon.
- Click Install app from file.
- Click Upload App.
- Enter your splunk.com account credentials (username and password). Splunk Cloud Platform uses these credentials to authenticate your AppInspect app validation.
- Click Agree and Login.
This confirms that you accept the specified license conditions and submits your login credentials. - Select your private app package and click Upload.
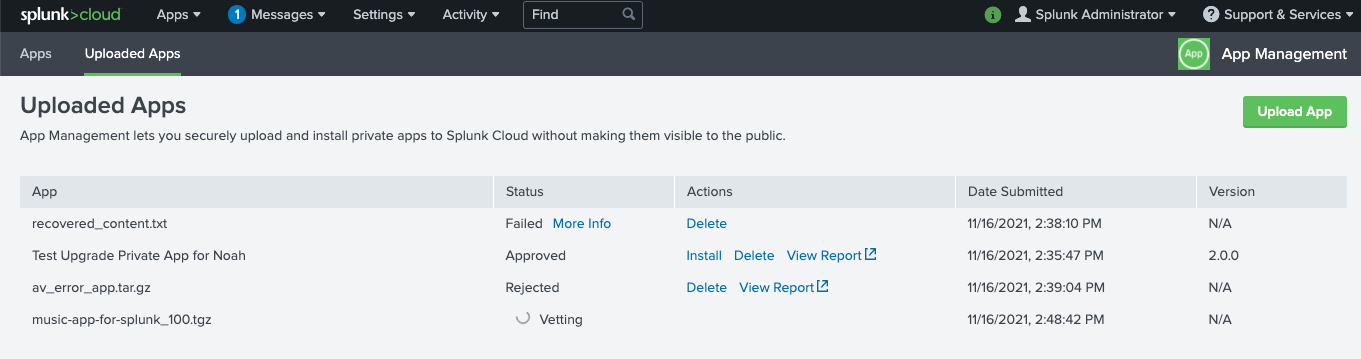
Your app appears in the Uploaded Apps table. Splunk Cloud Platform automatically runs your app through AppInspect validation.
- Check the app validation status. Your app must pass all AppInspect checks and be approved before you can install it. While you only need to enter your credentials once per session, if you log out while an app is still in the vetting process, then log back in, you must click Check Status and enter your credentials again to complete the vetting process and view the app validation report. For more information, see Check app validation status.
- If your app validation status shows approved, click Install. If your app validation status shows rejected, click View Report to determine the issues you must fix before you can install the app. For more information, see View app validation report.
You can click "Upload App" to upload additional apps while an app is in the "vetting" process.
For a detailed explanation of self-service app installation behavior on Victoria Experience, see How self-service app installation works on Victoria Experience.
Check app validation status
The app validation status can be one of the following:
| Status | Description |
|---|---|
| Vetting | The app package is in the validation process. |
| Approved | The app package has passed all AppInspect checks, or you have chosen to acknowledge the Splunk General Terms regarding potential impact of known issues and proceed with installation. |
| Installed | The app package is installed on your Splunk Cloud Platform deployment. |
| Rejected | The app package did not pass AppInspect validation checks. This means that some checks failed, or manual checks were detected that might require a manual review by the Splunk AppInspect team. To see the results of AppInspect validation, click View Report. For assistance with manual app vetting, contact Splunk Support. |
| Failed message | The app package validation did not complete due to some issues, for example, issues with the AppInspect service. Click More Info to find out why the package failed validation. |
| Check Status (Victoria Experience only) | This appears if you log out then log back in while an app is in the vetting process, or if the logged in user does not match the user who uploaded the app. In either case, to continue the app vetting process and view the report, click Check Status and enter the appropriate credentials. |
View app validation report (Victoria Experience)
- Click View Report.
- Review the details of the app validation report to determine why AppInspect rejected the package. If the report shows a value greater than zero for Manual Checks, you must contact Splunk Support to install your app.
- Fix any issues specified in the report and and upload your app again.
Update a private app (Victoria Experience)
- Click Upload App and select the updated version of your app.
- Verify that the app status is Approved in the Uploaded Apps table. If the app status shows Rejected, review the app validation report. If the report shows a value greater than zero for Manual Checks, you must contact Splunk Support to install your app. See View app validation report (Victoria Experience).
- Click Install on the later version of the app to install the later version.
- Go to the Apps tab to see that the later version of your private app is listed in the Apps table.
If you want to downgrade to an earlier version of an app, you must first uninstall the app, then upload the earlier version.
Unlike Classic Experience, Victoria Experience does not support download of previously uploaded apps in the Splunk Web UI.
How self-service app installation works in Victoria Experience
When you install an app using self-service app installation in Victoria Experience, the app is automatically installed on all standalone search heads, search head cluster members, and premium search heads running premium apps, such as Splunk IT Service Intelligence (ITSI) and Splunk Enterprise Security (ES). The app is also automatically installed on indexers.
All app configuration files are installed on search heads, while only configuration files that have indexing-related functionality are installed on indexers, including indexes.conf, props.conf, and transforms.conf.
This app installation behavior means that default knowledge objects within an app will be available on all search heads across a deployment. For example, if you install an app containing search-time field extractions, those fields can be used by searches dispatched on any search head.
It also means, in some cases, you might need to enable or disable specific app features, depending on their default settings. For example, if an app ships with lookup-populating scheduled searches disabled by default, you must enable those scheduled searches after installation on search heads where the lookup is required. For more information, see Configure self-service apps in Victoria Experience.
Post migration app setup changes and considerations in Victoria Experience
Victoria Experience introduces some changes to the underlying Splunk Cloud Platform architecture that enhance scalability and enable self-service management of nearly all Splunk apps. As a result, there are some changes in self-service app setup post-migration that are important to consider when migrating from Classic Experience to Victoria Experience.
Post-migration app setup changes apply only to deployments with more than one search head group, for example, a deployment that has a standalone search head and a premium search head (or search head cluster). These changes do not apply to deployments that have only one search head or one search head cluster.
The following sections provide a summary of self-service app setup changes and considerations in Victoria Experience.
All apps are visible on all search heads
After migration from Classic Experience to Victoria Experience, all globally shared apps become visible to all users on all search heads. This means that users on any search head can now see all apps on any other search heads across your deployment, including all apps on standalone search heads, premium search heads, and search head clusters.
To prevent users from seeing an app, you can limit app sharing to specific user roles after migration. For example, you can create a role for premium search head users, another role for search head cluster users, and so on. Then, within each app's permission page, remove read access from "Everyone" and grant read/write access to users' specific roles accordingly.
You can manage roles and app permissions for app visibility in the Splunk Web UI. For more information on roles, see Create and manage roles with Splunk Web. For information on configuring app permissions, see Managing app and add-on configurations and properties.
You can also manage roles and app permissions for app visibility programmatically using the Admin Config Service (ACS) API. See Manage users, roles, and capabilities in Splunk Cloud Platform and Manage app permissions in Splunk Cloud Platform in the Admin Config Service Manual.
Additionally, you can manage app permissions for app visibility in bulk using the ACS CLI. For more information, see Run ACS CLI bulk operations in the Admin Config Service Manual.
Global app assets are available on all search heads
After migration to Victoria Experience, all globally shared app assets, such as lookups and other knowledge objects, become available on all search heads. While app asset sharing behavior does not change in Victoria Experience, bringing together globally shared apps on the search head tier during migration can introduce conflicts between shared assets that have the same name.
For example, an older version of a lookup named "LookupA" in one app can interfere with a newer version of "LookupA" in another app, causing recent lookup updates to be missed.
Globally shared assets across apps follow standard Splunk platform configuration context and precedence. For any conflicting assets where two or more assets share the same global context and have the exact same name, Splunk configuration file precedence merges settings based on standard lexicographical ordering. See Configuration file precedence in the Splunk Enterprise Admin Manual.
To avoid post migration app asset conflicts, make sure that all globally shared app assets have unique names. Also, consider limiting app asset sharing to the local app context only, when possible, rather than sharing assets globally, to prevent duplicate app asset naming conflicts. For more information, see Manage knowledge object permissions.
Scheduled searches are disabled on non-original search heads
During a migration from Classic Experience to Victoria Experience, Splunk remembers the search head group on which each app is installed. After migration, Splunk disables any scheduled searches within apps that were not originally on that search head group.
For example, consider a deployment that includes a premium search head with App A, and a search head cluster without App A. After migration, App A now appears on both the premium search head and the search head cluster. However, App A's scheduled searches on the search head cluster are disabled.
To run an app's scheduled searches on the non-original search head group, you must explicitly enable the scheduled searches after migration on that search head group. This does not affect app performance on the original search head group and any existing scheduled searches remain operational there.
You can enable or disable scheduled searches on any search group at any time. Enabling or disabling an app's scheduled searches on one search head group has no effect on other search head groups. For example, enabling App A's scheduled searches on the search head cluster has no effect on the premium search head.
For instructions on how to enable or disable scheduled searches, see Disable a report.
Global actions versus local actions
Most edits made using the Splunk Web UI apply only to the specific search head group on which the change occurs. For example, if you enable or disable a scheduled search on a standalone search head, those changes are written to local files and apply only to that standalone search head. Likewise, if you enable or disable a scheduled search on a premium search head, running a premium app such as Enterprise Security, those changes apply only to that specific premium search head.
Syncing of local changes on a search head cluster occurs by default, as the cluster replicates local changes on one cluster member to all other cluster members. However, syncing of local files does not apply across different search head groups.
For more information on global versus local actions, see Configure self-service apps in Victoria Experience.
Configure self-service apps in Victoria Experience
While self-service apps in Victoria Experience are installed, updated, enabled, disabled and deleted globally on all search heads and indexers, you configure self-service apps locally on individual search heads. This applies to most features that you configure using the Splunk Web UI or REST endpoints, including knowledge objects, such as dashboards, saved searches, field extractions, macros, eventtypes, tags, and so on, as well as modular and scripted inputs.
After you install an app, you might need to make configuration changes, such as disabling or enabling specific app features, depending on the apps default configuration settings. Some common scenarios that might require you to disable or enable app features on individual search heads include:
- Alerts (email or modular): For apps that come with email or modular alerts disabled by default, you must enable the alert on the individual search head most suited to running the workload. Likewise, for apps that come with email or modular alerts enabled by default, you must disable the alert on all but the "best" search head (or search head cluster) within your deployment. For instructions on how to enable or disable email alerts, see Define an email notification for an alert or scheduled report.
- Lookups: For apps that come with lookup-populating scheduled searches disabled by default, you must enable the scheduled searches on each search head where the lookup is required. Likewise, for apps that come with lookup-populating scheduled searches enabled by default, you must disable the lookup-populating scheduled searches on each search head where the lookup is not required. For instructions on how to enable or disable scheduled searches, see Disable a report.
- Dashboards: For apps that come with dashboard-related scheduled searches disabled by default, you must enable the scheduled searches on each independent search head where you want to view the dashboard. Likewise, for apps that come with dashboard related scheduled searches enabled by default, you must either accept the performance overhead of scheduled searches running on every independent search head, or disable the scheduled search on each search head where the dashboard is not used. For instructions on how to enable or disable scheduled searches, see Disable a report.
- Datamodel acceleration: Apps must ship with datamodels unaccelerated by default to pass AppInspect app validation. As a result, you must enable datamodel acceleration post-install on the particular search head where you want to use acceleration for a given data model. For instructions on how to enable datamodel acceleration, see Enable data model acceleration.
- Summary indexing: For apps that come with summary-index-populating scheduled searches disabled by default, you must enable the scheduled search on the independent search head most suited to running the workload. Note that regardless of which search head populates the summary index, all independent search heads will be able to search the summary index. Likewise, for apps that come with summary-index-populating scheduled searches enabled by default, you must disable the scheduled search on all but the "best" search head (or search head cluster) within your deployment. For instructions on how to enable or disable summary indexing, see Configure summary indexes.
- Scripted inputs: For apps that come with modular or scripted inputs disabled by default, you must enable the inputs on any search head or search head cluster where you want to run the data input. Likewise, for apps that come with modular or scripted inputs enabled by default, you must disable the inputs on any search head on which you do not want to run the input. For more information on scripted inputs, see Get data from APIs and other remote data interfaces through scripted inputs.
Install a private app on Classic Experience
If your Splunk Cloud Platform deployment is on Classic Experience, you can upload and install your private app using the Upload App workflow in Splunk Web.
Splunk Cloud Platform does not support self-service installation of private apps on IDM. If you are on Classic Experience, and your private app contains modular or scripted inputs that require installation on IDM, you must contact Splunk Support and submit a Cloud App Request to upload your app.
When you install an app using self-service app installation on Classic Experience, the app is automatically installed on all regular search heads and search head cluster members across your deployment. The app is also installed on indexers.
Classic Experience does not support self-service app installation on premium search heads, such as those running IT Service Intelligence (ITSI) or Enterprise Security (ES). If your deployment is on Classic Experience, to install any app on a premium search head, you must contact Splunk Support.
To install a private app on a Classic Experience deployment:
- In Splunk Web, click the Apps gear icon.
- Open the Uploaded Apps tab, and click Upload App.
- Enter your splunk.com account credentials. Splunk Cloud Platform uses these credentials to authenticate your AppInspect app validation.
- Click Agree and Login.
This confirms that you accept the specified license conditions and submits your login credentials. - Select your private app package and click Upload.
Your app appears in the Uploaded Apps table. Splunk Cloud Platform automatically runs your app through AppInspect validation to confirm that it meets Splunk Cloud Platform requirements.
- In the Uploaded Apps table, check the app validation status. Your app must pass all AppInspect checks and be approved before you can install it. For more information, see Check app validation status.
- If your app validation status is approved, click Install. If your app validation status is rejected, click View Report to determine the issues you must fix before you can install the app. For more information, see View app validation report.
- After you install your app, click the Apps tab to confirm that your private app is now listed in the Apps table. You can also see that the value for App Origin is Uploaded.

View app validation report (Classic Experience)
- Click View Report.
- Review the details of the report to determine why AppInspect rejected the package. If the report shows a value greater than zero for Manual Checks, you must contact Splunk Support to install your app.
- Fix the issues specified in the report and upload your app again.
Update a private app (Classic Experience)
- Click Upload app and select your updated app.
- Verify that the app status is Approved in the Uploaded Apps table. If the app status shows Rejected, review the app validation report. If the report shows a value greater than zero for Manual Checks, you must contact Splunk Support to install your app. See View app validation report (Classic Experience).
- Click Install to install an earlier version. Click Update to replace an installed app with a later version.
- Go to the Apps tab to see that the later version of your private app is listed in the Apps table.
If you want to downgrade to an earlier version of an app, you must first uninstall the app, then upload the earlier version.
View app install log (Classic Experience)
As of version 8.2.2107 the Install Log tab has been removed from the app management page in Splunk Web. However, you can still view the same app install log information by running the following rest search command:
| rest /services/dmc/changes count=0 output_mode=json state=deployed
Manage lookups in Splunk Cloud Platform
In Splunk Cloud Platform, on both Victoria Experience and Classic Experience, you cannot update an existing lookup file when you upgrade an app using the Splunk Web UI, the Admin Config Service (ACS API), or the Splunk REST API.
To update an existing lookup file in an app, you can:
- Edit the lookup file using the Splunk App for Lookup File Editing. See Splunk App for Lookup File Editing on Splunkbase.
- Use the
outputlookupcommand to to update the lookup. See outputlookup in the Search Reference.
Lookup file behavior during app upgrade differs on Victoria Experience and Classic Experience deployments. The following sections describe default lookup behaviors during app upgrade, with workarounds you can use to update or retain existing lookup files when upgrading apps.
Lookup file behavior during app upgrade on Victoria Experience
On Victoria Experience 8.2.2106 and higher, when you upgrade an app, Splunk Cloud Platform preserves any existing lookup files as is. If the new version of the app contains an update to an existing lookup, that update is ignored, but if the new version contains a new lookup that doesn't yet exist in the app, it will deploy it. For example, if myapp v1.0 has myLookupA, and myapp v2.0 has an updated myLookupA and a new myLookupB, on upgrade myLookupA is not updated, but myLookupB is added.
When upgrading an app that includes updated lookup files, use one the following workarounds to update those lookup files:
- Use the Splunk App for Lookup File Editing to upload the updated lookup file.
- Delete the lookup file after app upgrade using the Splunk Web UI. This will update the old lookup to the new lookup.
Lookup file behavior during app upgrade on Classic Experience
Lookup file behavior during app upgrade on Classic Experience differs on single instance, single search head, and search head cluster deployments.
When you upgrade an app on a single instance deployment, by default Splunk Cloud Platform overwrites any existing lookup files with the updated lookup files. In this case, the content of the existing lookup file is replaced with the updated content, and no new lookup file is created. When upgrading an app on a single instance, you can use the following workaround to retain an existing enriched lookup file (a lookup file modified by the customer):
- Backup the lookup file before upgrade, and upload the backed up lookup to the app after upgrade.
When you upgrade an app on a single search head, by default Splunk cloud platform excludes all lookup file updates. In this case, all updates to lookup files are ignored and no lookup files are added or removed. When upgrading an app that contains updated lookups on a single search head, you can use the following workaround to update the lookup files:
- Use the Splunk App for Lookup File Editing to upload the updated lookup file.
When you upgrade an app on a search head cluster, by default Splunk Cloud Platform preserves any existing lookup files as is. If the new version of the app contains an update to an existing lookup, that update is ignored, but if the new version contains a new lookup that doesn't yet exist in the app, it will deploy it. When upgrading an app that contains updated lookups on a search head cluster, you can use the following workaround to update the lookup files:
- Use the Splunk App for Lookup File Editing to upload the updated lookup file.
For more information on lookups, see About lookups in the Knowledge Manager Manual.
Configuration file reload triggers in app.conf
Splunk apps can contain a combination of Splunk Enterprise core configuration files and custom configuration files, such as those created by app developers for both private apps and public apps on Splunkbase. Whether these configuration files reload when you install an app or make configuration changes depends on reload trigger settings in app.conf.
Many Splunk Enterprise core configuration files reload by default on app installation or when configuration updates occur. These files have a reload setting under the [triggers] stanza in $SPLUNK_HOME/etc/system/default/app.conf, which causes them to reload automatically.
A custom configuration file is by definition any configuration file that does not have a corresponding .spec file in $SPLUNK_HOME/etc/system/README. This includes custom configuration files found in third party apps, such as aws_settings.conf, service_now.conf, eventgen.conf, and so on.
All custom configuration files reload by default, unless the file has a custom reload trigger in app.conf. For example, in the Splunk Security Essentials app, app.conf contains the following custom reload trigger: reload.ssenav = http_get /SSEResetLocalNav. When you install an app or update configurations for an app that has a custom reload trigger in app.conf, Splunk software tries to honor the custom reload trigger setting. If the custom reload trigger fails, then a rolling restart occurs.
If a custom configuration file does not have a reload trigger specified in app.conf, the default behavior is to restart for unknown configs. If a restart is not required, you can set the conf level trigger in app.conf to reload.<conf_file_name> = simple.
For detailed information on how to configure reload trigger settings for configuration files, see app.conf in the Admin Manual.
For more information on restart vs. reload behavior of Splunk Enterprise core configuration files, see Restart or reload after configuration bundle push? in the Splunk Enterprise documentation.
Stanza-level reload triggers for inputs.conf
Stanza-level reload triggers enable the reload of only those specific configuration file stanzas that change when a configuration update occurs. This lets admins perform more efficient configuration updates based on which stanzas in the configuration file will change.
Stanza-level reload currently applies to a subset of stanzas in inputs.conf only. Any inputs.conf stanza that has a reload.<conf_file_name>.<conf_stanza_prefix> entry under the [triggers] stanza in app.conf will reload when changes are made to the specified stanza. Changes made to any inputs.conf stanzas that are not specified in a stanza-level reload entry will trigger a rolling restart.
Stanza-level reload for inputs.conf applies only when pushing changes to the configuration bundle in the indexer clustering context.
The following stanzas are reloadable in inputs.conf:
| .conf file name | stanza prefix | Reload or restart |
|---|---|---|
| inputs.conf | http | reload |
| inputs.conf | script | reload |
| inputs.conf | monitor | reload |
| inputs.conf | <modular_input> | reload |
| inputs.conf | batch | reload |
For detailed information on stanza-level reload triggers, see app.conf. in the Splunk Enterprise documentation.
Disable reload triggers in app.conf
You can disable both .conf-level reload triggers and stanza-level reload triggers by specifying the value never for any reload trigger entry in app.conf. Any reload trigger entry with a value of never will trigger a rolling restart when configuration changes occur. This can be useful if for any reason you want a specific configuration change to trigger a rolling restart.
For more information on configuring reload triggers, see app.conf. in the Splunk Enterprise documentation.
For a listing of restart vs. reload behavior of frequently used apps and configuration files in Splunk Cloud Platform, see Restart versus reload behavior of common apps and .conf files.
| Install apps on your Splunk Cloud Platform deployment | Manage the Splunk Product Guidance app on your Splunk Cloud Platform deployment |
This documentation applies to the following versions of Splunk Cloud Platform™: 8.2.2112, 8.2.2201, 8.2.2202, 8.2.2203, 9.0.2205, 9.0.2208, 9.0.2209, 9.0.2303, 9.0.2305, 9.1.2308, 9.1.2312, 9.2.2403, 9.2.2406, 9.3.2408, 9.3.2411 (latest FedRAMP release)
Feedback submitted, thanks!