About jobs and job management
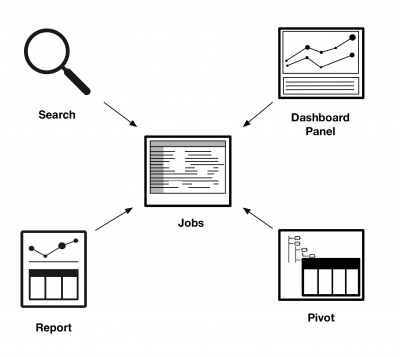
Each time you run a search, create a pivot, open a report, or load a dashboard panel, the Splunk software creates a job in the system. When you run a search, you are creating an ad hoc search. Pivots, reports, and panels are powered by saved searches.
A job is a process that tracks information about the ad hoc search or saved search. The information that is tracked includes the owner of the job, the app that the job was run on, how many events were returned, and how long the job took to run.
Each job process creates a search artifact. The artifact contains the results and associated metadata that are returned at the time that the ad hoc search or saved search was run.
Inspecting jobs and managing jobs
There are several ways that you can look at information about your jobs. You can inspect a job or you can manage a job.
- Search Job Inspector
- Use the Search Job Inspector to view information about the current job, such as job execution costs and search job properties. See View search job properties.
- Job Details dashboard
- The Job Details dashboard provides a clear and concise overview of a search job process. You can access the Job Details dashboard through the Search Job Inspector. See View search job properties.
- Jobs manager page
- Use the Jobs manager page to view information about recent jobs. If you have the Admin role or a role with an equivalent set of capabilities, you can manage the search jobs run by other users. See Manage search jobs.
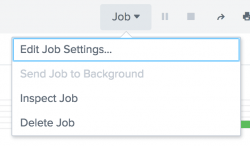
After you run a search or open a report in Splunk Web, you can access and manage information about the search job without leaving the Search page. While the search is running, paused, or finalized, click Job and choose from the available options.
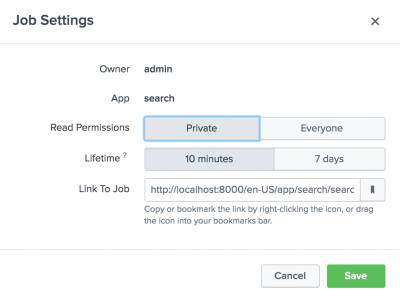
- Edit the job settings. Select this to open the Job Settings dialog, where you can change the job read permissions, extend the job lifetime, and get a URL for the job. You can use the URL to share the job with others, or to create a bookmark to the job from your web browser.
- Send the job to the background. Select this if the search job is slow to complete and you want to work on other Splunk activities, including running a new search job. The job continues to run in the background.
- Inspect the job. Opens a separate window and displays information and metrics for the search job using the Search Job Inspector.
- Delete the job. Use this to delete a job that is currently running, is paused, or which has finalized. After you delete the job, you can still save the search as a report.
Edit search job settings
You can open the Job Settings dialog when a search job is running, paused, or finalized. Just click Job and select Edit Job Settings.
Sharing jobs
There are several ways to share a job with other Splunk users. You can change the job permissions or send a link to the job. This can be handy if you want another user to see the results returned by the job. See Sharing and exporting jobs.
Job lifetimes
When you run a new search, a job is retained in the system for a period of time, called the job lifetime. The default lifetime is 10 minutes. The lifetime starts from the moment the job is run. See Extending job lifetimes in this manual.
Managing long-running jobs
Sometimes a search job runs for a long time. You might want to edit the search to change the search criteria, or you might want to pause the search or run the search in the background.
Autopause long-running jobs
To handle inadvertently long-running search jobs, you can autopause a job. This feature is enabled by default only for summary dashboard clicks, to deal with the situation where a user mistakenly initiates "all time" searches.
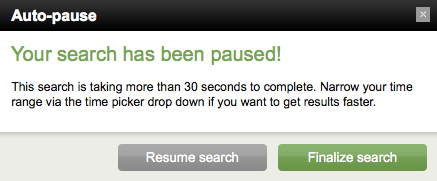
When autopause is enabled for a particular search view, the search view includes an autopause countdown field during the search. If the search time limit has been reached, an information window will appear to inform the user that the search has been paused. It offers the user the option of resuming or finalizing the search. By default, the limit before autopause is 30 seconds.
Managing jobs when a computer goes into sleep mode
When a search is run in Splunk Web from a computer that is not a Splunk server and the computer changes to sleep or hibernate mode, the underlying search process is stopped. The Splunk software interprets the change to sleep or hibernate mode as if the browser tab in which the software is running has been closed and is no longer being used.
To avoid this issue, use one of the following techniques:
- Send the job to the background. The job continues to run in the background even when your computer goes into sleep or hibernate mode. From the Job menu, select Send Job to Background.
- Save and schedule the search. The search runs independently from the computer that was used to create the search. You will need to decide if you want to save and schedule the search as a report, dashboard or an alert. See Saving searches and Scheduling searches.
- Share the job. The lifetime of the job is automatically extended to 7 days and read permissions are set to Everyone. See Share jobs and export results.
- Change the settings on the computer to extend the time before the computer goes into sleep or hibernate mode.
Administering jobs
Users with the Admin role, or a role with equivalent capabilities, can restrict how many jobs a given user can run, and how much space their job artifacts can take up.
You must define a role with the desired restrictions and assign the user to the role. You can apply a high level of granularity by giving unique roles to each user in your system.
Edit search restriction settings
To edit the search restrictions setting for a role:
- In Splunk Web, go to Settings and then Roles.
- Edit an existing role and use the 4. Restrictions tab to limit the scope of search results that are returned when users with the role run searches. See Use roles to limit search results.
For more information about roles, see Add and edit roles in the Securing Splunk Enterprise manual.
Edit search restrictions using authorize.conf
If you're using Splunk Enterprise, you can manually edit search restrictions using the authorize.conf file.
- Review the contents of the authorize.conf.example file in the Admin Manual. This example explains some the attributes that you might want to use.
- Create the configuration file.
Scope Description System-wide Create the authorize.conffile in local directory for the system. The location of the system local directory is$SPLUNK_HOME/etc/system/local.Application-specific Create the authorize.conffile in the local directory for the application. The location of an application local directory is$SPLUNK_HOME/etc/apps/<app_name>/local.- Edit the local
authorize.conffile. To restrict the jobs that users can run, add the following information to the file:- Add a stanza for the role that you want to create. Use the format
[role_<roleName>]. Role names must be in lowercase characters. For example, [role_ninja]. - Optional. Add the
importRolesattribute. Importing a role also imports the other aspects of that role, such as the indexes that the role is allowed to search. For example, importRoles = user. - Add the
srchDiskQuotaattribute and value. This is the maximum amount of disk space (MB) that search jobs can use, for a user that belongs to this role. The default value is 100MB. For example, srchDiskQuota = 500. - Add the
srchJobsQuotaattribute and value. This is the maximum number of concurrently running searches that a user of this role can have. The default value is 3. srchJobsQuota = 10. - Optional. Add the
rtsearchattribute to specify if the user is authorized to run real-time searches. If you enable real-time searches for the user, you should also specify thertSrchJobsQuotaattribute.
- Add a stanza for the role that you want to create. Use the format
For attribute descriptions and information about the default values, see role_name stanza for the authorize.conf file in the Admin Manual.
See also
- Create and edit reports in the Reporting Manual
| Identify and group events into transactions | Extending job lifetimes |
This documentation applies to the following versions of Splunk Cloud Platform™: 9.3.2411 (latest FedRAMP release), 8.2.2112, 8.2.2201, 8.2.2202, 8.2.2203, 9.0.2208, 9.0.2205, 9.0.2209, 9.0.2303, 9.0.2305, 9.1.2308, 9.1.2312, 9.2.2403, 9.2.2406, 9.3.2408


 Download manual
Feedback submitted, thanks!