Get Amazon Web Services (AWS) data into Splunk Cloud Platform
This topic guides you through the steps to use the Splunk Add-on for AWS to get AWS data into Splunk Cloud Platform.
The best practice in most use cases for onboarding this data type is to now use the Data Manager app. Data Manager comes installed on all Splunk Cloud instances.
For more information on which method best fits your use cases, see:
Use cases for the AWS data input in Data Manager
Use cases for the Splunk Add-on for AWS
Administrator requirements
Splunk Cloud Platform administrators must meet the following prerequisites to get AWS data into Splunk Cloud Platform:
- You need a valid AWS account with administrative permissions to configure the AWS services that provide your data.
- You need permission to create IAM roles and users. This lets you set up accounts or EC2 IAM roles with the ability to collect data from your AWS services.
If you do not have permissions to perform all the actions yourself, work closely with your organization's AWS administrator to complete all steps, including creating the accounts or EC2 IAM roles with the permissions that the Splunk Add-on for AWS uses to connect. If you need to review the AWS documentation, go to https://docs.aws.amazon.com/index.html
Customers are responsible for the setup, configuration, and maintenance of third-party services and resources, which includes payment. See Network connectivity and data transfer in the Splunk Cloud Platform Service Description.
AWS region limitations
The Splunk Add-on for AWS supports all regions offered by AWS.
In the AWS China region and the AWS GovCloud regions, the add-on only supports the services that AWS supports in those regions. There are limitations in both of these regions, so ensure that you understand the limitations before you begin. For more information, see the following topics:
- For an up-to-date list of what products and services are supported in this region, see amazonaws.cn/en/products/ or aws.amazon.com/about-aws/global-infrastructure/regional-product-services/.
- For an up-to-date list of what services and endpoints are supported in the GovCloud region, see the AWS documentation: docs.aws.amazon.com/govcloud-us/latest/UserGuide/using-services.html.
Before you begin
To get AWS data into Splunk Cloud Platform, you need a solid understanding of Splunk and AWS concepts. The table lists these concepts and provides links to more information.
| Product | Concept | See |
|---|---|---|
| Splunk and Splunk Cloud | indexes search head |
Fundamental Splunk and Splunk Platform Cloud concepts |
| AWS | AWS CloudTrail | This is a service that enables governance, compliance, operational auditing, and risk auditing of your AWS account. CloudTrail provides event history of your AWS account activity, including actions taken through the AWS Management Console, AWS SDKs, command-line tools, and other AWS services. |
Overview of getting your AWS CloudTrail data into Splunk Cloud Platform
In this procedure, you'll set up your Splunk Cloud Platform instance to get data from AWS CloudTrail. There are many useful AWS services that you can configure later, but starting with CloudTrail provides a very comprehensive view of AWS activity.
Before performing this procedure, check if your Splunk Cloud Platform environment uses the Victoria Experience or the Classic Experience; see Determine your Splunk Cloud Platform Experience. If your Splunk Cloud Platform environment uses the Victoria Experience, perform steps 8-9 on your Splunk Cloud Platform search head or search head cluster member instance. If your Splunk Cloud Platform environment uses the Classic Experience, perform steps 8-9 on your Splunk Cloud Platform Inputs Data Manager (IDM) instance.
To get AWS CloudTrail data into Splunk Cloud Platform, complete the following high-level steps:
- Set up your Splunk Cloud Platform environment.
- Configure an access policy for Splunk Access in AWS.
- Create a Splunk Access user.
- Create a group for Splunk Access Users.
- Enable the AWS CloudTrail Service.
- Create an SQS subscription.
- Create an SQS subscription for the Dead Letter Queue.
- Configure the Splunk Add-on for AWS.
- Configure CloudTrail inputs.
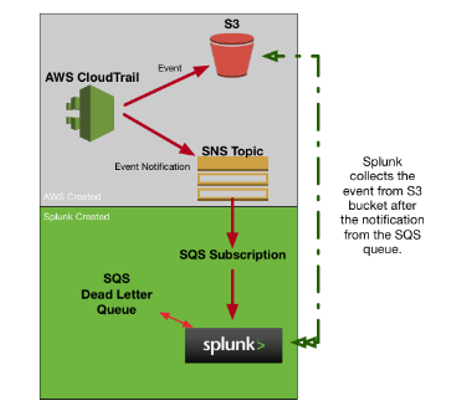
The following graphic shows the configuration of AWS and Splunk Cloud Platform that enables you to get AWS data into Splunk Cloud Platform:
When you finish the configuration steps, AWS CloudTrail populates the following Splunk App for AWS dashboards:
- Overview
- Topology
- Security Overview
- IAM Activity
- VPC Activity
- Security Groups
- Key Pairs Activity
- Network ACLs
- User Activity
- Insights Overview
- Security Anomaly Insights
- Timeline
Step 1: Set up your Splunk Cloud Platform environment
Before you can get AWS data into Splunk Cloud Platform, you must ensure the following:
- Confirm that you are assigned the
sc_adminrole role on your Splunk Cloud Platform instance. - Install the following, and ensure you allow adequate time for these tasks to be completed before you attempt to get data in:
- For Classic Experience customers, request that Splunk Support install the Splunk Add-on for AWS on your Inputs Data Manager and the Splunk App for AWS on your Splunk Cloud Platform instance.
- Victoria Experience customers can use the self-service app install procedure described in Install an app to install the Splunk Add-on for AWS on your search head or search head cluster member instance, and the Splunk App for AWS on your Splunk Cloud Platform instance.
- Verify that port 443 is available. The Splunk Add-on for AWS makes REST API calls using HTTPS on this port.
- Create a test index in your Splunk Cloud Platform instance so that you can test your installation before going into production. Follow these instructions to create an index: Create a Splunk Cloud Platform Index.
Step 2: Configure an access policy for Splunk Access in AWS
Complete the following steps to set up an access account in AWS so that Splunk Cloud Platform can communicate with AWS without having root access. The SplunkAccess account is used to collect data from AWS.
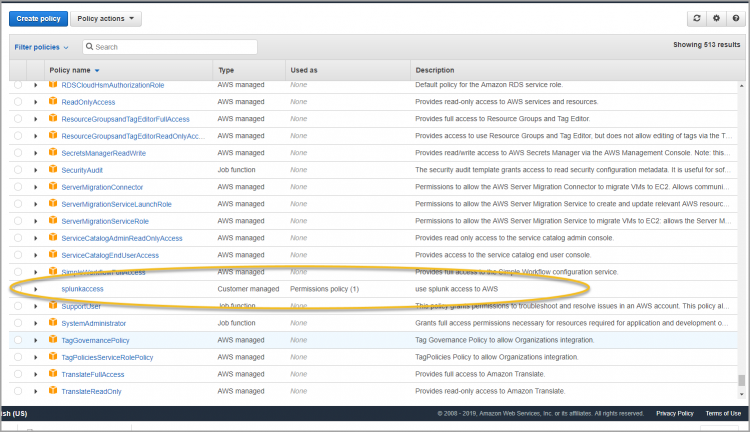
- In AWS, open IAM > Policies > Create New Policy.
- Click Create New Policy.
- Select JSON.
- In the JSON visual editor, paste the following JSON code:
- Click Review Policy.
- Name the policy SplunkAccess.
- Give it a description.
- Click Create Policy.
- Return to the list of IAM policies and ensure that you see the new SplunkAccess policy in the list of policies.
{
 "Version": "2012-10-17",
 "Statement": [
   {
     "Effect": "Allow",
     "Action": [
       "sqs:GetQueueAttributes",
       "sqs:ListQueues",
       "sqs:ReceiveMessage",
       "sqs:GetQueueUrl",
       "sqs:SendMessage",
       "sqs:DeleteMessage",
       "s3:ListBucket",
       "s3:GetObject",
       "s3:GetBucketLocation",
       "s3:ListAllMyBuckets",
       "s3:GetBucketTagging",
       "s3:GetAccelerateConfiguration",
       "s3:GetBucketLogging",
       "s3:GetLifecycleConfiguration",
       "s3:GetBucketCORS",
       "config:DeliverConfigSnapshot",
       "config:DescribeConfigRules",
       "config:DescribeConfigRuleEvaluationStatus",
       "config:GetComplianceDetailsByConfigRule",
       "config:GetComplianceSummaryByConfigRule",
       "iam:GetUser",
       "iam:ListUsers",
       "iam:GetAccountPasswordPolicy",
       "iam:ListAccessKeys",
       "iam:GetAccessKeyLastUsed",
       "autoscaling:Describe*",
       "cloudwatch:Describe*",
       "cloudwatch:Get*",
       "cloudwatch:List*",
       "sns:Get*",
       "sns:List*",
       "sns:Publish",
       "logs:DescribeLogGroups",
       "logs:DescribeLogStreams",
       "logs:GetLogEvents",
       "ec2:DescribeInstances",
       "ec2:DescribeReservedInstances",
       "ec2:DescribeSnapshots",
       "ec2:DescribeRegions",
       "ec2:DescribeKeyPairs",
       "ec2:DescribeNetworkAcls",
       "ec2:DescribeSecurityGroups",
       "ec2:DescribeSubnets",
       "ec2:DescribeVolumes",
       "ec2:DescribeVpcs",
       "ec2:DescribeImages",
       "ec2:DescribeAddresses",
       "lambda:ListFunctions",
       "rds:DescribeDBInstances",
       "cloudfront:ListDistributions",
       "elasticloadbalancing:DescribeLoadBalancers",
       "elasticloadbalancing:DescribeInstanceHealth",
       "elasticloadbalancing:DescribeTags",
       "elasticloadbalancing:DescribeTargetGroups",
       "elasticloadbalancing:DescribeTargetHealth",
       "elasticloadbalancing:DescribeListeners",
       "inspector:Describe*",
       "inspector:List*",
       "kinesis:Get*",
       "kinesis:DescribeStream",
       "kinesis:ListStreams",
       "kms:Decrypt",
       "sts:AssumeRole"
     ],
     "Resource": [
       "*"
     ]
   }
 ]
}
Step 3: Create a Splunk Access user
Complete the following steps to create the Splunk Access user.
- In AWS, from the IAM Users list, click Users.
- Click Add User.
- Add a user name. In this example, use the name Splunk_Access.
- For Select AWS Access type, select Programmatic access only. This safeguards your account.
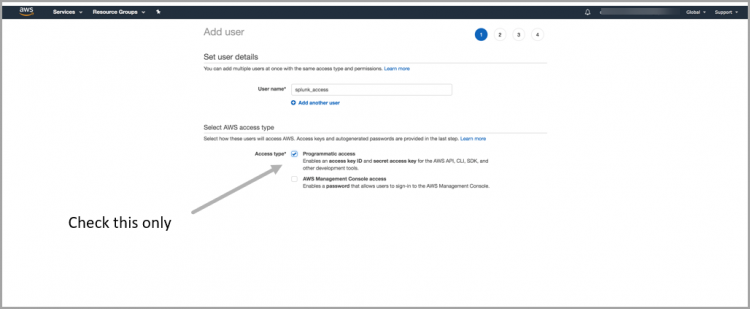
- Click Next: Permissions to add the new user to a group.
Step 4: Create a group for Splunk Access users
Complete the following steps to assign the user to a group.
- Click Create group:
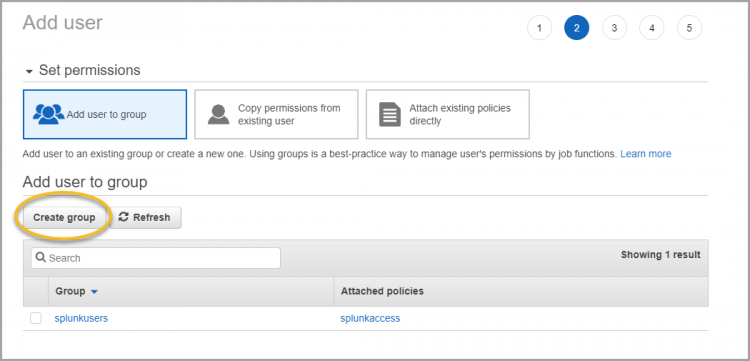
- In Group Name, enter SplunkAccessGroup.
- Apply the IAM policy you created. To do this, search for the IAM policy by entering splunk in the Filter Policies field. The IAM access policy you created displays.
- Select the checkbox next to the SplunkAccess IAM policy, and click Create Group.
- Ensure your new group is selected and click Next Review:
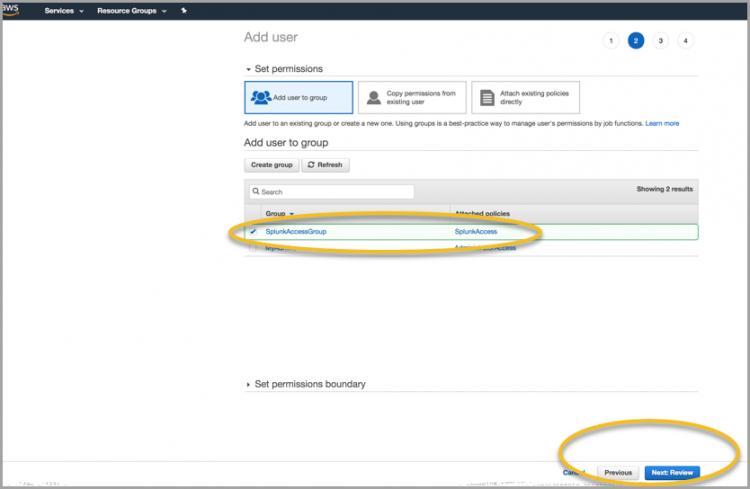
- Now that you have created a user and associated that user with a group and an IAM policy, click Create User.
- After the user is created, Amazon provides access to a CSV file with the user credentials. Download this file and store it securely because you will need it later.
Step 5: Enable the AWS CloudTrail Service
Complete the following steps to enable CloudTrail to capture AWS data and send it to Splunk Cloud Platform.
AWS CloudTrail writes events to a Simple Notification Service (SNS) topic, and you can then create a Simple Queue Service (SQS) subscription. When SQS notifies Splunk Cloud Platform of an event, Splunk Cloud can collect the events from the S3 bucket.
- In AWS Management Console, click All Services, and select CloudTrail.
- Click Get Started Now.
- Name your trail. For this example, use the name 'cloudtrail.
- Apply the trail to all regions.
- In the Read/Write events field, select All.
- Create a storage location for CloudTrail. In this case, create a new S3 bucket. To do this, select Create a new S3 bucket. As a best practice, use the naming convention of cloudtrail-<AWSAccountID>.
- Click Advanced.
- In the Send SNS notification for every log file delivery field, clickYes.
- In the Create a new SNS topic field, click Yes.
- Enter a name for your SNS topic. For this example, name the topic cloudtrail.
Step 6: Create an SQS subscription
Complete the following steps to set up an SQS to subscribe to the SNS topic created by AWS CloudTrail.
- From the AWS Management Console > Application Integration, select Simple Queue Service.
- Click Create New Queue.
- Enter a name for the queue. For example, call it cloudtrail.
- Select Standard Queue.
- Click Quick-Create Queue. Your new queue is displayed.
- Select your queue and select Queue actions.
- Select Subscribe Queue to SNS topic.
- In the Choose a Topic field, select the SNS topic you created in step 5:
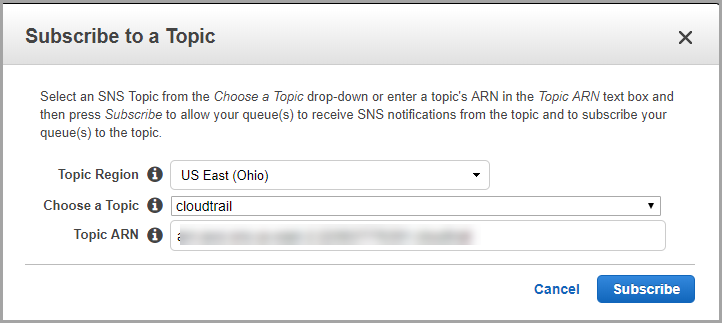
- The Topic ARN auto-populates.
- Select Subscribe.
Step 7: Create an SQS subscription for the Dead Letter Queue
Complete the following steps to create a CloudTrail Dead Letter Queue.
This queue is required for the new Splunk SQS-based S3 input. To keep the inputs stateless, the Dead Letter Queue notifies Splunk Cloud Platform where the last input left off and where to continue collecting events from AWS.
- From the AWS Management Console > Application Integration, select Simple Queue Service.
- Click Create New Queue.
- Enter a name for the queue. For this example, call it cloudtrail-dlq.
- Select Standard Queue.
- Click Quick-Create Queue. Your new queue is displayed.
- From the list of queues, select your cloudtrail queue, and click Queue Actions.
- Click Configure Queue.
- In the Dead Letter Queue Settings, select Use Redrive Policy.
- In the Dead Letter Queue field, enter cloudtrail-dlq.
- In the Maximum receives field, enter 3.
- Click Save Changes.
Step 8: Configure the Splunk Add-on for AWS
Complete the following steps to configure the Splunk Add-on for AWS to get data from your AWS account.
- Open the Splunk Add-on for AWS from the list of available apps.
Victoria Experience customers: Open the app from your search head or search head cluster member instance.
Classic Experience customers: Open the app from your IDM. You can log into your IDM athttps://idm-<cloudname>.splunkcloud.comwhere<cloudname>represents your Splunk Cloud Platform name. - Click Configuration > Create an account > Add.
- In the Add Account field, enter a name for the account. For this example, name it splunk_access.
- Open the credentials file you previously downloaded. Enter the credentials in the Key ID and Secret Key fields.
- Leave the Region Category field as Global unless you are using GovCloud or AWS China.
- Click Add.
Step 9: Configure Cloudtrail inputs
Complete the following steps to configure Cloudtrail inputs for your specific Splunk Cloud Platform Experience, as follows:
- Victoria Experience customers: Perform these steps on your search head or search head cluster member instance.
- Classic Experience customers: Perform these steps on your IDM.
- In the Inputs tab, click Create New Input > Cloudtrail > SQS-Based S3.
- Enter a name for the CloudTrail input. For example, name it cloudtrail.
- From the drop-down list, select your AWS account.
- Select your AWS region.
- In the SQS queue field, select your cloudtrail queue.
- Use the default values for other settings, and click Save.
Now you can open your Splunk App for AWS dashboards and see that the dashboards for Cloudtrail are getting populated with data.
What's next?
Now that you have configured the Splunk AWS Add-on for your Splunk Cloud Platform instance, you can set up your Splunk Cloud Platform instance to get data from various AWS services. The table lists these AWS services, and also additional topics of interest.
See also
| For more information about | See |
|---|---|
| Amazon CloudWatch: A monitoring service for AWS cloud resources and the applications you run on AWS. You can use Amazon CloudWatch to collect and track metrics, collect and monitor log files, set alarms, and automatically react to changes in your AWS resources. | Splunk Add-on for AWS CloudWatch documentation |
| AWS Config: A service that enables you to assess, audit, and evaluate the configurations of your AWS resources. Config continuously monitors and records your AWS resource configurations and allows you to automate the evaluation of recorded configurations against desired configurations. | Splunk Add-on for AWS Config documentation |
| AWS Inspector: An automated security assessment scanner that can evaluate security loopholes and deviation from the best practices for applications hosted on AWS. AWS Inspector communicates with EC2 instances using agents installed on it and generates reports. | Splunk Add-on for AWS Inspector documentation |
| Testing and troubleshooting data input | The Improve the data input process section in the Splunk Cloud Platform Getting Data In manual |
| Introduction to Getting Data In | Get Microsoft Azure data into Splunk Cloud Platform |
This documentation applies to the following versions of Splunk Cloud Platform™: 8.2.2112, 8.2.2201, 8.2.2202, 8.2.2203, 9.0.2205, 9.0.2208, 9.0.2209, 9.0.2303, 9.0.2305, 9.1.2308, 9.1.2312, 9.2.2403, 9.2.2406, 9.3.2408, 9.3.2411 (latest FedRAMP release)
 Download manual
Feedback submitted, thanks!